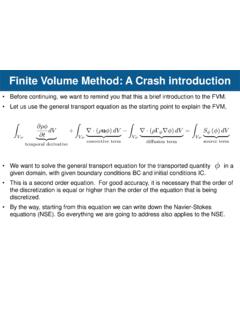
Transcription of Meshing of BlockMesh - Wolf Dynamics
1 BlockMesh1 Mesh generation using BlockMesh BlockMesh is a multi-block mesh generator. For simple geometries, the mesh generation utility blockMeshcan be used. The mesh is generated from a dictionary file named blockMeshDictlocated in the system directory. The Meshing tool generates high quality meshes, it is the tool to use for very simple geometries. As the complexity of the geometry increases, the effort and time required to setup the dictionary increases a lot. Usually the background mesh used with snappyHexMeshconsist of a single rectangular block, therefore blockMeshcan be used with no problem. It is highly recommended to create a template of the dictionary blockMeshDictthat you can change according to the dimensions of your domain. You can also use m4 or Python scripting to automate the whole generation using blockMeshblockMesh workflow3 Mesh generation using BlockMesh To generate a mesh with BlockMesh , you will need to define the vertices, block connectivity and number of cells in each direction.
2 To assign boundary patches, you will need to define the faces connectivity4blockMesh guided tutorials Let us take a close look to a blockMeshDictdictionary. We will use the square cavity case. You will find this case in the directory: From this point on, please follow me. We are all going to work at the same pace. Remember, $PTOFCis pointing to the path where you unpacked the guided tutorialsWhat are we going to do? We will use this simple case to take a close look at a blockMeshDictdictionary. We will study all sections in the blockMeshDictdictionary. We will introduce two features useful for parameterization, namely, macro syntax and inline calculations. You can use this dictionary as a blockMeshDicttemplate that you can change automatically according to the dimensions of your domain and the desired cell guided tutorials17 convertToMeters 1;18 19 xmin 0;20 xmax 1;21 ymin 0;22 ymax 1;23 zmin 0;24 zmax 1;25 30 deltax ;31 deltay ;32 deltaz ;33 34 lx #calc "$xmax-$xmin";35 ly #calc "$ymax -$ymin";36 lz #calc "$zmax $zmin";37 38 xcells #calc "round($lx/$deltax)";39 ycells #calc "round($ly/$deltay)";40 zcells #calc "round($lz/$deltaz)";41 44 vertices45 (46 //BLOCK 047 ($xmin $ymin $zmin)//048 ($xmax $ymin $zmin)//149 ($xmax $ymax $zmin)//250 ($xmin $ymax $zmin)//351 ($xmin $ymin $zmax)//452 ($xmax $ymin $zmax)//553 ($xmax $ymax $zmax)//654 ($xmin $ymax $zmax)//766 );The blockMeshDictdictionary.
3 The keyword convertToMeters (line 17), is a scaling factor. In this case we do not scale the dimensions. In lines 19-24 we declare some variables using macro syntax notation. With macro syntax, we first declare the variables and their values (lines 19-24), and then we can use the variables by adding the symbol $to the variable name (lines 47-54). In lines 30-32 we use macro syntax to declare another set of variables that will be used later. Macro syntax is a very convenient way to parameterize guided tutorials17 convertToMeters 1;18 19 xmin 0;20 xmax 1;21 ymin 0;22 ymax 1;23 zmin 0;24 zmax 1;25 30 deltax ;31 deltay ;32 deltaz ;33 34 lx #calc "$xmax-$xmin";35 ly #calc "$ymax -$ymin";36 lz #calc "$zmax $zmin";37 38 xcells #calc "round($lx/$deltax)";39 ycells #calc "round($ly/$deltay)";40 zcells #calc "round($lz/$deltaz)";41 44 vertices45 (46 //BLOCK 047 ($xmin $ymin $zmin)//048 ($xmax $ymin $zmin)//149 ($xmax $ymax $zmin)//250 ($xmin $ymax $zmin)//351 ($xmin $ymin $zmax)//452 ($xmax $ymin $zmax)//553 ($xmax $ymax $zmax)//654 ($xmin $ymax $zmax)//766 );The blockMeshDictdictionary.
4 In lines 34-40 we are doing inline calculations using the directive #calc. Basically we are programming directly in the dictionary. OpenFOAM will compile this function as it reads it. With inline calculations and codeStreamyou can access many OpenFOAM functions from the dictionaries. Inline calculations and codeStreamare very convenient ways to parameterize dictionaries and program directly on the guided tutorials17 convertToMeters 1;18 19 xmin 0;20 xmax 1;21 ymin 0;22 ymax 1;23 zmin 0;24 zmax 1;25 30 deltax ;31 deltay ;32 deltaz ;33 34 lx #calc "$xmax-$xmin";35 ly #calc "$ymax -$ymin";36 lz #calc "$zmax $zmin";37 38 xcells #calc "round($lx/$deltax)";39 ycells #calc "round($ly/$deltay)";40 zcells #calc "round($lz/$deltaz)";41 44 vertices45 (46 //BLOCK 047 ($xmin $ymin $zmin)//048 ($xmax $ymin $zmin)//149 ($xmax $ymax $zmin)//250 ($xmin $ymax $zmin)//351 ($xmin $ymin $zmax)//452 ($xmax $ymin $zmax)//553 ($xmax $ymax $zmax)//654 ($xmin $ymax $zmax)//766 );The blockMeshDictdictionary.
5 To do inline calculations using the directive #calc, we proceed as follows (we will use line 35 as example):ly #calc "$ymax -$ymin"; We first give a name to the new variable (ly), we then tell OpenFOAM that we want to do an inline calculation (#calc), and then we do the inline calculation ("$ymax-$ymin";). Notice that the operation must be between double quotation guided tutorials17 convertToMeters 1;18 19 xmin 0;20 xmax 1;21 ymin 0;22 ymax 1;23 zmin 0;24 zmax 1;25 30 deltax ;31 deltay ;32 deltaz ;33 34 lx #calc "$xmax-$xmin";35 ly #calc "$ymax -$ymin";36 lz #calc "$zmax $zmin";37 38 xcells #calc "round($lx/$deltax)";39 ycells #calc "round($ly/$deltay)";40 zcells #calc "round($lz/$deltaz)";41 44 vertices45 (46 //BLOCK 047 ($xmin $ymin $zmin)//048 ($xmax $ymin $zmin)//149 ($xmax $ymax $zmin)//250 ($xmin $ymax $zmin)//351 ($xmin $ymin $zmax)//452 ($xmax $ymin $zmax)//553 ($xmax $ymax $zmax)//654 ($xmin $ymax $zmax)//766 );The blockMeshDictdictionary.
6 In lines lines 34-36, we use inline calculations to compute the length in each direction. Then we compute the number of cells to be used in each direction (lines 38-40). To compute the number of cells we use as cell spacing the values declared in lines 30-32. By proceeding in this way, we can compute automatically the number of cells needed in each direction according to the desired cell guided tutorials17 convertToMeters 1;18 19 xmin 0;20 xmax 1;21 ymin 0;22 ymax 1;23 zmin 0;24 zmax 1;25 30 deltax ;31 deltay ;32 deltaz ;33 34 lx #calc "$xmax-$xmin";35 ly #calc "$ymax -$ymin";36 lz #calc "$zmax $zmin";37 38 xcells #calc "round($lx/$deltax)";39 ycells #calc "round($ly/$deltay)";40 zcells #calc "round($lz/$deltaz)";41 44 vertices45 (46 //BLOCK 047 ($xmin $ymin $zmin)//048 ($xmax $ymin $zmin)//149 ($xmax $ymax $zmin)//250 ($xmin $ymax $zmin)//351 ($xmin $ymin $zmax)//452 ($xmax $ymin $zmax)//553 ($xmax $ymax $zmax)//654 ($xmin $ymax $zmax)//766 );The blockMeshDictdictionary.
7 By the way, as this dictionary is designed for blocks with positive vertices coordinates, there is a small catch in the way we compute the length (lines 34-36) and the number of cells (lines 38-40). What will happen if xminis negative? What will happen if xcellsis negative? What will happen if xcellsis a float with decimals? Can you find a solution to these small problems?11blockMesh guided tutorials17 convertToMeters 1;18 19 xmin 0;20 xmax 1;21 ymin 0;22 ymax 1;23 zmin 0;24 zmax 1;25 30 deltax ;31 deltay ;32 deltaz ;33 34 lx #calc "$xmax-$xmin";35 ly #calc "$ymax -$ymin";36 lz #calc "$zmax $zmin";37 38 xcells #calc "round($lx/$deltax)";39 ycells #calc "round($ly/$deltay)";40 zcells #calc "round($lz/$deltaz)";41 44 vertices45 (46 //BLOCK 047 ($xmin $ymin $zmin)//048 ($xmax $ymin $zmin)//149 ($xmax $ymax $zmin)//250 ($xmin $ymax $zmin)//351 ($xmin $ymin $zmax)//452 ($xmax $ymin $zmax)//553 ($xmax $ymax $zmax)//654 ($xmin $ymax $zmax)//766 );The blockMeshDictdictionary.
8 In the vertices section (lines 44-66), we define the vertex coordinates of the geometry. In this case, there are eight vertices defining a 3D block. Remember, OpenFOAM always uses 3D meshes, even if the simulation is 2D. For 2D meshes, you only add one cell in the third dimension. Notice that the vertex numbering starts from 0 (as the counters in c++). This numbering applies for blocks as guided tutorials68 blocks69 (70 hex (0 1 2 3 4 5 6 7) ($xcells $ycells $zcells) simpleGrading (1 1 1)71 );72 73 edges74 (75 76 );The blockMeshDictdictionary. In lines 68-71, we define the block topology, hexmeans that it is a structured hexahedral block. In this case, we are generating a rectangular mesh. In line 70, (0 1 2 3 4 5 6 7) are the vertices used to define the block (and yes, the order is important). Each hex block is defined by eight vertices, in sequential order. Where the first vertex in the list represents the origin of the coordinate system (vertex 0in this case).
9 ($xcells $ycells $zcells) is the number of mesh cells in each direction (X Y Z). Notice that we are using macro syntax, and we compute the values using inline calculations. simpleGrading (1 1 1) is the grading or mesh stretching in each direction (X Y Z), in this case the mesh is uniform. We will deal with mesh grading/stretching in the next guided tutorials68 blocks69 (70 hex (0 1 2 3 4 5 6 7) ($xcells $ycells $zcells) simpleGrading (1 1 1)71 );72 73 edges74 (75 76 );The blockMeshDictdictionary. Let us talk about the block ordering hex (0 1 2 3 4 5 6 7), which is extremely important. hexblocks are defined by eight vertices in sequential order. Where the first vertex in the list represents the origin of the coordinate system (vertex 0in this case). Starting from this vertex, we construct the block topology. So in this case, the first part of the block is made up by vertices 0 1 2 3 and the second part of the block is made up by vertices 4 5 6 7 (notice that we start from vertex 4which is the projection in the Z-direction of vertex 0).
10 In this case, the vertices are ordered in such a way that if we look at the screen/paper (-z direction), the vertices rotate counter-clockwise. If you add a second block, you must identify the first vertex and starting from it, you should construct the block topology. In this case, you might need to merges faces, we will address this guided tutorials68 blocks69 (70 hex (0 1 2 3 4 5 6 7) ($xcells $ycells $zcells) simpleGrading (1 1 1)71 );72 73 edges74 (75 76 );The blockMeshDictdictionary. Edges, are constructed from the vertices definition. Each edge joining two vertices is assumed to be straight by default. The user can specified any edge to be curved by entries in the section edges. Possible options are: arc, spline, polyline, BSpline, line. For example, to define an arc we first define the vertices to be connected to form an edge and then we give an interpolation point. To define a polyline we first define the vertices to be connected to form an edge and then we give a list of the coordinates of the interpolation points.