Transcription of I Have a Dream, a Two-Part Introductory Tutorial
1 I have a Dream, a Two-Part Introductory Tutorial - 1I have a Dream, a Two-Part Introductory TutorialMost people have never even dreamed of building an app; software is this mysterious world of 0s and 1s and computer nerds. The goal of this lesson is to show people that they can create in this medium, that they can program software and contribute in today's highly digitized Tutorial will get you building an app in minutes! You don't need to install anything on your computer-- App Inventor runs in the cloud! You will build the app on your computer and test it on your Android device. If you don't have a device, you can even test on an emulator. This Tutorial is meant as a starter app. You will build the "I have a Dream" app in two parts.
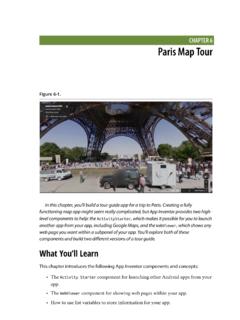
2 Part I: the app will have a single picture of MLK that, when clicked, plays a clip from the famous speech given to 250,000 on the steps of the Lincoln Memorial in ii: You will add an image of Malcolm X and one of his speeches, turning the app into a soundboard with these great leader's perspectives on the civil rights movement. You'll learn about conditional "if" blocks in this second part. The two parts of the Tutorial should take you less than an hour. When you complete the two parts, you'll be ready to build soundboard apps on any topic. Video version of this tutorialCheck out the app (part 1)This is the way your I have a Dream app will appear.
3 When the user clicks on the images, the app will play a speech by Martin Luther have a Dream, a Two-Part Introductory Tutorial - 2 Begin by opening a browser window to App Inventor: you have WiFi and an Android device, you can build apps with App Inventor completely "in the cloud", , without downloading any software to your computer. You login to the system with a Google account. If you were going to start an app from scratch, you would begin from here. But we'll use a "starter" app (see below).For this Tutorial , you'll begin with a "starter app" from the App Inventor GalleryApp Inventor has a gallery for sharing apps. Click this link and App Inventor will open to the I have a Dream Starter app.
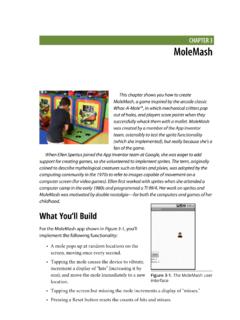
4 The starter app has no code-- it just contains the image files and sound clips you need for the app. Its provided so you can learn the coding without spending time finding media files on the Internet. Later, you can build your own soundboard app with your own images and sound have a Dream, a Two-Part Introductory Tutorial - 3 Open the starter appClick "Open the App" to open the starter app. You'll be prompted to name your app. Name it something like "IHaveADream", , remove the "Starter" from the name. Note that app names cannot have spaces or other out the Designer and align the screenYou'll specify how the app should look, and all the components you'll use, in the App Inventor Designer, which is shown above.
5 As you can see, the screen starts out as blank, but the starer app has some media files preloaded to help you get going. Note that you can add your own media files I have a Dream, a Two-Part Introductory Tutorial - 4as well, you're just not doing that in this get things started, set the Screen's AlignHorizontal property to "Center". When we add the pictures of the app, they'll automatically be centered within the a button onto the screenNext, add a Button to the screen. Click down on the Button in the palette, then drag one out and into the screen. The button will appear with some default text. In the next step, you'll change it so it shows a the button's image property so that it shows MLKI have a Dream, a Two-Part Introductory Tutorial - 5 Remove the default text from the buttonWhen you set the Image property for the button, the picture appears but the default text for the button is still there.
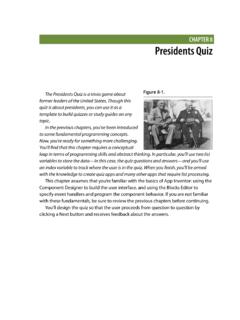
6 Click on the Text property and set it to blank (backspace to beginning).Add two labels above and below the two labels onto the screen, one above the button and one below. Set the Text property of the labels as shown. For the top label, check the FontBold property and change the FontSize to have a Dream, a Two-Part Introductory Tutorial - 6 Add a Player component for playing the speechOpen the Media drawer (1) and drag a Player component into the app (2). A Player component knows how to play sound clips and is considered a "non-visible" component because it doesn't show up in the user interface of the app. After dragging in the Player component, set its Source property to (the sound clip of MLK's speech).
7 Open the Blocks Editor to program the interactive behaviorThus far, you have completed the design of part 1 of the app, but you still need to code the interactive behavior of the app. In the right top-corner, you can switch between the Design view and the Blocks view. Click on "Blocks" and open the empty Blocks have a Dream, a Two-Part Introductory Tutorial - 7 Drag out a event handlerIn the Blocks editor, click on Button1 (1) and then drag out a event handler (2). You are preparing to show that when the button is clicked, the speech will be a block within the event on the Player1 drawer (1) and then drag out a "call " block and place it in the event handler. You are specifying that when the button is clicked, the speech should be played.
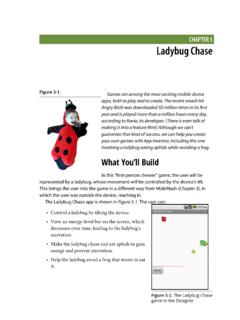
8 Remember, the property is set to the file, so that will have a Dream, a Two-Part Introductory Tutorial - 8 Install the MIT AI2 Companion on your test your app, you first need to install an app on your Android device (not your computer). On your device, open the Android Play Store and search for the MIT AI2 companion. Then install your device for live testingWhen you start the Companion on your phone, it will look like (1). Back in App Inventor, choose "Connect" (2) then "AI Companion. This will cause a QR code to appear (3) You can then scan the QR code (4) with your phone to see your app live. NOTE: for live testing to work, both your computer and phone/tablet must be connected to the same WiFi station.
9 Using WiFi is theeasiest way to connect, but if you're at school/work you may have firewall issues. If so, you can I have a Dream, a Two-Part Introductory Tutorial - 9connect using a USB cable. If you don't have an Android device, you can connect your app to an emulator that runs on your computer. For any setup issues, please your app!When you scan the QR code, your app should appear on your device. If you've programmed the app correctly, you should now be able to click on the picture and hear the have a Dream, a Two-Part Introductory Tutorial - 10 Download the app to your computer or deviceYour app is only working within the testing app, the Companion. If you disconnected from WiFi, the app wouldn't be on your phone, and so far you can't send it to a friend.
10 So go back to the Designer and choose "Build | App (save to my computer)" This will download a ".apk" file, an executableAndroid app. Once you download it you can email it to yourself or a friend. Then you and your friends can open the email on their Android phone and install the attachment. You can also choose the top choice and have a QR code appear. If you scan the QR code on your device, it will download the app (the .apk) directly to your device for : on some Android phones, you need to change a security setting to allow "Unknown Sources". This allowsthe device to install apps from places other than the Play ! You've built your first app!I have a Dream, a Two-Part Introductory Tutorial - 11 Part II.