Transcription of Vulcano Professor Pyraminx -2010 - Meffert's
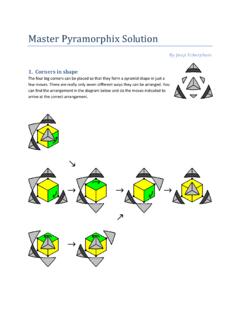
1 1 A tutorial for the Professor Pyraminx Introduction The Pyraminx is a very well known twisty puzzle that was invented by Professor Uwe Meffert 40 years ago. This tutorial will teach you an easy way to solve the Professor Pyraminx , especially for those of you who have solved the Pyraminx before. It uses a reduction method that reduces the more complex Professor Pyraminx to a much easier puzzle: the Jing s Pyraminx (or Halpern Meier tetrahedron ). This is similar to how a high order Professor Cube (5x5x5 Rubik s Cube) can be reduced to a 3x3x3 Rubik s Cube. The Professor Pyraminx is a higher order Pyraminx and is manufactured by Meffert s. The puzzle was originally designed by Timur Evbatyrov who produced a 3D printed version. The Pyrami nx f amily i ncludes: The classic Pyraminx which had its 40th anniversary in 2010 . The new shape modification of the Pyraminx by Adam G. Cowan and Timur Evbatyrov - 2011 Jing s Pyraminx The Jing's Pyraminx was designed by Adam Cowen and was produced by Uwe Meffert in 2009.
2 It is a pillowed Halpern-Meier pyramid, based on the Skewb mechanism. Jing s Pyraminx , Jade version - 2010 2 Crazy tetrahedron , by Dayan / mf8 - 2011 The Crazy tetrahedron is a Circle Halpern-Meier tetrahedron (several bandaged versions exist) Master Pyraminx , 3D printed version by Timur Evbatyrov - 2010 Vulcano , by Timur Evbatyrov - 2010 The Vulcano was manufactured by Meffert s. The original name given to the 3D printed version was the Trignis. Professor Pyraminx - 2010 The Professor Pyraminx was designed by Timur Evbatyrov and manufactured by Meffert s. The names were coined after the higher order Rubik s Cubes: the 4x4x4, or Rubik s Revenge, is sometimes referred to as the Master Cube and the 5x5x5, is known as the Professor Cube. It is easy to see that the tips of the Pyraminx , Master Pyraminx and the Professor Pyraminx are connected to just one piece underneath. They will always travel with this single 3-stickered piece.
3 The two pieces together should be viewed as a whole corner of the tetrahedron . A simple turn of a tip will align it with the other part; therefore the tips are called trivial tips . The Jing s Pyraminx is cut differently than the original Pyraminx . Also, the centres of the Jing s Pyraminx are connected to the core. You can view both the Jing s Pyraminx and the Professor Pyraminx as a face turning puzzle, a vertex turning puzzle, or both. (NB Mathematicians call this property self-dual.) By introducing notation for both face and vertex moves this tutorial will be easier to understand. If a Jing s Pyraminx is solved like a regular Pyraminx , in most cases centres will need to be swapped at the very end. There is a relatively short and easy sequence to achieve this. Many people familiar with twisty puzzles can already solve the original Pyraminx and the Jing s Pyraminx . Therefore, this tutorial will use a `reduction method`, where a scrambled Professor Pyraminx is reduced to a Jing s Pyraminx and then solved `as a Jing s Pyraminx `.
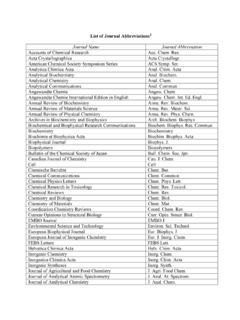
4 If a Jing s Pyraminx is solved like a Pyraminx , in most cases centres need to be swapped at the very end. There is a relatively short and easy sequence to achieve this. 3 These are the corners of the Jing s Pyraminx : They have been reduced by simply turning the trivial tips. In our first step we will group the three central tips with the innermost centre piece. These will become the centres of the Jing's Pyraminx : In our second step we will group the three central edge pieces to build the Jing's Pyraminx edges. After we have solved the reduced Jing's Pyraminx , we will then go back and solve the remaining edge pieces in the final step. In this step we will not build complete edges consisting of five pieces. The reason for not solving these pieces yet will be explained later. This is a diagram of the ordinary Jing's Pyraminx : Notice the relationship between the reduced Professor Pyraminx and the Jing's Pyraminx .
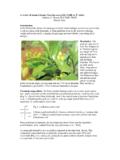
5 Nomenclature, Notation and Diagrams Nomencl ature In this diagram I have labelled all of the stickers on each specific piece type using the numbers 1 to 7 CENTRE: one sticker, in the centre of a face, (4 total) 1. CENTRE TIPS: one sticker, three on each face adjacent to the CENTRE; (12 total). When solved I call the combined group of 3 CENTRE TIPS and 1 centre piece a `BIG CENTRE`. 2. MIDDLE EDGES: two stickers, one in the centre of each edge, (6 total). 3. INNER WEDGE: two stickers; one pair of mirrored pieces per edge, adjacent to the MIDDLE EDGE,(12 total) 4. OUTER WEDGE: two stickers, one pair of mirrored pieces per edge, adjacent to the INNER WEDGEs, one pair per edge, (12 total) BIG CENTRE centrecentre tip4 5. CORNER: three stickers, adjacent to the three OUTER WEDGES, these are the real corners (because the trivial tips can be aligned by a simple twist). The trivial tips are solved in step 0 and after that they are not turned again while solving.
6 (4 total) 6. TRIVIAL TIPS CENTRES CENTRE TIPS MIDDLE EDGES INNER WEDGES OUTER WEDGES CORNERS TRIVIAL TIPS Not ation and Diagrams We will use three types of diagrams: The Pyramid is in all cases viewed as if it were sitting flat on a table. This diagram shows one tip pointing upwards and one tip pointing towards the viewer: In some cases we will reveal a few hidden stickers at the side of the pyramid like this. In this diagram we view the pyramid from above, looking down on the upward pointing tip: It shows three faces but the fourth is completely hidden. In cases where it is important to see all four faces we will use two connected diagrams: The colours on the diagrams match the standard sticker colours of the Professor Pyraminx . The arrows in diagrams indicate where pieces will travel to when a given sequence is applied. 5 The names of the four faces are shown here: L = Left R = Right B= Back D= Down We will use vertex moves as well with these names: U = UP F = Front L = Left R = Right Because we will be using the same letters for face turns and vertex turns, we will use a suffix v, when we describe a vertex move.
7 Move not ation We will not use a notation for the turning of the TRIVIAL TIPS. On our right, we can see a clockwise turn of a CORNER (a vertex turn) Uv. Most of the time it will be convenient to turn some inner layers with a CORNER during a vertex turn. In general we will use a number and two letters to denote a move: {1,2,3}X{f,v} When X is a capital letter it will represent a face or a CORNER turn {L, R, B, D, U, F}. A corresponding lowercase letter will be used for inner slice turns {l, r, d, u, f}. The number will represent how many layers are turned along with the face / CORNER (not including the TRIVIAL TIPS) and the suffix {f / v} denotes a face or vertex turn. The number 1 and suffix f will be the default and will usually not be written. A little graphic may be provided along with the notation, like this: 2Uv Uv The layer under the CORNER U is the slice u (lower case). uv uv Notice that the diagram on the right could represent either D LRDBLRFU6 a face turn D or a vertex turn 3Uv (we will call this a turn of the whole pyramid tip).
8 The result will be the same, but the orientation of the puzzle afterwards will be different. When a D turn is made, the top part of the pyramid will remain stationary and the base will move around. Alternatively when a 3Uv turn is made the base will remain stationary while the upper part of the pyramid (the whole pyramid tip) will move around. 3Uv Some more examples: D dd is the inner slice layer above the D face. It will turn in the same direction as the D face. So, both D and d are clockwise turns. Face turn: R clockwise In standard Twisty Puzzle notation a apostrophe ( ) represents an anticlockwise turn and it s absence represents a default clockwise turn. 2Fv Vertex Turn: Fv and inner slice anticlockwise. You ll find a table with many more moves at the end of the Addendum (at the end of this document) 7 Not ation for the l ocat ion of pieces CENTRES Designated by the face names L, R, B, D CENTRE TIPS Designated by the face name and the corresponding vertex Ru or Lf MIDDLE EDGES Designated by the edge names.
9 An edge name consists of the two adjacent face names RL or RD INNER WEDGES Designated by edge name and inner layer- below a vertex RLf or LDf or below a face LBd OUTER WEDGES Designated by the edge name and the corresponding vertex layer RLUv or RDFv General outline The Professor Pyraminx is the most complex Pyraminx available as a mass-produced puzzle, today. Many puzzlers have solved the normal Pyraminx and the Jing's Pyraminx . These are relatively easy twisty puzzles. Therefore, we will reduce the more complex Professor Pyraminx to an easier puzzle, the Jing's Pyraminx . Solving the Jing's Pyraminx is either already known or relatively easy to learn. For those of you who have never solved a Jing's Pyraminx , a brief solution will be described. This reduction method is very similar to the method most people use to solve the 4x4x4 cube. They build centres and edges and then solve the 4x4x4 cube as if it were a 3x3x3 cube.
10 We will solve the Professor Pyraminx in four steps (not counting the TRIVIAL TIPS) Step 0: TRIVIAL TIPS: Just twist the tips until they are aligned with the CORNER piece underneath. Step 1: Pair the CENTRE TIPS with the correct CENTRES building the BIG CENTRES. Step 2: Pair the MIDDLE EDGES with the INNER WEDGES. Step 3: Solve the reduced Halpern-Meier tetrahedron (or Jing s Pyraminx Step 4: Solve the OUTER WEDGES. If you have never solved a Jing s Pyraminx before, and your Professor Pyraminx is not yet scrambled, it may be a good idea to scramble it just using outer face moves (which will scramble it like a Jing s Pyraminx ) and go to Step 3. Step1: Pair the Centres with the Centre Tips When we finish this step, the four CENTRE pieces will be surrounded by their three corresponding CENTRE TIPS: We will call the combined 4 triangles the BIG CENTRES. We will ignore all of the other piece types at this stage.)