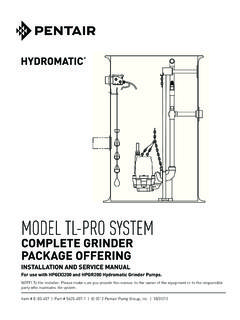
Transcription of HYDR-O-RAIL SYSTEM - files.pentairliterature.com
1 NOTE! To the installer: Please make sure you provide this manual to the owner of the equipment or to the responsible party who maintains the AND SERVICE MANUALItem # E-03-358 | Part # 5625-358-1 | 2012 Pentair Pump Group, Inc. | 10/30/12 2 Thank you for purchasing your hydromatic pump. To help ensure years of trouble-free operation, please read the following manual Operation: Read the following instructions carefully. Reasonable care and safe methods should be practiced. Check local codes andrequirements before : This manual contains important information for the safe use ofthis product.
2 Read this manual completely before using thisproduct and refer to it often for continued safe product use. DO NOT THROW AWAY OR LOSE THIS manual . Keep it in a safe place so that you may refer to it Pump:Remove pump from carton. When unpacking unit, check forconcealed damage. Claims for damage must be made at the receiving end through the delivery carrier. Damage cannot be processed from the : Before handling these pumps and controls, always disconnect the power first.
3 Do not smoke or use sparkable electrical devices or flames in a septic (gaseous) or possible septic PROPOSITION 65 WARNING: This product and related accessories contain chemicals known to the State of California to cause cancer, birth defects or other reproductive Description:In the HYDR-O-RAIL SYSTEM , the pump is raised and lowered in the basin on pipe rails. A unique, patented hydraulic sealing flange at the pump discharge allows the pump to be connected and removed from the discharge elbow with ease at any time without entering the wet well.
4 There is no need to disconnect any piping or electrical connections to remove a pump for inspection or routine maintenance checks. A typical SYSTEM will operate on float control switches. A bottom float control will turn off the pump(s). An additional float control per pump is then used to turn on the pump(s). In a multiple pump station, the pumps are automatically alternated if using a standard hydromatic panel. Also, additional float controls may be used to indicate high and/or low water sump conditions. General InformationSimplex Duplex TriplexOne pump Two pumps Three pumpsOne discharge Two discharge Three discharge elbow/baseplate elbow/baseplate elbow/baseplateassembly assemblies assembliesOne hydraulic Two hydraulic Three hydraulicsealing flange sealing flanges sealing flangesTwo guide rails Four guide rails Six guide railsOne door & One door & Door & frameframe assembly frame assembly
5 AssemblyElectrical Electrical Four levelcontrols controls controlsTwo level Three level Four levelcontrols controls controls3 The hazardous location HYDR-O-RAIL systems (optional) are designed for use with hazardous location pump models and intrinsically safe controls. The general equipment for a simplex, duplex and triplexsystem includes the following:Pump Not Operating or in Storage:Pumps with carbon ceramic seals must have impellers manually rotated (6 revolutions) after setting non-operational for 3 months or longer and prior to electrical with tungsten carbide seals must have impellers manually rotated (6 revolutions) after setting non-operational for 3 weeks or longer and prior to electrical :All codes must be observed.
6 Consult the local inspector before installation to avoid costly delays. hydromatic is not responsible for any expense incurred to meet local codes. 1. Concrete Basin(s) Pour one or two concrete systems one for pumps and control, etc., and one for valves, if required or obtain pre-cast concrete rings. A 45 degree slope may be poured around the inside perimeter of the basin at the bottom to prevent solids buildup providing the slope does not interfere with the discharge elbow and pump locations.
7 Before beginning the installation, please refer to "Installation Data," found in the hydromatic Engineered Catalog. Follow the Installation Drawing Data, taking into account the location of the discharge pipe, inlet pipe, controls, vent pipe, and the anchoring requirements of the baseplate assembly. (All of the above concrete work by others.) 2. Discharge/Elbow Baseplate Installation See "Mounting Stud Location - HYDR-O-RAIL SYSTEM " illustration (Page 8) for the proper location of the discharge elbow/baseplate assembly on the basin bottom.
8 Either cast 1 2" anchor bolts into sump bottom for pump baseplates with 1 2" nuts for securing, or drill holes for expansion lag screws to secure baseplate to sump bottom (furnished by others).NOTE: Each baseplate requires four anchors (furnished by others). Baseplates must be bolting the baseplates to the concrete sump, adjust the level with the baseplate leveling bolt and locknut located in the center of the plate. Use shims as necessary under appropriate mounting pad.
9 3. Discharge Piping (all supplied by others) Install the discharge piping modules to the base plate discharge elbow using bolts, nuts, loack washers and gasket as required. Install the discharge piping which typically includes a vertical run of piping, sized to mate with the discharge elbow, a 90 elbow and a horizontal run of piping sized to mate with valve box piping or force main piping. The horizontal run of piping usually extends through the sidewall of the basin and should be grouted in : If using flanged connections be certain that adequate clearances are provided throughout for installation of bolts, nuts, lockwashers, and total run of vertical piping exceeds twelve (12) feet, install a piping brace at the approximate midpoint of the piping.
10 Secure brace ( , U-bolt with angle iron strap and angle iron extensions) to both piping and wall of basin. 4. Basin Cover(s) The basin cover for the sump and valve box can either be poured concrete or precast. If hydromatic door and frame assemblies are used, locate the concrete openings with respect to the discharge elbow mounting studs per installation data. If the covers are poured, place the door and frame assembly inside the concrete form and position per installation : Provide a 5 8" x 4" cavity for guide rail clearance in sump concrete cover straps are provided on the door frames to secure them to the concrete.