Transcription of MO HealthNet FAQs - Emomed
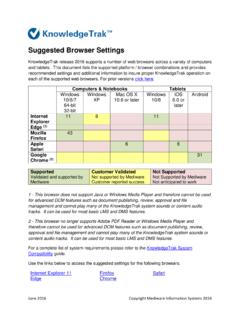
1 MO HealthNet faqs Contents Windows 10 .. 2 Options below will help you find Internet explorer in Windows 10 .. 2 Option 1 .. 2 Option 2 .. 2 To create shortcut to Internet explorer .. 2 Running Internet explorer 11 in Compatibility Mode .. 3 Running Internet explorer 10 in Compatibility Mode .. 4 Requesting & Accepting NPI Access .. 5 INITIATE REQUEST FOR NPI ACCESS .. 5 ACCEPT/DENY ACCESS REQUESTS (PROVIDER ADMINISTRATORS ONLY) .. 5 ADDING/CONTROLLING AN NPI (PROVIDER ADMINISTRATORS ONLY) .. 5 REMOVE OR MODIFY A USER S ACCESS TO AN NPI .. 6 How to Retrieve Your Printable Remittance Advice .. 7 Error Message PKSLOGOUT : .. 7 VERISIGN Setting .. 7 Windows 10 The default browser EDGE that is installed with Windows 10 does not work for provider enrollment or Emomed . Options below will help you find Internet explorer in Windows 10 Option 1 Select the magnify glass to the right of the Start Menu Start typing internet explorer It will show up immediately to be opened for use.
2 You can right click on the Internet explorer Icon in the Taskbar area and select Pin to Taskbar. Option 2 Select the Start Menu File explorer c Drive Program Files(x86) Internet explorer Iexplore To create shortcut to Internet explorer Select the magnify glass to the right of the Start Menu Start typing internet explorer Right click on "Internet explorer " in the Cortana/Search window. To add as a tile on your Start Menu click "Pin to Start." To keep it on your taskbar simply click "Pin to taskbar." Running Internet explorer 11 in Compatibility Mode Hold your Alt key and select the letter T to invoke the Tools Menu. Select Compatibility View, then Select Add to include it in your Websites you ve added to Compatibility View . Select Close. Data will have to be re-entered. Running Internet explorer 10 in Compatibility Mode Users who have recently upgraded their Internet explorer browser to version IE10 have reported certain options such as the New Claim and New Xover Claim selections in Claim Management as missing after the upgrade.
3 This can be resolved by running Internet explorer in Compatibility Mode as explained below. The easiest way to add a website to your compatibility view is to click on the icon that resembles a broken page located in the URL bar. Alternatively, if the icon isn t displayed, click on the Tools option from the Internet explorer Menu to display and access the Compatibility View Settings. Click Add to add to the Website List. Requesting & Accepting NPI Access INITIATE REQUEST FOR NPI ACCESS To initiate a request for access of an NPI, the user will login then follow the steps below: 1. Navigate to the ePassport tab 2. Select the Initiate Access Request option 3. Key in the NPI number in the field provided. 4. Click Add to verify the NPI was placed in the provider list 5. Click Submit located below the NPI list.
4 ** Emomed will generate an automated email to the Administrator of the NPI notifying them of the request. The user must wait until the request has been accepted by the Administrator. (MO HealthNet representatives cannot grant access to an NPI, only the Provider Administrator can do this. If access has not been granted within 7 days of the original request, please contact our Technical Support Help Desk at 573-635-3559) ACCEPT/DENY ACCESS REQUESTS (PROVIDER ADMINISTRATORS ONLY) Only the Administrator (or designated Sub-Administrator) of an NPI is responsible for granting or denying access to users. To grant or deny access, go to the ePassport tab and follow the steps listed below: 1. Click on Manage Access Requests 2. Click on the user s name 3. Once the new window opens, click the NPI to highlight 4. Move the NPI to the Accept column by clicking Add.
5 5. Click Submit 6. Click Finish If access to the NPI is to be denied, DO NOT remove the NPI from the Request column (leave it in the list), then click Submit. Emomed will deny the access request and send notification to the requesting user. ADDING/CONTROLLING AN NPI (PROVIDER ADMINISTRATORS ONLY) To add and control an NPI, the Provider Administrator of the NPI must login then follow the steps listed below: 1. Navigate to the ePassport tab 2. Select the Manage NPIs option, 3. Select NPIs I Control from the drop down list, 4. Click ADD NPIs I Control (located in blue below the list of NPIs). 5. Once the new window opens, key in the NPI and click ADD 6. Verify the NPI was added to the list of providers 7. Click Submit located below the NPI list. 8. Click Finish REMOVE OR MODIFY A USER S ACCESS TO AN NPI (Provider Administrators only) To remove or modify a user s access to an NPI, the Provider Administrator of the NPI must login, then follow the steps listed below: 1.
6 Navigate to the ePassport tab. 2. Select the NPI Access Management option. 3. Choose the search option you prefer and click Search . 4. Click on the user s ID highlighted in blue in the Results Summary field. 5. Locate the NPI Details field displayed below the User Information field. 6. To delete access, either click on the Remove Access All (the trash can) option in the blue header or click on the Remove radio button to the far right of the results displayed in the Functional Security Access field. 7. Click Save , then click Finish . 8. To grant administrator access as a sub-administrator, add or restrict a user s access, place a checkmark underneath the desired options. 9. Click Save then click Finish . Functional Security Access Access Status NPI Provider Name Claims Attachments Eligibility Remittance Advice Admin Authorized Remove 1234567890 Dr.
7 Smith How to Retrieve Your Printable Remittance Advice RA files are accessible by National Provider Identifier (NPI) and are available automatically following each financial cycle. Each RA remains available for approximately 62 days; the oldest drops off the list when a new RA becomes available. Click on File Management. In Search Scope, check Selected NPI. Be sure the correct NPI is displayed in the NPI box. Select Printable RAs in the File Type section and click on Search. This brings up a list of your four most recent RAs in the Results section. The RAs are in chronological order from the newest to the oldest. Click on the Adobe icon on the right side of the RA you want to open. This opens the RA as an Adobe PDF document. To print the RA, click on the printer icon or select print from File on the tool bar at the top of the page.
8 You can also save the document to your computer system by clicking on the computer disk icon or by selecting the Save option from File and selecting a location on your computer where you want to save the document. Error Message PKSLOGOUT : If you encounter a PKSLOGOUT message screen, click on PKSLOGOUT . This will allow you sign on to Emomed . pkmslogout page ends the user's session without performing an authorization check; VERISIGN Setting Follow the settings below to set Verisign for Emomed .