Transcription of Fifteen easy steps for you to progress from your …
1 (863) 324-43411 TheFifteen easy steps for you to progress from your first ride on trick skis to a 360 degree turnLearn to (863) 324-434121234567 Hand Signals1. Speed up: The thumbs-up gesture indicates that the skier would like the speed Slow down: The thumbs-down gesture indicates that the skier would like the speed OK: If the set speed or boat path is good, the skier may use the OK Turn: When either the skier or the driver wants the boat turned, a circle motion with the arm over the head with one finger in the air is used. It is usually followed by pointing in the direction of the Back to the Dock: A pat on the head indicates that the skier would like to return to the Cut Motor/Stop: A slashing motion with the hand across the neck indicates the boat is to stop immediately.
2 This signal can be used by the skier, driver or I m OK (after a fall): This important signal indicates that a skier is OK after a fall. It consists of both hands clasped over the head. It should be used every time the skier 1 Trick SkisOn land, demonstrate: The seven skier hand signals Explain five of the 15 Skier Safety CodesImportant safety rule:Always wear flotationRule 1: Always wear flotation. A properly fitted personal flotation device is designed to fit snugly, so that it won t slip up on the body during a fall. The recommended type is a jacket or vest that covers the chest, abdomen and 2: Always be sure your equipment is in good condition. Your personal safety and enjoyment depend on the equipment you use. Check your equipment regularly.
3 Be sure that your skis do not have sharp or protruding surfaces that could cut or scrape the skier. Check towropes for frayed areas or broken bridles and handles. Repair or replace damaged or unsafe 3: Don t give the starting signal until ready. Make sure you are ready, the slack has been taken out of the rope and you are clear of any dangerous obstacles around you. Keep your ski tips 4: Do not ski near docks, pilings, other boats or swimmers. Always look ahead and be sure you are aware of your surroundings and where you are going at all times. Many water ski injuries result from collisions with docks or other solid 5: Never put any part of your body through the handle or wrap the line around yourself in any 6: Never ski in shallow water or an area where there may be obstructions above or just beneath the 7: When a fall is inevitable, try to fall backward or to either side.
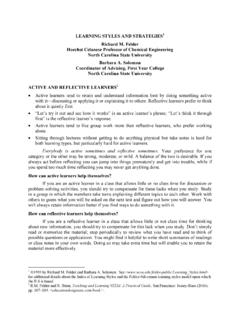
4 A forward fall increases the chances of contact with the 8: Know and use the skier hand signals. It is particularly important to use the skier s I m OK signal after a fall if you are all 9: If you fall in an area where there is other boat traffic, lift one ski half way out of the water. This will signal to other boats that there is a skier in the 10: Never ski to the point of excessive 11: Always ski during daylight, from sunrise to one-half hour after 12: Never ski directly in front of another 13: Always use equal length ropes when skiing 14: Always ensure that the motor is off when a skier is entering and exiting the 15: Always have an observer in the Skier s Safety (863) 324-43413 Proper Body Position For StartingProper Body Position While SkiingLevel 1 Trick Skis Proper fit and adjustment Proper grip to hold handle Proper body position for starting Proper body position for skiingBe sure to remain in the chair position at all times while on the water.
5 This will ensure proper posture. You should have your arms straight and shoulders proper cannonball body position on land before entering the water to get the proper feel. Hold the han-dle and have a partner pull on the rope slightly to help pull you up. This will give you the feeling of being pulled up by the boat. While practicing this task, make sure your knees are together at all times and stay in the cannonball position as shown in the picture. Let the boat do the work for you rather than trying to do the work To Properly Hold The HandleFor trick skiing, use the knuckles up grip. Hands are held at waist Feet In BindingsBinders should be snug but comfortable. If too loose your feet may come out when you start (863) 324-43414 Level 2 Trick Ski StartComplete a deep-water start and maintain the proper two-ski trick body position for three 3 Trick Ski BalanceMaintain proper two-ski trick body position for 20 emphasis on the proper two-ski body position: head up, arms straight and knees and ankles bent and flexible while putting some downward pressure on the Towboat SpeedsApproximate WeightOf SkierLess than50 to100 to150 lbsor moreTwo-Ski Speeds12 mph15 mph16 mph18 Ski Speeds14 mph17 mph18 mph20 Tip: Keep your Arms Straight, Knees Bent, Head UpWrap your arms around your knees and place the rope and handle between your skis.
6 When ready, signal the driver to begin accelerating. Let the boat slowly pull you up. DO NOT try to pull yourself out of the water by pulling in with your arms. When you feel the boat begin to pull you up, slowly rise to a sitting position using your legs. Once up, maintain the proper body position of arms straight, knees and ankles bent and flexible. Keep your head up, looking toward the boat. Trick skis will feel slippery on the water, which makes it important for you to keep your knees and feet close together so that the ski s do not slide out to either (863) 324-43415 Level 5 Trick Ski Wake CrossingCross over to the outside of the boat wakes on one side only and return to the center of the wakes for a total of 2 wake 6 Trick Ski Wake CrossingLeave the center of the boat wakes on one side and cross both wakes one time ending up outside the opposite wake for a total of 3 wake 7 Trick Ski Wake CrossingComplete seven wake crossings.
7 Once the tail of both skis are completely over the wake on one side and you are in the white wash of the wake, then you are completely over the the wakes by turning both skis at an angle to the wakes and bend your knees to absorb the shock. Crossing one ski at a time with not enough angle will result in a 4 Trick Ski EdgingEdge back and forth in control inside the each turn by placing more weight on the leg opposite to the direction you want to go. For example, to turn left, place pressure on your right foot and ski. Because the trick skis are slip-pery, it is very important to keep your knees and ankles flexible to help control the weight on one foot while placing more weight on the other foot will allow you to go in the direction you want to go.
8 For example: unweighting the left foot while placing more weight on the right foot will allow you to turn toward the left to bend your ankles!The most common mistake for a skier is to pull on the handle while crossing the wakes. Keep your arms slightly bent but do not pull as you cross the wake. Keep your knees bent and together. Continue to maintain the proper body to emphasize proper body to cross the wake at an angle. Turn toward the wake and keep more weight on the ski closest to the boat (furthest away from the wake) until you are well over the wake. Trying to go over the wake slowly will result in a (863) 324-43416 Level 9 Trick Ski Wake JumpFrom the opposite side, jump one wake with both skis clearing the water and land in the center of the the process in Level 8 from the opposite side of the wakes.
9 Challenge yourself by trying to jump the wake from the center going 8 Trick Ski Wake JumpLeave the center of the boat wakes on one side, jump one wake with both skis clearing the water and land in the center of the your weight to one foot to edge towards the wake. As you go up the wake and approach the top, push down on both feet and straighten your legs to propel you off the top of the jump the wake you need to push down on the skis by quickly extending your legs just before you hit the crest of the wake. This downward push will propel you into the air off the top of the wake. Re-member to bend your knees again for the (863) 324-43417 Level 11 Trick Ski Surface Turn, Front-To-BackPerform a front-to-back surface turn, pause and then perform a back-to-front surface 10 Trick Ski Side Slide And Reverse Side SlidePerform a side slide by turning both skis 90 degrees to the rear of the boat, pausing and then returning to the two-ski tricks the turn by pulling the handle to the waist in a firm and even manner.
10 Bring the handle toward the hip opposite of the direction you want to turn ( bring handle to right hip to turn to the left). Holding the handle at your hip will hold you in the side slide position. Bring the handle back to center to return to front positionPull the handle in to the hip opposite of the direction you want to turn until your elbows are at your side then let go with one hand. You will start turning in the direction of the free hand. Bring the handle with palms up to the small of your back while reaching for the handle around the opposite side of your body with your free hand. Grab hold of the handle behind your back with both hands as soon as you are able. Remember to keep your head up and knees bent while turning.