Transcription of TomcoTechtips - Tomco-inc Home Page
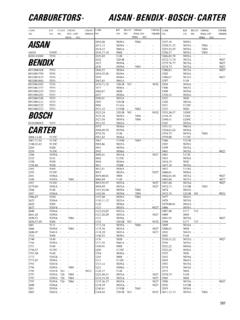
1 ISSUE 3TM1234567890123456789012345678901212345 6789012345678901234567890121234567890123 4567890123456789012112345678901234567890 1234567890121234567890123456789012345678 9012123456789012345678901234567890121123 4567890123456789012345678901212345678901 2345678901234567890121234567890123456789 0123456789012112345678901234567890123456 7890121234567890123456789012345678901212 3456789012345678901234567890121123456789 0123456789012345678901212345678901234567 8901234567890121234567890123456789012345 6789012112345678901234567890123456789012 1234567890123456789012345678901212345678 9012345678901234567890121123456789012345 6789012345678901212345678901234567890123 4567890121234567890123456789012345678901 2112345678901234567890123456789012123456 7890123456789012345678901212345678901234 5678901234567890121123456789012345678901 2345678901212345678901234567890123456789 0121234567890123456789012345678901211234 5678901234567890123456789012123456789012 3456789012345678901212345678901234567890 1234567890121123456789012345678901234567 8901212345678901234567890123456789012123 4567890123456789012345678901211234567890 1234567890123456789012123456789012345678 9012345678901212345678901234567890123456 7890121123456789012345678901234567890121 2345678901234567890123456789012123456789 0123456789012345678901211234567890123456 7890123456789012123456789012345678901234 5678901212345678901234567890123456789012 1123456789012345678901234567890121234567 8901234567890123456789012123456789012345 6789012345678901211234567890123456789012 3456789012123456789012345678901234567890 1212345678901234567890123456789012112345 6789012345678901234567890121234567890123 4567890123456789012123456789012345678901 2345678901211234567890123456789012345678 9012123456789012345678901234567890121234 5678901234567890123456789012112345678901 2345678901234567890121234567890123456789 0123456789012123456789012345678901234567 8901211234567890123456789012345678901212 3456789012345678901234567890121234567890 1234567890123456789012112345678901234567 8901234567890121234567890123456789012345 6789012123456789012345678901234567890121 1234567890123456789012345678901212345678 9012345678901234567890121234567890123456 78901234567890121 TomcoTechtipsHow to read trouble codes on Ford's EEC-IIIThe EEC-III is one of theengine control computer systemsused by Ford since midyear 1978.
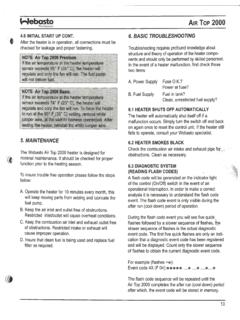
2 (We will cover the others in laterissues.) This procedure uses aninexpensive voltmeter and othergenerally available test devicesinstead of the special diagnostictester originally specified by follow these steps to get theservice codes from cars using Connect the negative leadfrom an analog (pointer type) voltme-ter to the green thermactor air bypassdiverter (TAB/TAD) solenoid. (Fig. A)This is usually found on the passen-ger side of the carburetor. (Don'tconfuse this with the EGR valve andthrottle kicker solenoids which areusually found on the driver side of thecarburetor.)2. Connect the positive leadto the positive battery Set the voltmeter to the12v battery Connect a 12v test light tothe canister purge ground : This is not thebowl vent Start the engine and run itat 2000 rpm for approximately oneminute. Then return to Apply 20" Hg vacuum tothe barometric pressure/manifoldabsolute pressure (BP/MAP) sensorvent port for eight seconds.
3 Thenrelease the vacuum. (Fig. B)The throttle kicker (TKS)plunger will move rapidly in and outto signal that the self test has it will remain out for approxi-mately 11/2 minutes, signaling that thesystem is in its diagnostic it will return to curb idle andthe system will begin to give To read the service codes,watch the pointer on the are displayed as needlesweeps. (Example: 3 sweeps, pause,1 sweep equals code 31). Thevoltmeter needle will continue tosweep until all codes in the memoryhave been displayed. Then the 12vtest light you connected earlier willcome on signaling the end of the , the computer willenergize the trottle kicker which willraise the rpm to 1500 for 15 to 20seconds, then return to idle. If you arenot sure of thew codes, repeat the following chart lists the servicecodes and the components or circuitsthey indicate for Ford's EEC-III. Keep inmind, this is a condensed, basic servicecode chart.
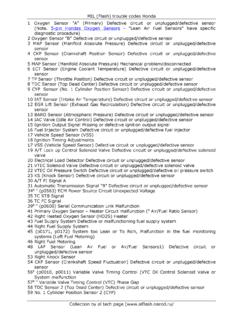
4 This procedures muchhandier than searching through largeservice manuals. However, for specificinformation, check the service manual forthe model and year of the Test "Pass Status"12 Engine RPM Out-of-Spec21 Engine coolant temperature sensorshorted, open or out of range22 Manifold absolute pressure sensorshorted or open23 Throttle position sensor shorted, openor out of range24 Air charge temperature sensorshorted, open or out of range31 EGR valve inoperative32 EGR valve position sensor shorted,open or out of range41 Fuel control system always lean42 Fuel control system always rich43 Engine coolant temperature-VTC3;cold VIP test44 Secondary Air system inoperativeEEC-IIISERVICE CODE CHARTTHERMACTORAIR DIVERTER(TAD) SOLENOIDTHERMACTORAIR BYPASS(TAB) SOLENOID( )Green WireAnalog MeterBattery( )How to test foropen/closed loop statusand rich/lean exhaustcondition onGM sample tests tells you if theengine is running in the open orclosed loop status, and also indicateswhether its exhaust condition is richor lean.
5 It requires no specialequipment. GM describes this test asplacing the computer into the fieldservice , with the ignition off, jumpthe A and B terminals of the assemblyline connecting link (ALCL). (As youmay remember from the last issue,this was accomplished using ajumper tool or bent paper , in that test we turned theignition on, but did not start theengine). To perform this test, you willstart the engine and observe theCHECK ENGINE or SERVICEENGINE SOON lightOPEN/CLOSED LOOP TESTThe SERVICE ENGINESOON light will begin to flash. Countthe number of flashes per second . Arate of two and a half flashes persecond indicates the system is inopen loop operation. The system willalways be in open loop when the engine coolantreaches operating temperature andthe O2 sensor output voltage beginsto vary, the system enters closed the system fails to go intoclosed loop operation, this indicatesthat the engine coolant temperaturesensor may not be functioningproperly.
6 Both should be checkedand replaced with a new Tomco, if FUEL MIXTURE TESTThe O2 sensor monitors thestatus of the air/fuel ratio in theexhaust. This status is indicated in theway the SERVICE ENGINE SOON this point, the light isflashing about one time per second. Ifthe flashes are short, so that the lightappears to be OFF more than ON, youare reading a lean mixture. If theflashes are long, so that the lightappears to be ON more than OFF, youare reading a rich CIRCUIT CHECKALCL CONNECTOR(Look for letters on the ALCL terminals)1 second1 second1 secondCheckEngineCheckEngineCheckEngineC heckEngineCheckEngine(flash)(flash)(flas h)(flash)(flash)2-1/2 flashes per second=open loop1 flash per second=closed loopTwo new service aids forGM computer-controlled to repair GM carburetorswith stripped lean mixtureadjustment screw repair kit can save yourcustomer $600 to $800 for a newcarburetor. Tomco, Inc. offers a repairkit with everything you need to repairthe lean mixture screw threads in thebowl casting of four barrel Quadrajetor two barrel Dual Jet computer-controlled 's how it works.
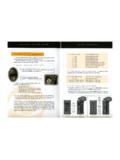
7 First,remove the mixture control solenoidand all components, float and pinassembly. Then place the carburetoror fuel bowl on a firm base, makingsure the linkage is apply Locitte 271(included in the kit) to the knurledsection of the repair stud. Place thedriving tool over the threaded shankof the stud. Put the knurled end of thestud in the counter bore of theadjustment stud screw hole and driveit into the hole and drive it into thehole until the shoulder seats againstthe all components andmake the necessary adjustments . Anew spring and adjusting cap areincluded in the kit, as are you can make "on thebench" mixture adjustments toGM handy tool kit allowsyou to adjust the lean mixture screw,rich stop screw, and idle air bleedvalve on GM computer-controlledQuadrajet and Dual Jet adjustments must be made forcorrect carburetor function. Thewrench is also needed for the finalon-the car mixture control solenoid"dwell" kit contains a leanmixture gauge, a lean mixture screwadjustment wrenchand a plungertravel gauge for making the rich stopscrew adjustment.
8 The kit alsocontains complete kits are available fromyour local Tomco, Inc. jobber. OrderNo. 13725 adjustment tool kit and repair installationinstructions are includedwith each StudApplyLoctiteCarburetor BodyThis lit saves the expense of anew 4 barrel Quadrajet or 2 barrelDual Jet computer controlled(CCC) carburetor when thethreads for the lean mixtureadjusting screw in the bowlcasting strip out. A knurledrepair stud and adjusting capreplace the original MIXTURE SCREW REPAIR KIT #13726GM computer controlledQuadrajet and Dual Jetcarburetors require thesespecial tools. Thisadjustment kit facilitates"on the bench"adjustments of leanmixture screw, rich stopscrew, and idle air MixtureAdjustingScrewSolenoidPlungerJust TouchGaugeStopGaugeRich StopAdjusting ScrewSpecial WrenchJust TouchIdle Air Bleed Out To AirBleed special wrench isalso needed for the final,on-the-car mixturecontrol solenoid "dwell" CONTROL ADJUSTMENT KIT #13725 NEWCONSOLIDATION!
9 Tomco, your tune-up sales with 60%fewer it's fuel injectionkits, carburetor kits, choke pull-offs,choke thermostats or carburetorfloats, you'll cut your inventory whileyou build sales at Tomco, Inc. fuelsystem parts. Call or write for all types of EGR valves withTomco, Inc. hand-held tester allows positive testing of alltypes of EGR valves. It is easy to use, inexpensive andoperates on shop air. It comes with complete instructionsand storage case. Call or write for more yourself and your mechanics on engineperformance controlsThis 40 minute tape gives you an overview of the10 most important engine performance controls. The tapecovers location, function and troubleshooting tips. It alsodemonstrates the new EGR valve tester. Order partnumber 8-V for VHS format or 8-B for Beta format. Sendcheck or money order for $ , plus $ for shippingand handling for each tape to the address Tomco, Inc.
10 Oxygen Sensorreplaces 68 of other brands,imports included!One partfits , Inc. part num-ber 11011 fits all carsand trucks, domesticand import, using oneor two-wire remove the oldsensor and splice thenew sensor onto theexisting for the jobis included in thepackage. Call orwrite for moreinformation.