Transcription of 18SP675.pdf - MBE 900 Grid Heater Relay …
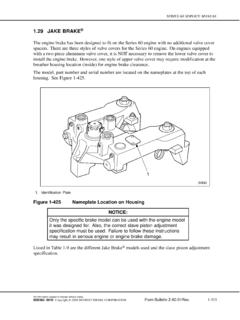
1 18sp675 Page 1 of 6 18sp675 MBE 900 grid Heater Relay installation instructions (P/N: A9061590004) KIT DESCRIPTION Kit P/N: A9061590004 includes a Relay and bracket assembly for installation on all EPA04 and EPA07 MBE 900 vehicles currently equipped with a grid Heater . KIT CONTENTS MBE 900 grid Heater Relay installation kit (P/N: A9061590004) contains contents listed in Table 1. IMPORTANT! Engines currently equipped with a kW grid Heater (P/N: EA0001592404, grey cover) must replace the current grid Heater with the kW grid Heater (P/N: EA0001595204, black cover, not included in kit) and update the MCM software to the latest version available on the server.
2 Failure to update the MCM software may cause various fault codes and premature Relay failure. Part No. Qty. Description A9061531340 1 Relay Bracket A0045459205 1 Relay A9061500056 1 Jumper Harness A0005455402 1 Bus Bar N910105006011 4 M6x70 Bolt N910105006002 2 M6x12 Bolt N916016020202 2 P-Clip N910112008001 1 M8 Nut 18sp675 1 installation
3 instructions Table 1 MBE 900 grid Heater Relay installation Kit (P/N: A9061590004) installation PROCEDURE 1. Make sure that the engine is off (key OFF, engine OFF). 2. Disconnect the batteries. 3. Disconnect the electrical harness connector and electrical cables from the grid Heater . Note routing of electrical harness and cables for re- installation . 18sp675 Page 2 of 6 4. Remove mounting bolts securing the grid Heater to the mixer housing. Remove and discard the attached ground bracket, if equipped. See Figure 1. Figure 1 Relay Ground Bracket to be Removed 5.
4 Identify the current grid Heater installed on the engine. If the engine is currently equipped with a kW grid Heater (P/N: EA0001592404), it must be replaced with a kW grid Heater (P/N: EA0001595204). Note: The correct grid Heater can be verified by a BLACK colored plastic cover. If the cover is grey, the grid Heater MUST be replaced with the kW grid Heater (P/N: EA0001595204). Note that paint on the engine may hide the true color of the grid Heater . A small amount of paint may have to be scraped off the grid Heater to find it s true color.
5 6. Mount the Relay (P/N: A0045459205) to the Relay bracket (P/N: A9061531340) using supplied M6x12 bolts (P/N: N910105006002). Torque fasteners to 15 N m (11 lb ft). 7. Install the Relay bracket and kW grid Heater (P/N: EA0001595204) to the mixer housing using new M6x70 bolts (P/N: N910105006011) as shown in Figure 2. Torque bolts to 10 N m (7 lb ft). Figure 2 Relay and Bracket Assembly Remove and discard bracket, if applicable 18sp675 Page 3 of 6 Figure 3 Relay and Bracket Assembled to Engine (EPA07 shown) 8. Connect the supplied electrical jumper harness (P/N: A9061500056) in series between the engine electrical harness and the grid Heater .
6 9. Attach the Relay signal wires from the electrical jumper harness to the Relay terminals as shown in Figure 4. Torque fasteners to 2 N m (15 lb in.). Figure 4 grid Heater Relay Wiring 10. Connect the positive battery cable to the Relay terminal as shown in Figure 4. Torque nut to 4 N m (35 lb in.). 11. Attach the bus bar (P/N: A0005455402) from the terminal of the Relay to the positive stud of the grid Heater as shown. Torque Relay nut to 4 N m (35 lb in.); torque grid Heater nut to a maximum 25 N m (18 lb ft). 12. Connect the negative battery cable to the Relay bracket stud (or under one of the bracket mounting bolt heads, depending on original configuration).
7 Torque nut to 15-18 N m (11-13 lb ft). Positive Jumper Terminal Negative Jumper Terminal Positive Battery Cable Negative Battery Cable 18sp675 Page 4 of 6 Note: Route the electrical cables similar to OEM configuration. Mounting tabs on the Relay bracket and supplied P-clips (P/N N916016020202) may be used for securing the cables. Ensure no wires are rubbing on the bus bar. 13. Reconnect the batteries. 14. Apply protective dielectric coating to all electrical cable connections using 3M 1602 Insulating Enamel (or equivalent). 15. For EPA07 only: If the grid Heater was originally a grey cover kW grid Heater (P/N: EA0001592404), replaced with a black cover kW grid Heater (P/N: EA0001595204), reprogram the MCM to the latest available version on the server.
8 If the grid Heater was not replaced, no programming is necessary. Verifying Proper Operation of the grid Heater and Relay Assembly Once the hardware has been installed to the engine, care must be taken to ensure that the grid Heater and Relay function properly. Activating the grid Heater using DDDL (EPA07) for more than two seconds will result in a fault code and will disable the grid Heater . With the correct grid Heater installed and the MCM correctly parameterized, the grid Heater should energize and stay on continuously (not cycle) during the following verification test.
9 If the Relay is audibly heard cycling, verify that the MCM has been programmed with the latest version of software available on the server. Reprogramming will correctly parameterize the MCM for the kW grid Heater . 1. Ensure engine coolant temperature is at 70 C (160 F) or lower. 2. Disconnect the intake manifold pressure/temperature sensor. Figure 5 EPA07 Intake Manifold Pressure/Temperature Sensor Schematic 3. Using Connector Test Kit J-48476, install male blade terminals J-48476-25 to pins 3 and 4 of the harness side intake manifold pressure/temperature sensor connector.
10 Note: Exercise care when installing the blade terminals to the connector to avoid spreading or damaging the connector terminals. 18sp675 Page 5 of 6 4. Install a 20k ohm resistor between the two blade terminals. An Instrument Gauge Tester (commercially available) set to the appropriate resistance may be utilized in place of a 20k ohm resistor. Figure 6 20k Ohm Resistor with J-48476-25 Plugged into Wiring Harness Connector 1. Instrument Gauge Tester 2. Inlet Manifold Pressure/Temperature Sensor Connector Figure 7 Instrument Gauge Tester set to 20k Ohms with J-48476-25 Terminals Plugged into Wiring Harness Connector 5.