Transcription of 2013-2015 Altima and 2014-2016 Rogue; CVT Judder & DTC ...
1 1/23 Classification: Reference: Date: AT15-012b NTB15-084bApril 1, 2016 2013-2016 Altima AND 2014-2016 ROGUE; CVT Judder AND DTC P17F0 OR P17F1 STORED This bulletin has been amended. Instructions have been changed and parts information added for installing a new oil strainer when the valve body is replaced. Please discard all previous versions of this bulletin. APPLIED VEHICLES: 2013-2016 Altima (L33) with 4-cyl engine only 2014-2016 Rogue (T32) NOTE: Does not apply to Rogue Select (S35) IF YOU CONFIRM: The customer reports a transmission Judder (shake, shudder, single or multiple bumps or vibration), AND One of the following DTCs are stored in the TCM: P17F0 (CVT_JUDDER (T/M inspection )) P17F1 (CVT_JUDDER (C/U inspection )) NOTE: If a transmission Judder (as described above) is NOT reported by the customer, this bulletin does not apply.
2 If DTC P17F0 or P17F1 was NOT found stored, this bulletin does not apply. NTB15-083, Enhanced Diagnostic Logic For CVT Judder , has reprogramming instructions that may apply. ACTIONS: Perform the SERVICE PROCEDURE, starting on page 3. Review the Repair Flow Chart on page 2. NOTE: Essential Tool Tech Cam ( borescope ) J-51951 has been sent to dealers. This tool s attachments make CVT inspection possible. IMPORTANT: The purpose of ACTION (above) is to give you a quick idea of the work you will be performing. You MUST closely follow the entire SERVICE PROCEDURE as it contains information that is essential to successfully completing this repair.
3 Nissan Bulletins are intended for use by qualified technicians, not 'do-it-yourselfers'. Qualified technicians are properly trained individuals who have the equipment, tools, safety instruction, and know-how to do a job properly and safely. NOTE: If you believe that a described condition may apply to a particular vehicle, DO NOT assume that it does. See your Nissan dealer to determine if this applies to your vehicle. Repair Flow Chart DTC P17F0 or P17F1 found stored Replace the CVT assembly See page 23 for important pre-authorization information This bulletin does not apply NONODTC P17F1 DTC P17F0 Remove the control valve (valve body), inspect the CVT belt (see page 7) The CVT belt checks out OK Replace the valve body Customer reports transmission Judder (shake, shudder, single or multiple bumps or vibration)
4 2/23 NTB15-084b SERVICE PROCEDURE Check for Stored DTCs 1. Before starting, it is IMPORTANT to make sure: ASIST on the CONSULT PC has been freshly synchronized (updated). All CONSULT related software updates (if any) have been installed. 2. Once all ASIST and CONSULT related updates have been performed, attach the CONSULT PC to the vehicle. Connect the plus VI to the vehicle. Connect the AC adapter to the CONSULT PC.
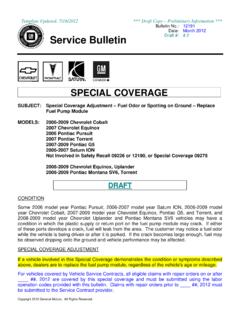
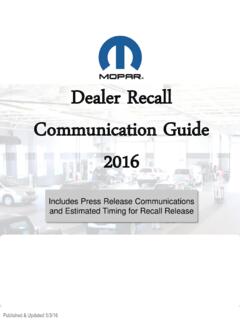
5 3. Turn ON the CONSULT PC, and then open CONSULT III plus (C-III plus). NOTE: Make sure all applications other than C-III plus are closed. 4. Press the ignition switch twice without depressing the brake pedal. The meter and gauges will illuminate. Do Not start the engine. Make sure ALL accessories are turned OFF. 5. Wait for the plus VI to be recognized. The serial number will display when the plus VI is recognized. 6. Go to Diagnosis (All Systems). Step 5: plus VI is recognized Step 6 Figure 1 3/23 NTB15-084b 7.
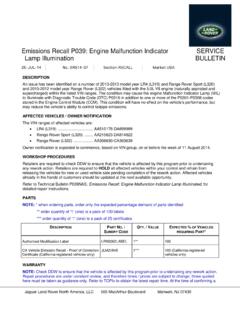
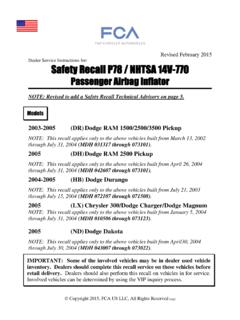
6 Select TRANSMISSION. Step 7 Figure 2 4/23 NTB15-084b 8. Select the Self Diagnostic Result tab, print the screen showing the VIN and DTC, and then attach the printout to the repair order. IMPORTANT: The screen printout MUST clearly show the VIN and DTC. a. If P17F0 is stored, replace the CVT assembly. For CVT assembly pre-approval, refer to page 23, Component Replacement Approval Procedures. Refer to the appropriate Electronic Service Manual (ESM), section TM-Transaxle & Transmission, for CVT assembly replacement procedure.
7 Skip to step 9. b. If P17F1 is stored, go to page 7, Control Valve (Valve Body) Removal and CVT Belt inspection for DTC P17F1 ONLY after completing steps 9-12. c. If neither P17F0 nor P17F1 are found stored, this bulletin does not apply. Close C-III plus, and then refer to ASIST and the ESM for further diagnosis. 9. After printing a screen shot, erase the DTC. 1N4AL3 APxxx-xxxxxxALTIMA L33 201x VIN must show on printout Step 8 DTC must show on printout xxxxx P17F1 CVT Judder (T/M inspection ) Step 9 Figure 3 10. Close C-III plus. 11. Turn the ignition OFF. 12.
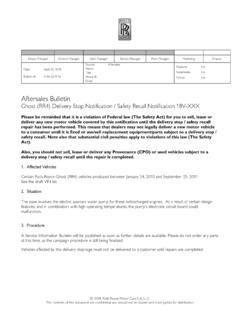
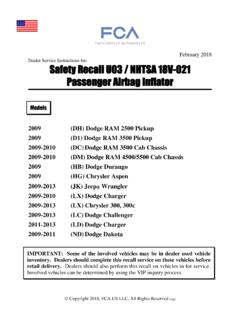
8 Disconnect the plus VI from the vehicle. For vehicles with P17F1, go to page 7, Control Valve (Valve Body) Removal and CVT Belt inspection for DTC P17F1 ONLY after completing steps 9-12. 5/23 NTB15-084b Exploded View (Total of 9 bolts) Figure 4 Transaxle (CVT) assembly Terminal cord assembly Control valve (valve body) O-ring Oil strainer assembly Oil pan gasket Oil pan Drain plug Drain plug gasket Two original magnets Spring washer Manual plate Lip seal Snap ring Overflow plug O-ring 6/23
9 NTB15-084b Control Valve (Valve Body) Removal and CVT Belt inspection for DTC P17F1 ONLY 1. Remove the valve body. Before lifting the vehicle: Place the transmission gear selector in Neutral. Leave the driver door unlatched. A step further in the procedure may require it. For Altima : Refer to the applicable ESM, section TM Transaxle & Transmission / RE0F10D, for valve body removal. For Rogue: Refer to the 2013 Altima ESM, section TM Transaxle & Transmission / RE0F10D, for valve body removal.
10 NOTE: The number 7 is on the head of all bolts that need to be removed for valve body removal. Do not remove any bolt that does not have the number 7 . CAUTION: Never allow any chemicals or fluids other than NS-3 CVT fluid or equivalent to enter the CVT assembly. Never allow any foreign debris, dust, dirt, etc. to enter the CVT assembly. For additional information, see video # 544: CVT Belt inspection . This video is located under the TECH TRAINING GARAGE VIDEOS tab in Virtual Academy. 7/23 NTB15-084b Figure 5 Figure 6 Figure 7 2.