Transcription of 3 Frequency 5/8 Dome Assembly Instructions - Dome Climber
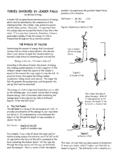
1 3 Frequency 5/8 dome Assembly InstructionsConnector Kit Inventory List: 61 Hub Units Total 40 Hexagon hubs (6 point)x30 Base plates with multi-color edgesx10 Base plates with green color edgesx40 Hexagon Center Cups 6 Pentagon Hubs (5 point)x6 Pentagon base plates (All Red Edges)x6 Pentagon center cups (All Red Edges) 15 Quad hubs (4 point)x10 Base plates with blue/green color edgesx5 Base plates with green color edges x15 Quad 4 sided Center CupsAdditional Materials Required: 1000 wood or drywall screws Cordless drill 4 to 5 hours Assembly Time Recommended rubber coated knit gloves and safety glasses. 83 eight ft 2x4s cut in half to the following lengths: x80 Green tip lengths at 45 inches x55 Blue tip lengths at 44 inches x30 Red tip lengths at 38 inches Quick Overview of Hub Unit Assembly ProcedureIts a 2 phase process. The first phase you will just get everything assembled loosely in place with a single screw.
2 The second phase after all the segments are in place is where the segments are locked into place with additional the first phase you are just going to attach the 2x4s to the plates with a single screw and attach a center cup to a single 2x4 at each hub in this initial phase as well. The center cup attached to a 2x4 will help guide the placement of the other 2x4s on the plate. This first phase is just to get all the 2x4 segments loosely in place. The second phase is where the other 2x4s are attached to the center cups and then the second round of screws through the base plates are added. Attaching all the 2x4s to the center cups in the second phase will add strength and tension to the structure. x10x30x40 80 - Green 2x4s55 - Blue 2x4s30 - Red 2x4sRed = Red = A = 38 inchesBlue = B = 44 inches Green = C = 45 inches Step 1a. Estimate and draw on ground 19 ft diameter circle. An approximation is Set aside: x15 -- 4pt hub platesx15 -- 4pt hub cupsx5 -- blue tip 2x4sx10 -- green tip 2x4sc.
3 Assemble the hub connections. Attach 2x4 to plate with screw then attach cup to 2x4, then attach other 2x4 to plate and position it so that its is flush against center the initial Assembly of dome , each cup will only be attached to a single 2x4. The remaining 2x4s edges will be attached to center cups as the final step after all the 2x4s are in place. As you attach the 2x4s to the plates the edge of the 2x4s should be flush against cup. Step 2a. Set aside: x10 -- blue tip 2x4sx10 -- 6pt cupsx10 -- 6pt hub platesb. Attach 2x4s to plates where the 4pt plate segment is blue. Attach each 6pt cup to tip of blue 2x4. Attach 6pt hubs plates to tips of 2x4s Step 3a. Set aside: x20 -- green tip 2x4sx5 -- 6pt cupsx5 -- 6pt hub platesb. Attach 2x4s to plates where the 4pt plate segment is green. Attach each 6pt cup to tip of green 2x4. Attach 6pt hubs plates to tips of green 2x4s Step 4a. Set aside: x5 -- blue tip 2x4sb.
4 Attach 2x4s to plates where the 6pt plate segment is blue to bridge across the tops of the triangles. Step 5a. Set aside: x10 -- green tip 2x4sb. Attach 2x4s to plates where the 6pt plate segment is green to bridge across the tops of the triangles. Step 6a. Set aside:x10 -- blue tip 2x4s, x10 -6pt cups, x10 --6pt platesb. Attach 2x4s to plates where the 6pt plate segment is blue. Attach cups to tops of blue tips and attach 6 pt plates. Step 7a. Set aside:x10 -- red tip 2x4s, x5 -5pt cups, x5 --5pt platesb. Attach 2x4s to plates where the 6pt plate segment is red. Attach cups to tops of red tips and attach 5 pt plates. Step 8a. Set aside:x10 -- green tip 2x4s, b. Attach 2x4s to plates where the 6pt plate segment is green. Step 9 Set aside: x10 -- red tip 2x4s, Attach 2x4s to plates where the 6pt plates are red. Step 10 Set aside: x5 -- blue tip 2x4s, Attach 2x4s to plates where the 6pt plates are blue.
5 Step 11 Set aside: x5 -- red tip 2x4s -- Attach 2x4s to plates where the 5pt plates are red. Attach x5 --6pt cups to red tip 2x4s. Step 12 Set aside: x10 -- blue tip 2x4s -- Attach 2x4s to plates where the 6pt plates are blue. Step 13 Set aside: x10 -- green tip 2x4s -- Attach 2x4s to plates where the 6pt plates are green. Attach x5 -- 6pt cups -- attach cups to edge of green 2x4s. Step 14 Set aside: x10 -- green tip 2x4s -- Attach 2x4s to plates where the 6pt plates are green. Step 15 Set aside: x5 -- blue tip 2x4s -- Attach 2x4s to plates where the 6pt plates are blue. Attach x5 -- 6pt cups -- attach cups to edge of blue 2x4s. Step 16 Set aside: x10 -- green tip 2x4s -- Attach 2x4s to plates where the 6pt plates are green. Step 17 Set aside: x5 -- blue tip 2x4s -- Attach 2x4s to plates where the 6pt plates are blue. Step 18 Set aside: x5 -- red tip 2x4s -- Attach 2x4s to plates where the 6pt plates are red.
6 Attach x1 -- 5pt cups -- attach cup to an edge of a red 2x4s. Attach 5 pt plate to all red 19 Secure all hubs with tension by adding adding screws into edges of all remaining 2x4s through cups. Each cup should currently only be attached to one 2x4. So now attach the remaining 2x4s edges to center cups. Cups will stretch or bend. If gap is too big you canre-attach the 2x4 to the base plate so the 2x4 edge is flush against cup. 4 ft8 ftCCBCCBCCB4 ftAABAAB1/2 B1/2 BAABP anel cover triangle side lengths are:A= cut lengths are:a'=38 '=44 '=45 dome Radius =116 in. then ..x30 AB triangles required4 triangles per 4x8ft sheet so 8 to 10 sheets requiredfor AB trianglesheight AB triangle= AB triangle= BC triangles required4 triangles per 4x8ft sheet so 19 to 25 sheets requiredfor BC trianglesheight of BC triangle= of BC triangle= to x35 sheets required for coverSuggested Instructions for 5/8ths dome Cover Using Rigid 4x8 ft Sheets1/2 B1/2 B Panel cover triangle side lengths are:A= cut lengths are:a'=38 '=44 '=45 dome Radius =116 in.
7 Then ..Draw circles on sheeting to be cutout using string measure as radius with center point tack nail and pen on the other pentagon circle cutouts 40 inch radiusx10 hexagon circle cutouts47 inch radiusx5 half hexagon cutouts47 inch radius .. half Suggested Instructions for 5/8ths dome Cover Using Thin Plastic or Canvas/Cloth SheetingBBradius=40 in.