Transcription of 32343180-001 - DC515XX Portable and Plug-In Wireless …
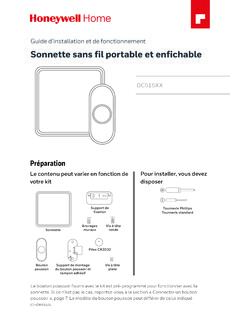
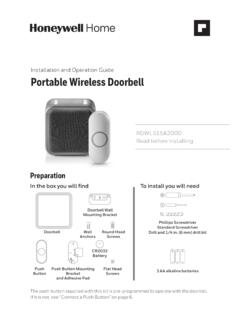
1 installation and Operation guide Portable and Plug-In Wireless doorbell DC515XX . English Spanish German Portuguese French Italian Dutch Preparation Content will vary according to your kit To install you will need Mounting Bracket Phillips Screwdriver Standard Screwdriver Wall Round Head doorbell Anchors Screws CR2032 Battery Push Push Button Mounting Flat Head Button Bracket Screws and Adhesive Pad The push button supplied with this kit is pre-programmed to operate with the doorbell . If it is not, see Connect a Push Button on page 7. Push button model may vary from the one shown above. Overview Just follow these simple steps: 1. Install the push button battery. Depending on the model, plug in the doorbell or install the batteries in it. 2. Set up the doorbell and your preferences. 3. Install the push button. doorbell for indoor use only. Do not expose to liquid, vapour or rain.
2 Power-up 1. Choose an outlet location that is not near a heat source, where the doorbell will be easy to see and hear and power it. +. 2. Open the push button battery cover and install the CR2032 battery. Setup and Operation Press the push button to test whether it is paired with the doorbell . The doorbell will light up and ring. If it does not, see Connect a Push Button on page 7. Change the Light Pattern Press the Sunlight button to change the lights that flash when the doorbell rings. Press the Sunlight button 1 time 2 times 3 times 4 times Halo light and Halo light only Top lights only No lights top lights 2. Change the Tune Press the Music button to change the doorbell tune. Every time you press the Music button, the tune will change. Stop pressing the Music button when you hear the tune you want. If you have multiple push buttons paired with the chime, you can select the melody for the last push button that was triggered.
3 Press the push button. (For any new push button, ensure that it is paired first. Refer to Connect a Push Button on Ding Dong page 7.) Westminster Piano Within 12 seconds, press the melody selection button Fantasy until the desired tune is selected. Soft Alert Smart Sax Change the Halo Light Colour Press the push button. Every time you press the Sunlight button, the halo light will change Within 12 seconds, press the Sunlight colour. Stop pressing the Sunlight button. button when you see the colour you want: Light Blue Green White Purple Red Yellow Dark Blue Adjust the Volume Mute the doorbell Press the Volume Press the Up or Volume Mute button Down buttons to to silence the adjust the volume doorbell . of the doorbell . 3. Set the Mute You can also mute the doorbell for specific amounts of time. Press the Mute button. Mute button shows doorbell is mute Mute button shows doorbell is mute 1 time doorbell is mute 4 times 9 hours 2 times 3 hours 5 times 12 hours 3 times 6 hours 6 times no longer mute It is also easier to unmute the doorbell by pressing and holding the mute button until it beeps.
4 Install Push Button 1. Mount the push button bracket in the desired location. Use the screws. OR . Use the adhesive backing. If using the adhesive backing, OR . clean the surface first. 2. Snap the push button onto the mounting bracket. Note: If you need to remove the push button, use a small screwdriver to release the tab. 4. Wall Mount installation ( Portable Models Only). Choose a location that is not near a heat source or on something that moves (like a door). For non-mounting locations, choose a place where the doorbell will be easy to see and hear. Install doorbell If you are not mounting the doorbell to the wall, place the doorbell where you want it. 1. Screw the doorbell wall mounting 2. Hang the doorbell on bracket to the wall using the the mounting bracket. included screws and anchors (if necessary). Drill 1/4-inch holes for the anchors. For DC515XX . models 5. Accessories You can connect up to 4 accessories to your doorbell , including other push buttons, window or door opening sensors, and motion sensors.
5 If you try to connect more accessories than the maximum number, the doorbell will sound two beeps. Connect a Motion Sensor 1. Press and hold the Setting button on the doorbell for three seconds. The halo light will circle. 2. Within 20 seconds of pressing the Setting button, wave or make some other kind of motion in front of the motion sensor. Before linking your outdoor motion sensor, you will need to adjust its settings: Turn the Dusk control and Time control fully anti-clockwise to its minimum setting. Ensure your sensor is in Day Mode. This will be shown by the slider button being in the left position (Sun symbol). 6. Connect a Push Button Follow these steps to change the ring and halo light colour for an existing doorbell , too. 1. Press and hold the Setting button on the doorbell for three seconds. The halo light will circle. 2. Press the push button. 3. Within 12 seconds of pressing the push button, press the Music button to select the ring for that push button.
6 4. Within 12 seconds of pressing the doorbell , press the Sunlight button to select a halo light colour for that push button. Night-Light (optional - Plug-In Models Only). Your doorbell can also be used as a night-light. 1. Plug the doorbell into a wall outlet. 2. Press and hold the Night-light button to select the halo colour. Plug socket shown above for reference 3. Release the Night-light button when you see the will vary by country/. colour you want. region Secret Knock For each push button, you can set up a Secret Knock that has a different ring and halo light colour. The Secret Knock is triggered by pressing the push button quickly 3 times. 1. Press the push button 3 times quickly. 2. Within 12 seconds of pressing the push button, press the Music button to select the ring for the Secret Knock. 3. Within 12 seconds of pressing the push button, press the Sunlight button to select a halo light colour for the Secret Knock.
7 7. Maintenance Your doorbell and push button require no maintenance except to periodically change the battery. If using the correct battery, its life should be approximately: Up to 2 years for the push button; replace with CR2032 lithium battery Low Battery Notification When the push button batteries are low, two beep sounds are heard after the normal tune. When the batteries are low on the Portable doorbells (battery models), the bottom edge of the halo light flashes yellow every 6 seconds until the batteries are replaced. Reset This process removes all pairings, including the push button that came with this doorbell : 1. Unplug the doorbell or remove the batteries from the Portable model. 2. Press and hold the Setting button and plug the doorbell back in at the same time. 3. The halo light will circle and the doorbell is returned to its default factory settings. 8. Specifications doorbell Push Button Operating Temperature -5 C to 40 C -20 C to 50 C.
8 Honeywell Home ActivLink 868 MHz 868 MHz Range (open field) 150 m 150 m Sound Level (typical) 84 dB - 3 x LR6(AA) - battery Battery Type CR2032. models only Up to 2 years - battery models Battery Life (5 activations/day) Up to 2 years only Rain proof N/A IP55. Troubleshooting If Then 1. Press the Mute button until all of the Mute lights are off. 2. Ensure the correct batteries are installed in both the push and doorbell with the correct polarity. 3. The doorbell might be out of range; try the doorbell in a different location. The doorbell does not work 4. Reconnect the doorbell . See Connect a Push Button on page 7. 5. Check all the batteries and replace if needed. 6. Check if the confidence LED on the transmitters is working when activated. 7. Check if the doorbell is muted. 8. Check that the transmitter is linked with the chime.*. Two beep' sounds are Replace push button battery with a new CR2032.
9 Heard after the normal tune 1. Metal structures including uPVC door frames can reduce the range. Don't mount the doorbell or push button on or near metal structures. Range is reduced 2. Move the doorbell closer to the push button. 3. Weak batteries will reduce range. In cold conditions (below 5 C), the batteries may need to be replaced more often. *Under these scenarios the push button is considered the transmitter . Other examples of transmitters are the Wireless motion (PIR) sensor or Wireless door window sensor. 9. 2019 Resideo Technologies, Inc. All rights reserved. The Honeywell Home trademark is used under license from Honeywell International Inc. 32343180-001