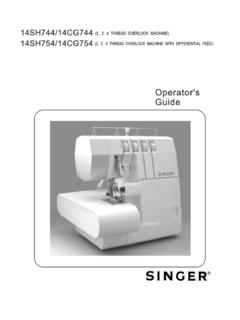
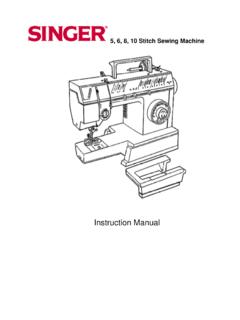
Transcription of 5, 8, 10, 16 & 22 P A TTERN SEWING MACHINES
1 5, 8, 10, 16 & 22 PATTERN SEWING MACHINES . Instruction Manual TABLE OF CONTENTS. Important Safeguards 4. Special Stitches Preparation 1. Getting to Know Your machine Patterns capability and graphics illustration Principal Parts Zig-Zag Stitch Accessories Zig-Zag Blindstitch Multi Stitch Zig-Zag 2. Getting Ready to Sew " M " Stitch/Sandcastle Stitch Connecting the machine /Running the machine Crescent Stitch/Chinese/Dynasty Stitch/Solid Choosing and Changing Needles Scallop Stitch Free Arm SEWING Arrow Stitch/Bunting Stitch/Privet Stitch Changing Presser Foot Wizard Stitch/Random Ric-Rac Stitch Replacing Presser Foot with Shank Stretch Overedge Stitch Attaching Feed Cover Ric-Rac/Straight Stretch Stitch Winding a Bobbin Road Runner/Fagoting Stitch Threading the machine Honeycomb Stitch Inserting a Wound Bobbin Slant Overedge Stitch/Seagull Stitch Raising Bobbin Thread
2 Selecting a Pattern 5. Four Step Buttonholing 3. Straight Stitching 6. Caring for Your machine Preparation Removing and Replacing Bobbin Case SEWING a Seam Removing and Replacing Light Bulb Free Motion Embroidery Cleaning the machine Inserting a Zipper Performance Checklist Additional Accessories Fabric, Thread and Needle Table CONGRATULATIONS Dear Customer: You are about to begin an adventure in creativity: You We recommend that for future reference you record are going to sew! And, you are going to sew with one the Serial Number of your SEWING machine in the of the easiest to use MACHINES ever made.
3 Space provided. The following features have been included on your Refer to illustration below for location of Serial Number machine , promising rewarding hours of uncomplicated on your machine . SEWING pleasure: Clearly defined thread path, reducing the possibility of threading errors. Built in buttonholer for fast, easy buttonholes. Serial No. Slant needle designed do allow you to sit, see & sew better. Model No. _____. One-step pattern selection, eliminating complicated Serial No. _____. selection operation. To ensure that you are always provided with the most In addition, this machine features a removable bed modern SEWING capabilities, the manufacturer reserves extension, permitting both flat and free-arm SEWING ; the right to change the appearance, design or acces- snap-on presser feet that are quickly removed and sories of this SEWING machine when considered neces- easily replaced; and a one-way needle-clamp that sary.
4 Makes it impossible to put the needle in backwards. *A Trademark of The Singer Company Take some time to acquaint yourself with this owner's manual and your machine . Whether you are a novice or an experienced sewer, you will discover how easy it is to create something uniquely your own! 3. IMPORTANT SAFETY INSTRUCTIONS Always unplug the machine from the electrical outlet when removing covers, lubricating, or when making When using this machine , basic safety precautions any other user servicing adjustments mentioned in should always be followed including the following: the Operator's Guide.
5 Read all instructions before using this machine . Do not attempt to adjust the motor belt. Contact your DANGER nearest Service Center should any adjustment be required. To reduce the risk of electric shock: Do not unplug by pulling on cord. To unplug, grasp The machine should never be left unattended when the plug, not the cord. plugged in. Always unplug the machine from the elec- tric outlet immediately after using and before clean- Handle the foot controller with care and avoid drop- ing. ping it on the floor. Be sure not to place anything on top of it. Always unplug before changing light bulb.
6 Replace bulb with the same type rated 15 watts. Be sure to Always use the proper needle plate. The wrong plate replace the face plate which covers the light bulb can cause the needle to break. before operating the machine . Do not use bent needles. WARNING When SEWING , keep fingers away from all moving parts. Special care is required around the SEWING To reduce the risk of burns, fire, electric shock or injury machine needle. to persons: Do not pull or push fabric while stitching. This may Be sure that the electrical voltage of the socket outlet deflect the needle causing it to break.
7 (wall receptacle) is the same as the rated voltage of the motor. Before removing the bobbin case, remove plug from the socket outlet. Use this machine only for its intended use as described in this Operator's Guide. Use only attach- For double insulated MACHINES , when servicing, use ments recommended by the manufacturer as con- only identical Singer replacement parts. See instruc- tained in the Operator's Guide. tions for Servicing of Double-lnsulated Appliances. To disconnect, turn all controls to the off ("0") posi- Never operate the machine if it has a damaged cord tion, then remove plug from outlet.
8 Or plug, if it is not working properly, if it has been dropped or damaged, or dropped into water. Return Disconnect the power-line plug from the socket outlet the machine to the nearest authorized dealer or or switch the machine off when making any adjust- Service Center for examination, repair, electrical, or ments in the needle area, such as threading needle, mechanical adjustment. changing needle, changing needle plate or changing presser foot, etc. 4. Safety Instructions SAVE THESE INSTRUCTIONS. Never operate the machine with any air openings Servicing should be performed by an authorized ser- blocked.
9 Keep ventilation openings of the machine vice representative. and foot controller free from the accumulation of lint, dust, and loose cloth. This product is intended for household use. Never drop or insert any object into any opening. FOR EUROPEAN AND SIMILAR TERRITORIES: Do not use outdoors. This product is suppressed for radio and television interference with the International Electrotechnical Do not operate where aerosol (spray) products are Commission requirements of the CISPR. being used or where oxygen is being administered. MACHINES for Great Britain and some other countries Do not allow to be used as a toy.
10 Close attention is having similar wiring standards are shipped from the necessary when the machine is used by or near chil- factory with a plug for connection to the mains. The dren. wires in this mains lead are coloured in accordance with the following code: SERVICING OF DOUBLE-INSULATED PRODUCTS. In a double-insulated product, two systems of insula- Blue: neutral (N) Brown: live ( L). tion are provided instead of grounding. No grounding means is provided on a double-insulated product, nor As the colours of the wires in the mains lead of this should a means for grounding be added to the prod- appliance may not correspond with the coloured mark- uct.