Transcription of 80-96 F150 4 -6 LIFT KIT INSTRUCTIONS - Amazon S3
1 92751000. 80-96 F150 4 -6 LIFT KIT INSTRUCTIONS . Rough Country recommends this system be installed by a certified technician. In addition to these INSTRUCTIONS , profes- sional knowledge of disassemble/reassembly procedures as well as post installation checks must be known. Attempts to install this system without this knowledge and expertise may jeopardize the integrity and/or operating safety of the vehi- cle. Please read INSTRUCTIONS before beginning installation. Check the kit hardware against the parts list and kit content on the back page of these INSTRUCTIONS . Be sure you have all needed parts and know where they go.
2 With the installation of all lift kits and larger tires it is important to check the condition of your steering stabilizer. If the stabilizer is worn or leaking it should be replaced. Steering stabilizers are designed to restrain bump steering and front end vibration, giving added life to tires, ball joints, and other steering components. A multiple stabilizer kit is recom- mended for vehicles equipped with a snow plow, winch, or larger tires PRODUCT USE INFORMATION. As a general rule, the taller a vehicle is, the easier it will roll. Offset, as much as possible, what is lost in rollover resis- tance by increasing tire track width.
3 In other words, go "wide" as you go "tall." Many sportsmen remove their mud tires after hunting season and install ones more appropriate for street driving; always use as wide a tire and wheel combina- tion as possible to enhance vehicle stability. We strongly recommend, because of rollover possibility, that the vehicle be equipped with a functional roll-bar and cage system. Seat belts and shoulder harnesses should be worn at all times. Avoid situations where a side rollover may occur Generally, braking performance and capability are decreased when significantly larger/heavier tires and wheels are used. Take this into consideration while driving.
4 Do not add, alter, or fabricate any factory or after-market parts to increase vehicle height over the intended height of the Rough Country product purchased. Mixing component brands is not recommended. Rough Country makes no claims regarding lifting devices and excludes any and all implied claims. We will not be re- sponsible for any product that is altered. Most states have some type of law limiting vehicle height. The amount of lift allowed, and how the lift may be achieved, varies greatly. It is the owner's responsibility to check state and local laws to ensure that their vehicle will be in compliance.
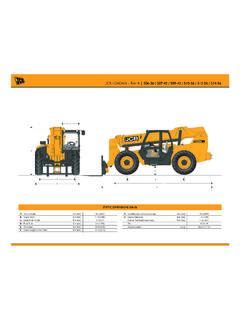
5 The installation time for this system is approximately 8 hours. This suspension system was developed using a 33x 15 tire, on an 8 wheel with a 3 5/8 backspacing. Before installing other combinations, please consult your local tire and wheel specialist. The following tools and supplies are recommended for proper installation of this kit Tools Needed Spring Compressor 21mm Wrench 22mm Socket 21mm Socket 19mm Socket 22mm Wrench 34mm Socket 1 1/8 Wrench 19mm Wrench 13mm Socket 12mm Socket Pitman Arm Puller 16mm Socket 14mm Wrench 7/16 Drill Bit If questions exist we will be happy to answer any questions concerning the design, function, and correct use of our prod- ucts.
6 NOTICE TO DEALER AND VEHICLE OWNER. Any vehicle equipped with any Rough Country product should have a Warning to Driver decal installed on the inside of the windshield or on the vehicle's dash. The decal should act as a constant reminder for whoever is operating the vehi- cle of its unique handling characteristics. INSTALLING DEALER - it is your responsibility to install the warning decal and forward these installation INSTRUCTIONS on INSTALLATION INSTRUCTIONS . 1. Place the vehicle on a level surface. Set the parking brake. Center front wheels and chock rear wheels. Place a floor jack under the outer ends of both axle halves and evenly raise vehicle approximately 12".
7 Place jack stands under frame rails approximately 4" behind radius arm brackets. Ease vehicle down onto stands. Continue down with jacks until there is only a slight load on the coil springs. 2. If vehicle is equipped with anti-sway bar, disconnect drop-links at the attaching points. Bar relocation is performed in a later step and with separate INSTRUCTIONS in kit #1018. (6 lifts must have a sway bar drop down bracket kit.). 3. Remove front tires and wheels. 4. Using a 14 mm wrench remove the nut from the top of the factory shock. Using a 19mm socket and wrench If longer brake hoses are being used, disconnect the stock rubber hoses where they connect to the metal lines at the frame rails.
8 A piece of rubber tubing routed from the metal lines to a catch pan will eliminate a fluid mess. New hoses are installed in a later step. If the stock rubber units are retained, they must be in good condition; check for chafed spots, cracks and dry rot. 5. Using a 13mm wrench remove the coil clip from the top of the coil seat. Retain clip and hardware for later use. See Photo 1. 6. Using a 1 1/8 wrench remove the nut on the lower coil seat. See Photo 2. Retain nut for later use. Photo 1 Photo 2. Remove Upper Coil Clip Remove Nut on Lower Coil Seat 7. Install a coil spring compressor on the coil and compress enough to remove the coil spring.
9 8. Using a 1 1/8 wrench remove the nut from the end of the radius arm and remove stock bushings. Retain the hard- ware for later use. 9. Some Ford trucks come from the factory with the radius arms, and I-beam brackets riveted on. If your truck has riv- ets you can use an air hammer, or torch to remove the rivets. If a torch is used to remove the rivets, take care not to damage any wiring/hoses routed inside the frame rails. Supporting I beam, remove the radius arm drop brackets from the vehicle, and discard. 10. Remove both axle eye pivot bolts. Detach the pivot bracket for the driver's side axle cross member.
10 11. Loosely attach the axle pivot bracket for the driver's side axle using the supplied mounting hardware. Bolt up to the 4. existing holes before tightening. See Photo a 16mm socket and a 17mm wrench torque to 60-75 ft. lbs. Attach the side support bracket with the supplied 7/16 bolts and hardware so it firmly against frame flange. Drill two 7/16 holes at existing holes in bracket, through the cross member lip. Install furnished 7/16 bolts, and locking nuts, flat washers are not required. See Photo 4. Reinstall stock axle bolt through appropriate hole, 4 top hole, 6 bottom hole. Torque bolts to 60-75ft.