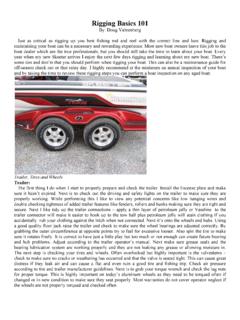
Transcription of A RIGGING GUIDE FOR A BOAT SO EASY TO ... - West Coast …
1 A RIGGING GUIDE FOR A boat SO EASY TO RIG, IT BARELY NEEDS 12/5/07 12:20 PM Page 1 GudgeonTravelerDaggerboard WellAutomatic BailerCockpitHiking StrapDrain PlugCoamingBullseye FairleadMast StepHorn CleatBow HandleSternCongratulations on the purchase of your new Sunfish!We suggest that you read through thisguide to better familiarize yourself with the parts and RIGGING of your new boat . If you have anyquestions please contact your dealer or call Vanguard s customer service at BoomMainsheetHalyardRudderLower BoomMastBowParts of the Hull:1 Vang 12/5/07 12:21 PM Page 2 Useful knots toknow:Figure 8 Knot orStopper KnotSquare KnotBowlineCleatClove HitchNautical Terminology:Port: Left side of the boat when looking forwardStarboard: Right side of the boat when looking forwardGunwale: Upper edge of a boat s sideLeeward: Direction away from the windWindward: Direction from which the wind is comingS HookInterlocking Eye BoltsMast CapSailGooseneckCorner TiesSail RingsGrommetMainsheetMastHead of theSailParts of the Sail:Clew ofthe SailTack ofthe SailLeechLuff1 Vang 12/5/07 12:21 PM Page 3 The Sunfish is available in two models; Standard and Pro.
2 The Pro model comes with equipmentmost commonly used for Daggerboard, plastic2. Tiller with extension (33 ) 3. Colored sail4. Rudder, wood5. Line bag 6. Sail rings 7. Mainsheet ratchet block8. Bailer parts, Brummel hooks (2), Snap shackle1. Daggerboard, plastic2. Tiller with extension (36 ) 3. White race sail4. Wind indicator5. Rudder, FRP6. Line bag 7. Harken mainsheet ratchet block and compression spring8. Bailer parts, Brummel hooks (2), Snap shackleStandard Sunfish Delivery Kit:Pro Sunfish Delivery Kit:Figure 1 Figure 2 First: Locate your delivery kit. Depending on which model you have purchased (Pro or Standard) there will be a few differences in some of thehardware. Using Figure 1 or 2, identify the contents of your kit. To avoid damaging the contents, be sure not to cut into the packagingnside the S hook2. Brummel hook (2)3. Snap shackle4. Bailer o-ring5. Bailer cap6. Bailer plug7. Bailer housingContents of item # 12/5/07 12:21 PM Page 4 Here is a list of toolsthat we recommendedyou have to assist youin assembling yournew Sunfish: Sunfish Mast Kit:Locate the mast, upper and lower boom.
3 The upper and lower boom will be connected at one end withtwo interlocking eye bolts (Figure 3). The gooseneck (Figure 4) will come assembled on the lowerboom. Depending on the model that you purchased the gooseneck bolt may differ in appearance. Onthe Sunfish Pro model the gooseneck comes equipped with a quick adjust lever (Figure 5). This levercan easily be released in order to adjust the positioning of the gooseneck on the lower boom. Alsolocated on the Sunfish Pro lower boom are two outhaul clam cleats (Figure 6). Be sure to remove any bubble wrap and plastic coating before Mast Kit Standard:Sunfish Mast Kit Pro:Figure: 4 Figure: 5 Figure: 3 Pro Mast and Boom SetFigure: 6 Standard Mast and Boom SetInterlocking eye boltsCleatsElectrical TapeScrew DriversWrenchesUtility KnifePliers1 Vang 12/5/07 12:21 PM Page 51. Locate the bailer o-ring (a), cap (b), plug(c) and housing (d) from the delivery kit(Figure 7). 2. Fit the bailer cap into the hole of the plugso that the plug stopper faces upward(Figure 8).
4 Fold the rubber plug over the capto close (Figure 9).3. Locate the bailer housing and o-ring(Figure 10). Place the o-ring over the neck ofthe bailer and push it down completely(Figure 11).4. Locate the bailer opening in the cockpit(Figure 12). Take the bailer housing witho-ring and place it under the hull, sliding itup through the cockpit. Make sure that theball in the housing is facing towards the sternof the boat (Figure 13). 5. While holding the housing in place, threadthe bailer cap through the cockpit hole andinto the bailer housing. Tighten the bailer sothat it is hand tight. 6. When open, the stopper of the bailer plugshould lie on the cockpit floor pointingtowards the bow (Figure 14). Bailer Installation:Reminder: The bailer lets water out of thecockpit while you are sailing. Insert the bailerplug in the cap before launching and duringsailing (Figure 15). If the cockpit begins tocollect water open the bailer to release thewater.
5 Note: the boat needs to be movingquickly in order to allow the water to releaseand not take on more water at the same : The bailer will not sit flush to thebottom of the Eduardo Cordero, 8 timeSunfish World born, Eduardo moved toVenezuela in 1982 and is now aresident of the US. With over15 years of coachingexperience; working at worldrenowned sailing schools,Eduardo is helping to contributehis knowledge back to thesport. Thank you to Eduardo forgraciously contributingtechnical knowledge in helpingwith this RIGGING GUIDE . To findout more about Eduardo and hisinvolvement in the sailingcommunity or Fiction:The Sunfish logo was created byCortland Heyniger by tracing anickel and adding fins and atail? submit your answer to theSunfish Fact or Fiction question and register to beentered into a raffle drawing! Figure: 8 Figure: 7 Figure: 9 Figure: 10 Figure: 11 Figure: 12 Figure: 13 Figure: 14 Figure: 15 Bailer BallPlugBailer HousingO RingCapABDCB ailer OpeningBalltowardsthe sternSpacebetweenhull andbailer1 Vang 12/5/07 12:21 PM Page 6 Ratchet Block Installation:Depending on which model Sunfish you have purchased the ratchet block will bedifferent in appearance.
6 Follow the instructions below for your model Sunfish. Findthe mainsheet eyestrap located on the deck forward of the cockpit, aft of thedaggerboard well (Figure 16). This is where you will attach the mainsheet ratchetblock. 1. In the delivery kit locate the ratchet block (Figure 17), shackle, pin and ring(Figure 18). 2. Loop the shackle through the eyestrap and align the hole in the shackle with thehole in the bottom of the mainsheet block. Insert the pin and secure withthe ring (Figure 19).Ratchet Block Installation Pro:Ratchet Block Installation Standard:1. In the delivery kit locate the ratchet block (Figure 20), compression spring(Figure 21), shackle, pin and ring (Figure 22). 2. Take the shackle and loop it through the eyestrap. Place the compression springover the eyestrap (Figure 21). 3. While compressing the spring, place the mainsheet ratchet block at the top of the spring and align the hole in the bottom of the block withthe holes in the Secure the Ratchet block to the shackle using the pin and ring(Figure 23).
7 Tip: To assist in keeping the spring compressed while attaching the block to theshackle, try compressing the spring and tie with string (Figure 24). Place the tiedspring over the eyestrap and attach the block. Then untie the string and release : 16 Figure: 19 Figure: 21 Figure: 17 Figure: 18 Figure: 20 Figure: 23 Figure: 24 Figure: 22 EyestrapDaggerboard WellTip: After RIGGING the mainsheet block some racers prefer to raise the height of thehiking strap in order to more easily get their feet under after a tack. Using a smallpiece of line or shockcord, thread one end through the forward loop of webbing in thehiking strap. Continue the line through the mainsheet block eyestrap (Figure 21). Besure to tie the line tightly in order to keep the strap in the lifted position. 1 Vang 12/5/07 12:21 PM Page 71. From the delivery kit locate the sail, upper and lowerbooms, S hook and package of sail rings. Remove the twoouthaul lines from the line Find a flat surface free of sharp objects that you canspread your sail out on.
8 3. Align the lower boom along the foot of the sail andthe upper boom along the luff (Figure 25). The Sunfishlogo should face the upper boom; the boom that does nothave any blocks The two booms are attached together by interlockingeye bolts. This corner of the sail is known as the the S hook and loop one end through theinterlocking eye bolt that is attached to the lower boom(Figure 26).5. Take the free end of the S hook and place it throughthe grommet in the tack of the sail. Using a pair ofpliers, crimp the S hook closed (Figure 27). 6. Attaching the outhaul lines: Starting at either thehead of the sail or the clew (one of the ends that is notyet attached to the booms) take one of the outhaul linesand tie a stopper knot in the end of it Feed the free endof the line through the boom cap (Figure 28). 7. Continue the line through the grommet in the sail(Figure 29) and then back down through the top the line through the grommet (Figure 30) andsecure with a couple half hitches (Figure 31).
9 Theouthaul line should be fairly Repeat the same procedures for the second Secure the remainder of the sail to the booms usingthe sail rings. Locate a grommet, place the sail ringaround the boom, insert the grommet between theopenings of the ring and press firmly to secure(Figures 32 and 33). Attaching the Sail to the Booms (Standard):Figure: 25 Upper BoomLower BoomFoot of the SailLuffFigure: 26 Figure: 27 Figure: 28 Figure: 29 Figure: 30 Figure: 31 Complete OuthaulFigure: 32 Figure: 33 TackHeadClewGrommetLeechTip: The tight of the sail rings is to ensure that the sailis securely connected to the booms. Thus pliers may beused in snapping the rings closed. However use cautionwhen using pliers, as they can easily scratch the 12/5/07 12:21 PM Page 8 Attaching the Sail to the Booms (Pro): RIGGING the Outhaul (Pro):4. The two booms are attached together by interlocking eye boltsTake the S hook and loop one end through the interlocking eye boltthat is attached to the lower boom (Figure 34).
10 5. Take the free end of the S hook and place it through the grommetin the tack of the sail. Using a pair of pliers, crimp the S hookclosed (Figure 35). 6. Starting at the tack of the sail, use two of the corner ties toattach the sail to the booms (Figure 36). Start by wrapping one tiearound the boom and through the grommet in the sail. The tieshould be wrapped around twice before being secured with a squareknot. Tie off the head and the clew of the sail with the remainingcorner : Make sure to set the tie at the head of the sail so that the sail sluff tension is as loose as you will want it while sailing. You willthen be able to adjust the luff tension with the cunningham Complete attaching the sail to the booms with the remaining sailties. For each grommet in the sail, tie one sail tie around the boomand through the grommet. Secure with a square knot (Figure 37).Figure: 34 Figure: 35 Figure: 36 Figure: 371. From the delivery kit locate the sail, upper and lower boom, S hook, and sail ties.