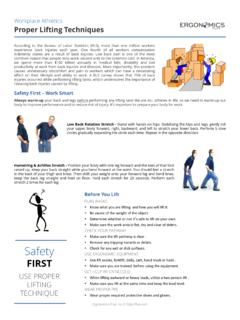
Transcription of A Step-by-Step Guide Rapid Upper Limb Assessment (RULA)
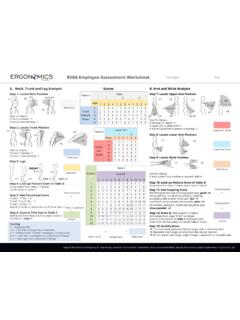
1 THINK PREVENTION. A Step-by-Step Guide Rapid Upper limb Assessment (RULA). Ergonomics Plus Inc. | | RULA: A Step-by-Step Guide Rapid Upper limb Assessment (RULA). RULA was developed to evaluate the exposure of individual workers to ergonomic risk factors associated with Upper extremity MSD. The RULA ergonomic Assessment tool considers biomechanical and postural load requirements of job tasks/demands on the neck, trunk and Upper extremities. A single page worksheet is used to evaluate required body posture, force, and repetition. Based on the evaluations, scores are entered for each body region in section A for the arm and wrist, and section B for the neck and trunk. After the data for each region is collected and scored, tables on the form are then used to compile the risk factor variables, generating a single score that represents the level of MSD risk. PAGE 2. | RULA: A Step-by-Step Guide The RULA was designed for easy use without need for an advanced degree in ergonomics or expensive equipment.
2 Using the RULA worksheet, the evaluator will assign a score for each of the following body regions: Upper arm, lower arm, wrist, neck, trunk, and legs. After the data for each region is collected and scored, tables on the form are then used to compile the risk factor variables, generating a single score that represents the level of MSD risk as outlined below: Getting Ready The evaluator should prepare for the Assessment by interviewing the worker being evaluated to gain an understanding of the job tasks and demands, and observing the worker's movements and postures during several work cycles. Selection of the postures to be evaluated should be based on: 1) the most difficult postures and work tasks (based on worker interview and initial observation), 2) the posture sustained for the longest period of time, or 3) the posture where the highest force loads occur. The RULA can be conducted quickly, so multiple positions and tasks within the work cycle can usually be evaluated without a significant time and effort.
3 When using RULA, only the right or left side is assessed at a time. After interviewing and observing the worker, the evaluator can determine if only one arm should be evaluated or if an Assessment is needed for both sides. PAGE 3. | RULA: A Step-by-Step Guide Using the RULA Example The RULA worksheet is divided into two body segment sections on the labeled A. and B. Section A (left side) covers the arm and wrist. Section B (right side) covers the neck, trunk and legs. This segmenting of the worksheet ensures that any awkward or constrained postures of the neck, trunk or legs which might influence the postures of the arms and wrist are included in the Assessment . The evaluator should score Group A (Arm & Wrist) postures first, then score Group B (Neck, Trunk & Legs) postures for left and right. For each region, there is a posture scoring scale and additional adjustments outlined on the worksheet which need to be considered and accounted for in the score.
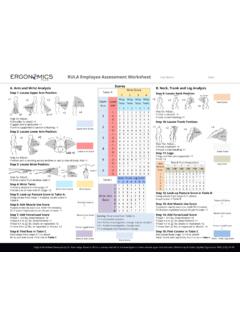
4 Steps 1-4: Right Arm & Wrist Analysis PAGE 4. | RULA: A Step-by-Step Guide Note: In step 1, a +3 score was used for Upper arm position (45+ degrees). For step 2, a +2 score was given for the lower arm position (<60 degrees). The step 3 wrist score was +3 for wrist flexion (>15 degrees), and +1 was added for ulnar deviation. The step 4 wrist score is +2 because the wrist is twisted near the end range. Each score should be circled on Table A. PAGE 5. | RULA: A Step-by-Step Guide Steps 5-8: Calculate the score for Group A as outlined below: Step 5: Using values from steps 1-4, locate the score for this step in table A. PAGE 6. | RULA: A Step-by-Step Guide Step 6: Add the muscle use score to this box. In this example, the posture is not sustained for more than 10 minutes, and not repeated 4x per minute. Therefore, the score is 0. Step 7: In this example, the load is greater than lbs. and repeated. Therefore, the score is +2. Step 8: Add the values in steps 5-7 to obtain the Wrist / Arm Score.
5 Steps 9-11: Neck, Trunk and Leg Analysis PAGE 7. | RULA: A Step-by-Step Guide Note: In step 9, a +3 score was used for the neck position (>20 degrees). The step 10 score is +1 due to a trunk position of 0-20 degrees. Each score should then be circled on Table B. PAGE 8. | RULA: A Step-by-Step Guide Steps 12-15: Calculate the total score for Group B as outlined below: PAGE 9. | RULA: A Step-by-Step Guide Step 12: Using values from steps 9-11, locate the score for this step in table B. Step 13: Add the muscle use score to this box. In this example, the posture is not sustained for more than 10 minutes, and not repeated 4x per minute. Therefore, the score is 0. Step 14: In this example, the load is greater than lbs. and repeated. Therefore, the score is +2. Step 15: Add the values in steps 12-14 to obtain the Neck, Trunk, & Leg Group B. Score. PAGE 10. | RULA: A Step-by-Step Guide Determine Final RULA Score: Use Table C to determine the final RULA score as shown below.
6 Final RULA Score = 7. In this example, the final RULA score of 7 indicates high risk and calls for engineering and/or work method changes to reduce or eliminate MSD risk as outlined in the chart on page 1. PAGE 11. | RULA: A Step-by-Step Guide Implemented ergonomic improvements: The assembly process was changed to install the access plate prior to riveting the can together. A fixture was fabricated to hold the can open while the access plate is being installed. A straight or in-line pneumatic screw driver (on a tool balancer) is now used to improve Upper extremity work postures and eliminate the force required. A follow-up analysis using the RULA worksheet was performed upon completion of this ergonomic process and tool improvement. When using the new work process and tools, the RULA total score is reduced from 7 to 1. PAGE 12. | RULA: A Step-by-Step Guide About Ergonomics Plus Since 1989, Ergonomics Plus consultants have been working with companies to reduce injury risk and improve productivity and efficiency.
7 Over two decades of experience has taught us that a proactive, prevention-focused process that is comprehensive and works to improve both the work and the worker gets the best results. In a comprehensive MSD prevention process: Ergonomic issues are systematically identified and resolved with cost-effective solutions. Employees are educated on proper lifting techniques, ergonomic principles, body mechanics and self-care tools and techniques. Costly injuries are averted with a proactive, prevention-focused approach (early intervention) that seeks out and eliminates worker fatigue and discomfort. Think Prevention! We call our process described above the E+ System, and it's the methodology we use for our clients. If you are interested in learning more about our proactive MSD prevention process, get in touch with us today: Phone: Email: CONTACT US. About the Author -- Mark Middlesworth, MS, ATC/L, CEES. Mark has been providing workplace injury prevention and ergonomics consulting services to industry since 1989.
8 He is the founder of Ergonomics Plus, author of Building Wellness from the Inside Out and a member of the National Speakers Association. PAGE 13.