Transcription of ACH550 BCR/BDR/VCR/VDR E-Clipse Bypass Drives …
1 ACH550 E-Clipse Bypass User s Manual2-1 ACH550 BCR/BDR/VCR/VDRE-Clipse Bypass HPUser s ManualACH550-EB_UM (3 AUA0000016461) Rev DENEFFECTIVE: 2010-04-01 SUPERSEDES: ACH550 -EB_UM (3 AUA0000016461) Rev C 2009-03-11 2010 ABB. All Rights E-Clipse Bypass User s Manual2-3 SafetySafetyUse of warnings and notesThere are two types of safety instructions throughout this manual: Notes draw attention to a particular condition or fact, or give information on a subject. Warnings caution you about conditions which can result in serious injury or death and/or damage to the equipment. They also tell you how to avoid the danger. The warning symbols are used as follows:Electricity warning warns of hazards from electricity which can cause physical injury and/or damage to the equipment. General warning warns about conditions, other than those caused by electricity, which can result in physical injury and/or damage to the ! The ACH550 adjustable speed AC drive should ONLY be installed by a qualified !
2 Even when the motor is stopped, dangerous voltage is present at the power circuit terminals U1, V1, W1 (L1, L2, L3) and U2, V2, W2 (T1, T2 T3) and, depending on the frame size, UDC+ and UDC-, or BRK+ and ! Dangerous voltage is present when input power is connected. After disconnecting the supply, wait at least 5 minutes (to let the intermediate circuit capacitors discharge) before removing the ! Even when power is switched off from the input terminals of the ACH550 , there may be dangerous voltage (from external sources) on the terminals of the relay ! When the control terminals of two or more Drives are connected in parallel, the auxiliary voltage for these control connections must be taken from a single source which can either be one of the Drives or an external supply. 2-4 ACH550 E-Clipse Bypass User s ManualSafetyWARNING! disconnect the internal EMC filter when installing the drive on an IT system (an ungrounded power system or a high-resistance-grounded [over 30 ohm] power system).
3 WARNING! Do not attempt to install or remove EM1, EM3, F1 or F2 screws while power is applied to the drive s input ! Do not control the motor with the disconnecting device (disconnecting means); instead, use the control panel keys or commands via the I/O board of the drive . The maximum allowed number of charging cycles of the DC capacitors ( power-ups by applying power) is five in ten ! Never attempt to repair a malfunctioning ACH550 ; contact the factory or your local Authorized Service Center for repair or ! The ACH550 will start up automatically after an input voltage interruption if the external run command is ! The heat sink may reach a high : For more technical information, contact the factory or your local ABB E-Clipse Bypass User s Manual2-5 Table of contentsSafetyUse of warnings and notes .. 2-3 Table of contentsInstallationApplication .. 2-7E-Clipse Bypass features and functions .. 2-7 Installation flow chart .. 2-9 Preparing for installation (supplement to ACH550 -UH User s Manual).
4 2-10 Installing the wiring (supplement to ACH550 -UH User s Manual) .. 2-11 Check E-Clipse Bypass jumpers and switches .. 2-28 Control panelBypass control panel features .. 2-29 Bypass control panel modes .. 2-31 Start-upStart-up .. 2-33 Bypass functions overviewOperating modes .. 2-37 Relay contact (digital) inputs .. 2-40 Relay contact outputs .. 2-42 Energy Savings Estimator .. 2-46 Application macrosE-Clipse HVAC Default macro .. 2-50 Damper macro .. 2-51 Retrofit macro .. 2-52 Smoke Control (Override1) macro .. 2-53 ParametersParameter list and descriptions .. 2-57 Table of contents2-6 ACH550 E-Clipse Bypass User s ManualTable of contentsEmbedded fieldbusOverview .. 2-77 Mechanical and electrical installation EFB .. 2-79 Communication setup EFB .. 2-81 Activate drive control functions EFB .. 2-88 Feedback from the drive EFB .. 2-93 Activate Bypass control functions EFB .. 2-96 Feedback from the ABB E-Clipse Bypass EFB.
5 2-99 Diagnostics EFB .. 2-100N2 protocol technical data system .. 2-105 FLN protocol technical data system .. 2-120 BACnet protocol technical data system .. 2-144 Modbus protocol technical data system .. 2-170 ABB control profiles technical data drive .. 2-178 Fieldbus adapterOverview .. 2-195 Mechanical and electrical installation FBA .. 2-198 Communication setup FBA .. 2-199 Activate drive control functions FBA .. 2-199 Feedback from the drive FBA .. 2-202 Activate Bypass control functions FBA .. 2-203 Feedback from the ABB E-Clipse Bypass FBA .. 2-205 Diagnostics FBA .. 2-206 ABB Drives profile technical data .. 2-208 Generic profile technical data .. 2-217 DiagnosticsDiagnostic displays .. 2-219 Correcting faults .. 2-220 Correcting alarms .. 2-227 Bypass status listing .. 2-232 Error messages .. 2-233 Technical dataInput power connections (supplement to ACH550 -UH User s Manual) .. 2-235 Motor connections (supplement to ACH550 -UH User s Manual).
6 2-243E-Clipse Bypass control unit connections (RBCU)(supplement to ACH550 -UH User s Manual) .. 2-244 Dimensions and weights (supplement to ACH550 -UH User s Manual) .. 2-245 Applicable standards .. 2-251 IndexACH550 E-Clipse Bypass User s Manual2-7 InstallationInstallationStudy these installation instructions carefully before proceeding. Failure to observe the warnings and instructions may cause a malfunction or personal ! Before you begin read Safety on page ! When the ACH550 with E-Clipse Bypass is connected to the line power, the Motor Terminals T1, T2, and T3 are live even if the motor is not running. Do not make any connections when the ACH550 with E-Clipse Bypass is connected to the line. disconnect and lock out power to the drive before servicing the drive . Failure to disconnect power may cause serious injury or manual is a supplement to the ACH550 -UH User s Manual and documents E-Clipse Bypass Bypass features and functionsThe ACH550 with E-Clipse Bypass is an ACH550 AC adjustable frequency drive in an integrated UL type 1, UL type 12 or UL type 3R package with a Bypass motor starter.
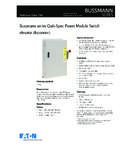
7 The ACH550 with E-Clipse Bypass provides: disconnect switch or circuit breaker with door mounted control lever. The lever can be padlocked in the OFF position (padlock not supplied). Bypass starter. Motor overload protection. Local operator panel with indicating lights and multifunction display. Provisions for external control connections. Embedded communications for major BMS protocols including BACnet, Johnson Controls International N2, Siemens Building Technologies FLN, and Modbus Optional fieldbus adapters for connection to additional BMS protocols including LonWorks and Ethernet Optional drive service switch ( drive input disconnect ), the functional equivalent of a three-contactor Bypass E-Clipse Bypass User s ManualInstallationThe following shows the front view of the ACH550 E-Clipse Bypass vertical configuration, and identifies the major following shows the front view of the ACH550 E-Clipse Bypass standard configurations, and identifies the major BypassE-Clipse Bypass Control PanelOperating Handle for disconnect Switch or Circuit BreakerACH-CP-B Control PanelACH550 DriveBP0092 ACH-CP-B E-Clipse BypassOperating Handle ACH550 drive with E-Clipse BypassControl Panelfor disconnect Switch or Circuit BreakerE-Clipse Bypass (R8)
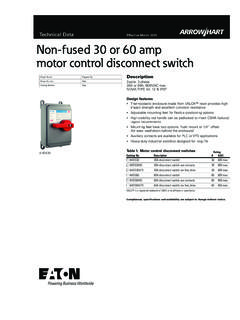
8 Control PanelACH550 E-Clipse Bypass User s Manual2-9 InstallationThe following is a typical power flow chartThe installation of E-Clipse Bypass Configurations for ACH550 Drives follows the outline below. The steps must be carried out in the order shown. At the right of each step are references to the detailed information needed for the correct installation of the in ACH550 -UH User s Manual Installation sectionReference in this Manual PREPARE for installationPreparing for installationDrive identification on page mounting location (supplement to ACH550 -UH User s Manual) on page 2-11 PREPARE the mounting locationPrepare the mounting location MOUNT the unitMount the drive REMOVE the covers from Vertical E-Clipse Bypass UnitRemove front cover INSTALL wiringWiring overview and Install the wiringInstalling the wiring (supplement to ACH550 -UH User s Manual) starting on page jumpers and switches Check E-Clipse Bypass jumpers and switches on page installationCheck installationInitial settings and checks on page the coversRe-install cover APPLY powerApply power START-UPStart-up Start-up on page with E-Clipse BypassMotor3 PhaseDrive33 disconnect Switchor Circuit BreakerService Switch(Optional)
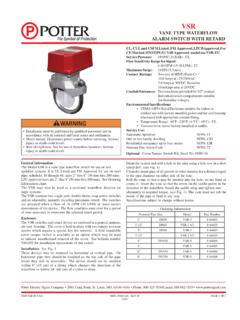
9 Input PowerBypassContactorBypassControlDrive OutputContactorDrive Input Fuse2-10 ACH550 E-Clipse Bypass User s ManualInstallationPreparing for installation (supplement to ACH550 -UH User s Manual) drive identificationDrive labelsTo determine the type of drive you are installing, refer to either: Serial number label attached on upper part of the chokeplate between the mounting holes. Type code label attached on the heat sink on the right side of the unit cover. Type codeUse the following chart to interpret the type code found on either S/N 2090501769S/N 2090501769 ACH550 BCR 316A-4 Input 3PH Hz Output 3PH HzVoltage(U1) Vac Voltage(U2) VacCurrent(I1n) 316 A Current(I2n) 316 AShort Circuit 100 kAPower(Pn) 250 Hp ABB in the USA of foreign parts MTR OL INCL: SEE MANUALMfg.
10 Date: 04-March-2009 Orig. drive Firmware: Orig. Bypass Firmware: Schematic: 3 AUA0000014954 ACH550 -BCR-316A-4+..+.. AC, HVAC drive 550 product series4 = VACBCR = E-Clipse Bypass with circuit breaker 2 = VACC onstructionVoltage ratingUH = Base driveEnclosure protection classNo specification = IP 21 / UL type 1 +B055 = IP 54 / UL type 12 BDR = E-Clipse Bypass with disconnect switch PCR = drive with circuit breaker PDR = drive with disconnect switch VCR = Vertical E-Clipse Bypass with circuit breaker VDR = Vertical E-Clipse Bypass with disconnect switchLine reactor+E213 = Line ReactorService Switch+F267 = Service switchFieldbus Adapters+K451 = DeviceNet Adapter+K452 = LonWorks Adapter+K454 = Profibus Adapter6 = VAC+B058 = IP 58 / UL type 3R +K466 = EtherNet AdapterOutput current rating (See Ratings for details on page 1-299) ACH550 E-Clipse Bypass User s Manual2-11 InstallationRatings and frame sizeThe chart in the Ratings section of the ACH550 -UH User s Manual on page 1-299 lists technical specifications, and identifies the drive s frame size significant, since some instructions in this document vary, depending on the drive s frame size.