Transcription of Alienware AW3821DW Monitor User's Guide
1 Alienware AW3821DW MonitorUser s GuideModel: AW3821 DWRegulatory model: AW3821 DWbNotes, cautions, and warningsNOTE: A NOTE indicates important information that helps you make better use of your : A CAUTION indicates potential damage to hardware or loss of data if instructions are not : A WARNING indicates a potential for property damage, personal injury, or death. 2020-2021 Dell Inc. or its subsidiaries. All rights reserved. Dell, EMC, and other trademarks are trademarks of Dell Inc. or its subsidiaries. Other trademarks may be trademarks of their respective - 03 Rev. A02|3 ContentsSafety instructions .. 6 About your Monitor .. 7 Package contents .. 7 Product features .. 9 Identifying parts and controls .. 10 Front view ..10 Top view .. 11 Back view .. 11 Rear and bottom view .. 13 Monitor specifications .. 16 Resolution specifications .. 17 Supported video modes ..18 Preset display modes.
2 18 Electrical specifications .. 20 Physical characteristics .. 21 Environmental characteristics .. 22 Pin assignments .. 23 Plug and Play capability .. 24 Universal Serial Bus (USB) interface .. 25 USB Gen1 (5 Gbps) upstream connector .. 25 USB Gen1 (5 Gbps) downstream connector .. 26 USB ports .. 26 LCD Monitor quality and pixel policy.. 27 Ergonomics.. 27 Handling and moving your display .. 29 Maintenance guidelines .. 30 Cleaning your Monitor .. 304|Setting up the Monitor .. 31 Attaching the stand .. 31 Connecting the computer .. 35 Removing the Monitor stand .. 36 VESA wall mounting (optional) .. 38 Operating the Monitor .. 39 Power on the Monitor .. 39 Using the joystick control .. 39 Using the rear-panel controls .. 40 Using the On-Screen display (OSD) menu .. 41 Accessing the menu system .. 41 OSD warning message .. 53 Setting the maximum resolution .. 54 Using the tilt, swivel, and vertical extension.
3 55 Tilt and swivel extensions ..55 Vertical extension ..55 Using AlienFX application.. 56 Prerequisites .. 56 Installing AWCC through Windows update .. 56 Installing AWCC from the Dell Support website .. 56 Navigating the AlienFX window .. 57 Creating a theme .. 59 Setting lighting effects .. 60 Troubleshooting .. 63 Self-test.. 63 Built-in diagnostics .. 64 Common problems.. 65 Product specific problems .. 68 Universal Serial Bus (USB) specific problems .. 70|5 Appendix .. 71 FCC notices ( only) and other regulatory information .. 71 Contact Dell .. 71EU product database for energy label and product information sheet .. 716|Safety instructionsSafety instructionsCAUTION: Use of controls, adjustments, or procedures other than those specified in this documentation may result in exposure to shock, electrical hazards, and/or mechanical hazards. Place the Monitor on a solid surface and handle it carefully.
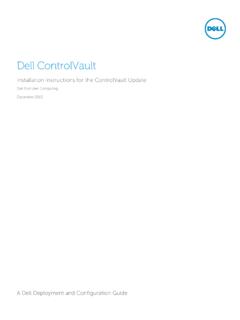
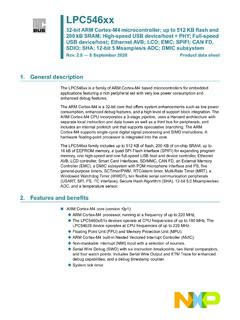
4 The screen is fragile and can be damaged if dropped or hit sharply. Always be sure that your Monitor is electrically rated to operate with the AC power available in your location. Keep the Monitor in room temperature. Excessive cold or hot conditions can have an adverse effect on the liquid crystal of the display . Do not subject the Monitor to severe vibration or high impact conditions. For example, do not place the Monitor inside a car trunk. Unplug the Monitor when it is going to be left unused for an extended period of time. To avoid electric shock, do not attempt to remove any cover or touch the inside of the Monitor . About your Monitor |7 About your monitorPackage contentsYour Monitor ships with the components shown below. If any component is missing, contact Dell technical support. For more information see Contact : Some components may be optional and may not ship with your Monitor .
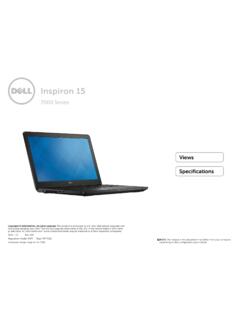
5 Some features or media may not be available in certain imageComponent descriptionDisplayStand riserStand baseI/O cover8|About your monitorPower cable (varies by country)DisplayPort to DisplayPort cable ( meters)Mini-DisplayPort to DisplayPort cable ( meters)HDMI cable ( meters)USB Gen1 (5 Gbps) upstream cable (enables the USB ports on the Monitor , meters) Quick Setup Guide Safety, Environmental, and Regulatory Information Alienware Welcome CardAbout your Monitor |9 Product featuresThe Alienware AW3821DW Monitor has an active matrix, thin - film transistor (TFT), liquid crystal display (LCD) and LED backlight. The Monitor features include: cm ( inch) viewable area (measured diagonally). Resolution: Up to 3840 x 1600 through DisplayPort and HDMI, with full-screen support or lower resolutions, supporting a high refresh rate of 144 Hz. NVIDIA G-SYNC ULTIMATE Monitor with a rapid response time of 1 ms gray to gray in Extreme mode*.
6 Color gamut of sRGB and DCI P3 95%. Tilt, swivel, and height adjustment capabilities. Removable stand and Video Electronics Standards Association (VESA ) 100 mm mounting holes for flexible mounting solutions. Digital connectivity via 1 DisplayPort and 2 HDMI ports. Equipped with 1 SuperSpeed USB 5 Gbps (USB Gen1) Type B upstream port, 1 SuperSpeed USB 5 Gbps (USB Gen1) Type-A downstream charging port, and 3 SuperSpeed USB 5 Gbps (USB Gen1) Type-A downstream ports. Plug and play capability if supported by your system. On-Screen display (OSD) adjustments for ease of setup and screen optimization. AW3821DW offers a couple of preset modes, including FPS (First-Person Shooter), MOBA/RTS (Real-Time Strategy), RPG (Role-Playing Game), SPORTS (Racing) and three customizable game modes for User's own preference. In addition, key enhanced gaming features such as Timer, Frame Rate, and display Alignment are provided to help improve gamer's performance and provide best-in game advantage.
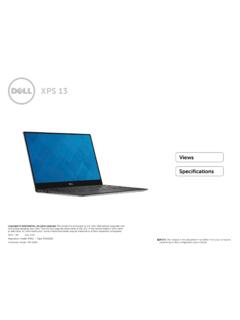
7 < W in Standby Mode. VESA DisplayHDR 600. Optimize eye comfort with a flicker-free : The possible long-term effects of blue light emission from the Monitor may cause damage to the eyes, including eye fatigue, digital eye strain, and so on. ComfortView feature is designed to reduce the amount of blue light emitted from the Monitor to optimize eye comfort.*The 1 ms gray-to-gray mode is achievable in the Extreme mode to reduce visible motion blur and increased image responsiveness. However, this may introduce some slight and noticeable visual artifacts into the image. As every system setup and every gamer's needs are different, Alienware recommends that 10 |About your monitorusers experiment with the different modes to find the setting that is right for parts and controlsFront viewLabelDescriptionUse1 Cable-management slot (on the front side of the stand)To organize the cables On/Off button (with LED indicator)To turn the Monitor on or off.
8 Solid blue light indicates that the Monitor is turned on and functioning normally. Blinking white light indicates that the Monitor is in Standby your Monitor |11 Top viewLabelDescriptionUse1 Ambient light sensorDetects ambient light and adjusts the brightness of the display accordingly. For more information, see Ambient Light viewBack view without Monitor standBack view with Monitor standLabelDescriptionUse1 JoystickUse it to control the OSD buttonsFor more information, see Operating the , serial number, and Service Tag labelRefer to this label if you need to contact Dell for technical support. The Service Tag is a unique alphanumeric identifier that enables Dell service technicians to identify the hardware components in your Monitor and access warranty information. 4 Cable-management clips (2)To organize the cables release buttonReleases the stand from the mounting holes (100 mm x 100 mm - behind VESA Cover)Wall mount Monitor using VESA-compatible wall mount kit (100 mm x 100 mm).
9 7 Regulatory labelLists the regulatory dock connectorWhen the stand riser is attached to the Monitor , the dock supplies power to the light on the slot (at the back of the stand)To organize cables by routing them through this coverProtects the I/O ports. 12 |About your monitorAbout your Monitor | 13 Rear and bottom viewRear and bottom view without Monitor standLabelDescriptionUse1 Power connectorConnect the power cable (shipped with your Monitor ).2 HDMI port (HDMI 1)Connect your computer with the HDMI cable (one HDMI cable is shipped with your Monitor ).3 HDMI port (HDMI 2)Connect your computer with the HDMI cable (one HDMI cable is shipped with your Monitor ).4 DisplayPort Connect your computer with DisplayPort-DisplayPort cable (shipped with your Monitor )or Connect your computer with mini-DisplayPort-DisplayPort cable (shipped with your Monitor )14 |About your monitor5 DownlightsWhen the Monitor set up is complete, tap the touch sensor at the bottom of the display to turn the downlights on or off.
10 NOTE: The factory setting is on, so the downlights are active if the power cable is connected. To change the default settings, see AlienFX : When the Spectrum function is On, the downlights are turned StateDownlights StatusWhen Spectrum is OffWhen Spectrum is OnOnEnabledDisabledNo SignalEnabledDisabledStandbyEnabledDisab led6 SuperSpeed USB 5 Gbps (USB Gen1) Type-A downstream port with Power ChargingConnect to charge your USB your Monitor | 15*To avoid signal interference, when a wireless USB device has been connected to a USB downstream port, it is not recommended to connect any other USB devices to the adjacent portConnect the headphone or : Increasing the audio output beyond 50% on the volume control or equalizer may increase the output voltage on the headphones thereby increasing the sound pressure , 10 SuperSpeed USB 5 Gbps (USB Gen1) Type-A downstream port (3)Connect your USB Gen1 (5 Gbps) device.