Transcription of ALL MODE MULTI-BAND TRANSCEIVER TS-2000 TS-2000X …
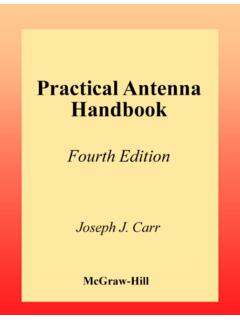
1 B62-1221-20 (K)09 08 07 06 05 04 03 02 ALL MODE MULTI-BAND TRANSCEIVERTS-2000TS-2000 XTS-B2000 INSTRUCTION MANUALKENWOOD CORPORATIONiTHANK YOUTHANK YOUT hank you for choosing this KENWOOD TS-2000 (X)/TS-B2000 TRANSCEIVER . It has been developed by ateam of engineers determined to continue thetradition of excellence and innovation in TRANSCEIVER features dual Digital SignalProcessing (DSP) units to process IF and AF taking maximum advantage of DSP technology,the TS-2000 (X)/ TS-B2000 gives you enhancedinterference reduction capabilities and improves thequality of audio that you transmit without installingadditional analog filters. You will notice thedifferences when you fight QRM and QRN. As youlearn how to use this TRANSCEIVER , you will also findthat KENWOOD is pursuing user friendliness . Forexample, each time you change the Menu No. inMenu mode, you will see scrolling messages on thedisplay that tell you what you are user friendly, this TRANSCEIVER is technicallysophisticated and some features may be new to this manual to be a personal tutorial fromthe designers.
2 Allow the manual to guide you throughthe learning process now, then act as a reference inthe coming All mode operation from HF to GHz ( TS-2000 /TS-B2000 Optional) amateur radio band with DSPfunctions. Dual high speed Digital Signal Processing (DSP)units. Adjustable DSP filter frequencies. High speed Digital Automatic Gain Control (AGC). A second independent sub-receiver for the 144 MHzand 430 (440) MHz bands (FM and AM mode only). A built-in Antenna Tuner for HF/ 50 MHz band . A built-in 9600/ 1200 bps TNC for DX PacketCluster Tune ( ) and Sky Command II+operations. DX Packet Cluster Tune ( ) for DX hunting. Instant Satellite communication key. A razor sharp DSP filter up to 50 Hz for ACCESSORIESA fter carefully unpacking the TRANSCEIVER , identify theitems listed in the table. We recommend you keepthe box and packing material below in case you needto repack the TRANSCEIVER in the (25 A)esuFXX-1352-50F11(4 A)esuFXX-7204-60F11teSwercSXX-4202-99N11 034-BMrofrecapSXX-8962-11G44retlifeniL1X X-8041-97L11dnaBgniniateR1XX-7030-16J11 MOR-DCXX-3210-39T 1launaMnoitcurtsnIXX-1221-26B11kcolB/cit amehcSsmargaiDXX-4160-25 BXX-6160-25 BXX-8160-25 BXX-7160-25B11dracytnarraWXX-9640-64B)ep yt-K(XX-0130-64B)sepyt-EllA(11 AccessoryPart NumberQuantityTS-2000TS-2000 XTS-B2000or1E and E2-type onlyWRITING CONVENTIONS FOLLOWEDThe writing conventions described below have beenfollowed to simplify instructions and avoidunnecessary ]YEK[]YEK[]YEK[]YEK[]YEK[.
3 ]2 YEK[+]1 YEK[]2 YEK[+]1 YEK[]2 YEK[+]1 YEK[]2 YEK[+]1 YEK[]2 YEK[+]1 YEK[.dlohdnasserP1 YEK1 YEK1 YEK1 YEK1 YEK, , ]1 YEK[]1 YEK[]1 YEK[]1 YEK[]1 YEK[,]2 YEK[]2 YEK[]2 YEK[]2 YEK[]2 YEK[.sserP1 YEK1 YEK1 YEK1 YEK1 YEK,yliratnemomesaeler1 YEK1 YEK1 YEK1 YEK1 YEKsserpneht, ][+]YEK[][+]YEK[][+]YEK[][+]YEK[][+]YEK[ .,FFOrewopreviecsnartehthtiWdlohdnasserp YEKYEKYEKYEKYEK hctiwsneht,ybrewopreviecsnartehtNOgnisse rp][][][][][.)REWOP(iiMODELS COVERED BY THIS MANUALThe models listed below are covered by this :HF/ VHF/ UHF All-mode multi -bandTransceiverTS-2000X:HF/ VHF/ UHF/ GHz All-modeMulti- band TransceiverTS-B2000:HF/ VHF/ UHF All-mode multi -bandTransceiverAs for TS-B2000, refer to the on-line help forinformation on how to operate and control thetransceiver. Refer to pages 2, 3, and 13 for theinstallation and information on the CODESK-type:The AmericasE-type:EuropeE2-type:SpainThe market code is shown on the carton to the specifications {page 105} for theinformation on available operating TO THE USEROne or more of the following statements may beapplicable for this WARNINGThis equipment generates or uses radio frequency or modifications to this equipment may cause harmfulinterference unless the modifications are expressly approved inthe instruction manual.
4 The user could lose the authority tooperate this equipment if an unauthorized change ormodification is TO THE DIGITAL DEVICE USER REQUIREDBY THE FCCThis equipment has been tested and found to comply with thelimits for a Class B digital device, pursuant to Part 15 of theFCC Rules. These limits are designed to provide reasonableprotection against harmful interference in a equipment generates, uses and can generate radiofrequency energy and, if not installed and used in accordancewith the instructions, may cause harmful interference to radiocommunications. However, there is no guarantee that theinterference will not occur in a particular installation. If thisequipment does cause harmful interference to radio ortelevision reception, which can be determined by turning theequipment off and on, the user is encouraged to try to correctthe interference by one or more of the following measures: Reorient or relocate the receiving antenna.
5 Increase the separation between the equipment and receiver. Connect the equipment to an outlet on a circuit different fromthat to which the receiver is connected. Consult the dealer for technical observe the following precautions to preventfire, personal injury, and TRANSCEIVER damage: Connect the TRANSCEIVER only to a power sourcedescribed in this manual or as marked on thetransceiver itself. Route all power cables safely. Ensure the powercables can neither be stepped upon nor pinchedby items placed near or against the cables. Payparticular attention to locations near ACreceptacles, AC outlet strips, and points of entry tothe TRANSCEIVER . Take care not to drop objects or spill liquid into thetransceiver through enclosure openings. Metalobjects, such as hairpins or needles, inserted intothe TRANSCEIVER may contact voltages resulting inserious electrical shocks.
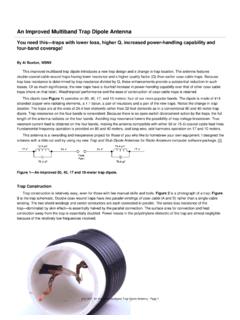
6 Never permit children toinsert any objects into the TRANSCEIVER . Do not attempt to defeat methods used forgrounding and electrical polarization in thetransceiver, particularly involving the power inputcable. Adequately ground all outdoor antennas for thistransceiver using approved methods. Groundinghelps protect against voltage surges caused bylightning. It also reduces the chance of a build-upof static OF ANTENNA GROUNDINGANTENNALEAD INWIREGROUNDCLAMPELECTRIC SERVICEEQUIPMENTANTENNADISCHARGE UNITGROUNDING CONDUCTORSGROUND CLAMPSPOWER SERVICE GROUNDING ELECTRODE SYSTEM Minimum recommended distance for an outdoorantenna from power lines is one and one-halftimes the vertical height of the associated antennasupport structure. This distance allows adequateclearance from the power lines if the supportstructure fails for any reason. Locate the TRANSCEIVER so as not to interfere withits ventilation.
7 Do not place books or otherequipment on the TRANSCEIVER that may impede thefree movement of air. Allow a minimum of4 inches (10 cm) between the rear of thetransceiver and the wall or operating desk shelf. Do not use the TRANSCEIVER near water or sourcesof moisture. For example, avoid use near abathtub, sink, swimming pool, or in a dampbasement or attic. The presence of an unusual odor or smoke isoften a sign of trouble. Immediately turn thepower OFF and remove the power cable. Contacta KENWOOD service station or your dealer foradvice. Locate the TRANSCEIVER away from heat sourcessuch as a radiator, stove, amplifier or otherdevices that produce substantial amounts of heat. Do not use volatile solvents such as alcohol, paintthinner, gasoline or benzene to clean the cabinetof the TRANSCEIVER . Use a clean cloth with warmwater or a mild detergent.
8 Disconnect the input power cable from the powersource when the TRANSCEIVER is not used for longperiods of time. Remove the TRANSCEIVER s enclosure only to doaccessory installations described in this manual oraccessory manuals. Follow provided instructionscarefully, to avoid electrical shocks. If unfamiliarwith this type of work, seek assistance from anexperienced individual, or have a professionaltechnician do the task. Enlist the services of qualified personnel in thefollowing cases:a) The power supply or plug is ) Objects have fallen or liquid has spilled into ) The TRANSCEIVER has been exposed to ) The TRANSCEIVER is operating abnormally orperformance has seriously ) The TRANSCEIVER has been dropped or theenclosure 21 PROGRAMMING THE QUICK 21 USING THE QUICK 21 MENU 22 ALPHABETICAL FUNCTION 26 CHAPTER 7 BASIC COMMUNICATIONSSSB 28FM 28AM 29 NARROW BANDWIDTH FOR 29 NARROW BANDWIDTH FOR 29CW 30 AUTO 30TX SIDETONE/ RX PITCH 30 CHAPTER 8 ENHANCED COMMUNICATIONSSPLIT-FREQUENCY 31TF-SET (TRANSMIT FREQUENCY SET).
9 31FM REPEATER 32 PROGRAMMING AN 32 Selecting an Offset 32 Selecting an Offset 32 TRANSMITTING A 33 Activating the Tone 33 Selecting a Tone 33 Selecting Continuous or 33 Transmitting a 1750 Hz 33 AUTOMATIC REPEATER 34 REVERSE 34 AUTOMATIC SIMPLEX CHECK (ASC).. 34 TONE FREQ. ID 34FM CTCSS 35 CTCSS FREQ. ID 35FM DCS 36 DCS CODE ID 36 CHAPTER 9 COMMUNICATING 37 SELECTING YOUR 37 Direct Frequency 37 Using 1 MHz 37 Quick 37 Fine 38 Equalizing VFO Frequencies (A=B).. 38 RIT (RECEIVE INCREMENTAL TUNING).. 38 AGC (AUTOMATIC GAIN CONTROL).. 39 VOX (VOICE-OPERATED TRANSMIT).. 39 Microphone Input 39 Delay 39 SPEECH 40 XIT (TRANSMIT INCREMENTAL TUNING).. 40 CUSTOMIZING TRANSMIT 41TX Filter Bandwidth (SSB/AM).. 41TX Equalizer (SSB/FM/AM).. 41 TRANSMIT 41 CHANGING FREQUENCY 41 THANK iSUPPLIED iWRITING CONVENTIONS iMODELS COVERED BY THIS iiMARKET iiNOTICE TO ivCHAPTER 1 INSTALLATIONANTENNA 1 GROUND 1 LIGHTNING 1DC POWER SUPPLY 2 UTILIZING THE BAIL ( TS-2000 (X) ONLY).
10 2 REPLACING 2 ACCESSORY 3 FRONT 3 Headphones (PHONES).. 3 Microphone (MIC).. 3 REAR 3 External Speakers ( ).. 3 Keys for CW (PADDLE and KEY).. 3 CHAPTER 2 YOUR FIRST QSO (HF/ 50 MHz band ) 5 CHAPTER 3 YOUR FIRST QSO (VHF/ UHF band ) 7 CHAPTER 4 GETTING ACQUAINTEDFRONT 8 REAR 17 CHAPTER 5 OPERATING BASICSSWITCHING POWER 18 ADJUSTING 18 AUDIO FREQUENCY (AF) 18 RADIO FREQUENCY (RF) 18 SELECTING VFO A OR VFO 18 SELECTING A 18 SELECTING A 19 ADJUSTING 19 SELECTING A 19 FRONT PANEL 20 SELECTING TRANSMIT 20 MICROPHONE 20 CHAPTER 6 MENU SETUPWHAT IS A MENU?.. 21 MENU A/ MENU 21 MENU 21vCONTENTSRADIO TELETYPEWRITING (RTTY).. 51 AMTOR/PacTOR/CLOVER/G- 52 SLOW SCAN TV/ 52DX PACKET CLUSTER 53 SATELLITE 53 BASIC 53 STORING SATELLITE MEMORY CHANNELS .. 54 RECALLING A SATELLITE 54 SATELLITE CHANNEL 54 QUICK MEMORY IN SATELLITE 54 CHECKING THE UPLINK 54 USING XIT/ RIT IN SATELLITE 54 CHANGING THE FREQUENCY 54 CHAPTER 12 REJECTING INTERFERENCEDSP 55 CHANGING THE RECEIVE 55 SSB/ FM/ AM 55CW/ FSK 55 NOTCH FILTER (SSB).