Transcription of & 4 SELVEDGE MINERAL SURFACED ROLL ROOFING - Owens Corning
1 Owens Corning SHALL NOT BE RESPONSIBLE FOR ANY DAMAGE, LOSS, COST, EXPENSE OR LIABILITY RELATING TO FAILURE TO FOLLOW THESE INSTRUCTIONS. FAILURE TO FOLLOW THESE INSTALLATION INSTRUCTIONS MAY AFFECT Owens Corning OBLIGATIONS UNDER THIS PRODUCT S LIMITED Instructions for FIBERGLAS MINERAL SURFACED roll RoofingNot to be used as part of a Built-Up ROOFING System. Apply over wood decks when incline is not less than 1" per foot. The deck must drain freely at all : It is suggested that roll ROOFING not be applied at temperatures below 50 F. When it is necessary to handle the material below this limit, it should be warmed before unrolling in order to avoid roll ROOFING should be cut into maximum 18' lengths and stacked in a pile on a smooth surface before application until they flatten out.
2 This is important to prevent wrinkling after Deck: The roof deck shall be dry, firm, smooth, and constructed of a minimum 3 8" thick plywood, 7 16" oriented strand board (OSB) or dry well-seasoned lumber, nominal 1" thick, not over 6" in width. Boards shall be laid close together and securely nailed. If plywood or OSB is used it should be as recommended by the American Plywood Association, Underwriters Laboratories Inc. or local building codes. Plywood and OSB sheathing must be spaced a minimum of 1 8" and maximum ".Preparation of Roof DeckNew Construction: Install metal drip edges at eaves and rakes. Sweep roof deck clean of loose particles. Apply one layer of underlayment of #15 asphalt saturated felt over the entire roof surface.
3 Lay in a horizontal manner lapping each course over the lower course 2"; and where ends join, lap them 4". Lay underlayment at least 6" over all hips, ridges and : Remove any slag or gravel. Cut open all blisters and buckles, and nail both edges to give a smooth surface; also nail edges of large cracks. Remove loose nails and drive into sound deck. Before beginning application of ROOFING , sweep roof deck clean of all loose particles and : Use large head corrosion-resistant nails, 11- or 12-gauge, with heads at least 3 8" in diameter. Nails should be long enough to penetrate into wood deck at least ", or completely through plywood deck or OSB a minimum of 1 8".Concealed Nail MethodEdge Strips: Place 9" wide strips of roll ROOFING along the eaves and rakes, positioning them to overhang the deck " to 3 8".
4 Fasten the strips with rows of nails located 1" and 8" from the roof edge and spaced 4" on center in each Course: Apply the first course with a full-width strip of roll ROOFING so that its lower edge and ends are flush with the edge strips at the eaves and rakes. Fasten the upper edge with nails so that the next course will overlap them a mini-mum of 1". Lift the lower edge of the first course and cover the edge strips with lap cement. In cold weather, turn the course back carefully to avoid damaging the ROOFING material. Press the lower edge and rake ends of the first course firmly into the cement-covered edge strips. Work from one side of the sheet to the other to avoid wrinkling or laps should be 6" wide and cemented over the full lap area with the recommended cement.
5 Nail the underlying sheet in rows 1" and 5" from the end of the sheet with the nails spaced 4" on center and slightly staggered. End laps in succeed-ing courses must not line up with one and Succeeding Courses: Apply the sec-ond course so that it overlaps the first course at least 2". Fasten the upper edge to the deck, cement the laps and finish installing the sheet in the same manner as the first course. Follow the same pro-cedure for each successive course. Do not apply nails within 18" of the rake until cement has been applied to the edge strip and the overlying strip has been pressed and Ridges: Trim, butt and nail the sheets as they meet at a hip or ridge. Next, cut 12" x 36" strips from the roll ROOFING and bend them lengthwise to lay 6" on each side of the joint.
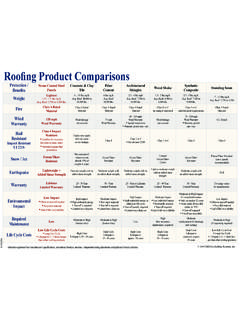
6 Do not bend the strips in cold weather without first warming them. These will be used as shingles to cover the joint, each one overlapping the other by 6" as shown in Figure hips at the bottom and ridges at the end opposite the direction of the prevailing winds. To guide the installation, snap a chalk line 5 " from and parallel to the joint on both sides. Apply asphalt plastic cement evenly over the entire area between chalk lines from one side of the joint to the other. Fit the first folded strip over the joint and press it firmly into the cement, driving two nails 5 " from the edge of the end that will be lapped. Cover the 6" lap on this strip with lap cement. Then place the next strip over it. Nail and cement in the same manner as the first strip.
7 Continue the same procedure until the hip or ridge is StandardsASTM E 108, Class CUL 790, Class COwens Corning warrants that this product meets our specifications and is free from manufacturing defects when manufactured. Owens Corning shall have no liability for any product failures or dam-age caused by improper installation or any other cause other than manufacturing defects. Should the product prove to be other than as warranted, Owens Corning s sole and exclusive liability shall be limited, at the option of Owens Corning , to either replacement of the product or providing customer with a full refund of the original cost of the FOREGOING CONSTITUTES OUR EXCLUSIVE WARRANTY, AND WE HEREBY DISCLAIM ALL OTHER WARRANTIES, WHETHER EXPRESSED OR IMPLIED, INCLUDING THE IMPLIED WARRANTIES OF MERCHANTABILITY AND FITNESS FOR A PARTICULAR PURPOSE.
8 IN NO EVENT SHALL Owens Corning BE LIABLE TO CUSTOMER FOR INCIDENTAL, INDIRECT OR CONSEQUENTIAL "DeckTop lap notless than 3"Nails located 1" and 8" from roof edge1"9"6" end lapFirmly embed all exposededges in cementCement entirelap areaEdge strips over-hang eaves and rakes 1 4" to 3 8"6" top lapLap cementNails6"51 2"51 2" band of asphaltplastic cementFigure 1 Figure 22" & 4" SELVEDGE MINERAL SURFACED roll ROOFINGAPPLICATION INSTRUCTIONSOWENS Corning ROOFING AND ASPHALT, LLCONE Owens Corning PARKWAYTOLEDO, OHIO, USA 436591-800-GET-PINK No. 100491-D. Printed in April 2008. THE PINK PANTHER & 1964 2008 Metro-Goldwyn-Mayer Studios Inc. All Rights Reserved. The color PINK is a registered trademark of Owens Corning .
9 2008 Owens de aplicaci n de rollos de superficie MINERAL para techos FIBERGLAS No debe usarse como parte de un sistema de materiales para techos ensamblados. Aplicar sobre estructuras de madera cuando la inclinaci n es de no menos de 1 pulg. por pie. La estructura debe drenar libremente en todos los : Se sugiere que el material en rollo para techos no se aplique a temperaturas por debajo de 50 F (10 C). Cuando se hace necesario manip-ularlo por debajo de este l mite, el material debe calentarse antes de desenrollarlo, a los efectos de evitar material en rollo para techos debe cortarse en longitudes m ximas de 18' y debe colocarse en una pila sobre una superficie plana y pareja antes de ser aplicado, hasta que quede plano. Esto es importante para impedir que se formen arrugas despu s de la aplicaci de techos: La estructura del techo debe estar seca, firme y lisa, y debe construirse con contrachapado de 3 8 pulg.
10 De espesor como m nimo, paneles de fibra orientada de 7 16 pulg. o de madera seca y bien curada con un espesor nomi-nal de 1 pulg. y que no exceda 6 pulg. de ancho. Las tablas deben estar colocadas una junto a otra y clavadas de manera segura. Si se usa contra-chapado o paneles de fibra orientada, esto debe hacerse de acuerdo con las recomendaciones de la Asociaci n del Contrachapado Estadounidense (American Plywood Association), Underwriters Laboratories Inc. o c digos locales de construc-ci n. Los paneles de contrachapado o paneles de fibra orientada deben espaciarse a 1 8 pulg. como m nimo y a pulg. como m n de la estructura del techoConstrucci n nueva: Instale escurrideros met li-cos en aleros e inclinaciones. Limpie la estructura del techo para que no tenga part culas sueltas.