Transcription of Anzeige- und Bediengerät Display And Operating …
1 Operating InstructionsDCU 001 DCU 100 DCU 150 DCU 200 DCU 300 DCU 600PM 800 477 BE/E (0206)Anzeige- und bedienger tDisplay And Operating Instructions .. The Control And Operating unit DCU .. For Your Orientation .. Product 4 Mechanical 4 Connection Options .. 5 Proper Use .. 5 Improper Front Panel .. Rear Panel .. Preparations For Rack Connecting Diagram .. Making The .. Short Overview, Operating .. Switching On The 9 Self-Testing .. Functions Of The Keys .. Symbol Definitions .. LED Display .. The Serial Codes .. Errors During Self-Testing .. To Do In Case Of Breakdowns ? .. , Data .. Data List .. Informations.
2 16 Manufacturer s 1 Index Page3 Read and follow all instructions in this manual. Inform yourself regarding Dangers which can arise from the unit ; Dangers which can arise from the system; Follow the safety and accident prevention instructions. Check regularly that all safety and protection requirements are being observed. When installing the DCU, take account of the ambient protection type is IP 20. The units DCU are protected against the ingress of foreignbodies 12 mm. Since water protection is not provided, the unit should be mounted in asuitable housing (see Section 3. Installation ). Do not carry out any unauthorised modifications or alterations to the DCU. Do not open the housing cover when the unit is connected to the mains nor during pumpingoperations.
3 Take account of the prescribed mains voltage values when connecting units DCU 100 to DCU600. When shipping, please note the instructions in Section Safety Instructions There is danger of damage to the unit or to is danger of an electric shock if the contactsare is danger of personal For Your OrientationSymbols usedThe following symbols will be used in the illustrations throughout the manual:Electrical connectionAbbreviations usedTMP = Turbomolecular PumpDCU = Display and Operating UnitTC= Electronic Drive UnitTPS= Mains Power UnitPosition numbersThe same accessory parts have the same position numbers in all instruction in the text Here, you must do Product DescriptionThe Display Control unit DCU is an Operating unit for PFEIFFER drive units.
4 It enables controlover all the main parameters of the unit . Additionally, the connection of a vacuum gauge is 001 = Basic unit without mains power unitDCU 100/150/200/300/600 = unit with mains power DesignThe DCU is fitted in a housing suitable for mounting in a 19 /3HE OptionsThe DCU provides the following connection options: Electronic drive unit for turbopump (X2) Pressure gauge (X3). Serial interface RS units DCU 001, DCU 100 - DCU 600 have been tested and passed by the authorities in accor-dance with EN 61010/VDE 0411 Safety Equipment For Electrical Units .2. Understanding The Display and Operating unit DCU 5 Proper Use The Display and Operating unit DCU may only be used to control PFEIFFER Electronic DriveUnits and their peripheral units.
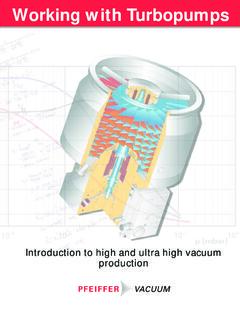
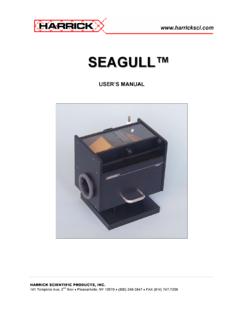
5 Instructions concerning installation, start-up, Operating and maintenance must be UseImproper is: Uses not covered above, especially: Connection to pumps and units which is not permitted in their Operating instructions. Connection to units which contain touchable and voltage carrying use will cause any rights regarding liability and guarantees to be Front panel12345678 The front panel contains all the Operating and LCD display2 Status Display (symbol defintions see chapter )3 Error acknowledgement key4 Key Left 5 Key Right 6 Pumping Station ON/OFF key7 Red illuminating diode for error status8 Green illuminating diode for Operating Rear Panel10AF10 AFDCU with100/150/200/300W-mains powerunitDCU with530/812W-mainspowerunitDCU 001 withoutmains powerunitS1 Mains switchF1 Mains fuseF2 Mains fuseX1 Mains connection 90-265 V~X2 Output for voltage supply, electronic drive unit X3 Pressure gauge connectionRS 485 Communication with electronic drive unitS1 Mains switchF1 Mains fuseF2 Mains fuseX1 Mains connection 90-265 V~X2 Output for voltage supply.
6 Electronic drive unit X3 Pressure gauge connectionRS 485 Communication with electronic drive unitX3 Pressure gauge connectionRS 485 Communication with electronic drive Preparations For InstallationUnauthorised modifications or alterations to the Display Control unit are not unit must be fitted in a housing taking account of the ambient conditions (seesection Technical Data ). Disconnect mains power plug before installation location:Protected against the following is applicable for open buildings and operations rooms which are not fully airconditioned:Temperature:+5 C - +40 humidity:5 - 85%, pressure:86 kPa - 106 Rack FittingThe units DCU 001, DCU 100 - DCU 600 are designed to be fitted into a 19 /3HE rack with guiderails. For installation secure the front panel to the rack using four fixing screws.
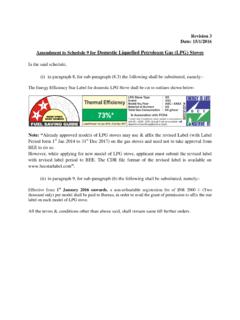
7 Ensure free convection. The minimum distance to the upper and lower ventilation slits mustbe ambient temperature in the rack housing must not exceed 40 on the version, various connections are provided on the Connecting Diagram3. Installation DCU 001 ElectronicDrive UnitTCPressureGauge152364 DCU connection without power unitElectronicDrive UnitTCPE323142314PE+1- 23315264 Power supplyPressureGaugeDCU100150200300600 DCU connection with power Making The Connections The units DCU 100 - DCU 600 have been designated protection class 1 and must always beconnected with the earthed conductor (PE) via the mains note:If using the TC 600 electronic drive unit , please disconnect the remote plug from the RS 485 interface connection. Mains connection must be made in accordance with the local regulations.
8 Make the connection X2 - Electronic Drive unit in accordance with the connecting diagram,section Make the connection pressure gauge to X3 as required. Make the connection RS 485/DCU-RS 485/Electronic Drive unit via the delivered 8 pole DCU 001 is re-supplied with its Operating voltage via the Serial Interface RS 485 cable fromthe Electronic Drive unit . As soon as this unit is switched on, the DCU is supplied with voltageDCU 100: 90 - 265V~, 125 VADCU 150: 90 - 265V~, 170 VADCU 200: 90 - 265V~, 230 VADCU 300: 90 - 265V~, 330 VADCU 600: 90 - 132/185-265V~, 590/900VA4. Operations Short Overview, OperatingSelecting the parameters Select the parameter numbers with the keys (back) or(forward) (keeping the key depressed enables rapidscrolling).
9 Setting parameters Select a parameter. Depress keys and simultaneously. >The arrow (--->) appears in the second line from the top. Reduce or increase the values with the key or respectively. Depress key and simultaneously. > The arrow (--->) disappears. > The parameter is GeneralAll function relevant aspects of the pump electronics are illustrated in the form of parameter has a number and a designation (for example, 720: Vent frequ ).The value of the parameter is always readable, in some cases also modifiable via the Switching On The Control unit Make the connection to the Serial Interface RS 001: Switch on the external supply of the Electronic Drive unit (for example TPS 100-600).DCU 100/150/200/300/600: Switch on the DCU by the switch S1 on the rear side.
10 In the event of an error message: depress: .Self-TestingAfter switching on, the DCU performs a self-test and also a test on the connected turbo electro-nics. Run time of the self-test: approx. 20s. During the test a bar appears in the Display in line 4and this shows the progress of this procedure. Display test: All signs in the LC Display are shown for a short time in black. LED test: During the whole testing process the red and the green LEDs illuminate. DCU test: The DCU hardware is tested. Connection to the turbo electronics test: The correct connection to the turbo electronics andtheir identity are examined. Parameter test: Information regarding the parameters is loaded. Identification of the connected components: The designation of the drive unit is there are no errors the DCU is now ready to Functions Of The KeysThe four keys on the front panel have the following functions:KeyApplication/ExampleExplanat ionReset (error acknowledgement).