Transcription of ASSASSIN Building Instructions by CRASHTESTHOBBY
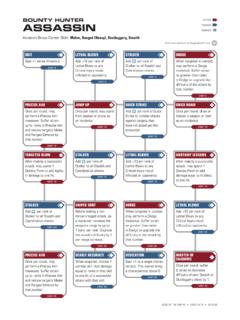
1 ASSASSIN Building Instructions by The ASSASSIN is the toughest plane on the planet!!! The ASSASSIN can take more abuse and keep on flying better than any other plane we have seen. It is cut from solid EPP foam that doesn t crush. It has EPP elevons that don t split. It uses a shock cord that spreads out the forces of impact. It has bidirectional reinforced Extreme Tape hinges and to protect the battery and radio. The plane is designed to use low cost off the shelf motors, ESCs, servos and batteries. You need one of these!!!! Your club needs a bunch of these. It s time to fly without worrying about breaking your plane. Fins are optional. Don't cut tip angles if you want to use the fins. (see pictures #1 and #9 below.) ASSASSIN QUICK BUILD Instructions Go watch our Building videos to see how we build at 1. Glue cores together. Cut elevons to length leaving on each side of propeller. Cut 2 x2 angles off wing tips if Building finless.
2 2. Cut spar slit " back from nose on the bottom of the wing with sharp razor blade. CA glue the spar in slit. Install the shock cord in a slit around perimeter of wing that is cut with a new razorblade. Glue Formica mount on the bottom in center of wing. 3. On bottom of wing put 2" strips of Scotch Extreme tape from spar forward. Wrap 2" E-Tape around leading edge of wing. 4. On top of wing put 2" E-tape from 4" forward. Tape across center of wing over spar and reinforce core between elevons. 5. Put 2 layers of laminate (blue) on elevons. Put one layer of laminate on top and bottom of wing over foam and tape. 6. Mount motor on metal motor mount. Screw motor mount on Formica plate 7. Make elevon hinges with 1" wide E-Tape top and bottom of wing. Iron 2" wide laminate strips over tape to protect from UV light. 8. Cut out battery hole with battery back " with battery laying flat in S-12 and on edge in S-14 and S-16. Cut radio slot " back with servo on each end of 10" slot.
3 Servos lay flat in S-12 and stand upright deep in foam in S-14 and S16. ESC and receiver sit on edge in slot. 9. Install radio, horns, and rods (and fins) Have servo arms to outside edge of slot. Pushrod near center of servo arm and at tip of elevon control horn for maximum leverage. Install pushrod guides. 10. CG is " back. Elevon throws 3/8" up and 3/8 down for first flights. Set motor to 0 degrees to center line of wing 11. Trim both elevons up 1/8" (reflex) make Velcro tie down for battery and radio. Specifications Target all up weight 19-23 oz (480-630 gm) Lighter flies better with slower glide. 2812-1534 KV motor with 7x6 prop with 25+ amp ESC and MG90 servos, One suggested upgrade is to 3530-1700 KV motor with 7x6 prop, 40 amp ESC and Corona 238 MGs servos 1300+ to 1800+ mah 3S lipo batteries EQUIPMENT NEEDED 1. Low-temperature hot glue gun and low-temp rated glue 2. or Quick Grip or Gorilla Glue (preferably white), or Goop brand glue 3.
4 Metal straight edge 4. Soldering iron 5. Pliers Bi-directional reinforced tape, Scotch E-Tape 6. Sharp razor blade 7. Philips head screwdriver 8. Electric drill and bits 9. Iron for applying laminate (hobby iron is preferable, but clothing iron may be used) 10. Velcro strips WING PREPARATION the ASSASSIN flies well with or without fins. We found ourselves frequently reattaching the fins on the wingtips of our combat planes, so we got rid of the fins. Our angled tips on the ASSASSIN s fat airfoil create stabilizing drag like a fin and make it incredibly stable at speed. Many flyers are not doing combat and like the more solid tracking and improved slower flight performance with fins. Here are Instructions for both. Rub the EPP foam surfaces with another piece of EPP foam to get the melted fibers off. Use your fingernail to pick off any stubborn fibers. You can also use a disposable razor to shave the EPP foam to get the fibers off.
5 1. Glue the wing halves together with low-temperature hot glue, Goop, or Shoe Goo. 2. Skip to SPAR Instructions if you are Building your ASSASSIN with fins. (The Widowmaker needs fins.) 3. To build the ASSASSIN without fins, you will need to cut a flat-faced angle onto the front of the tips. This gives some resistance on either side of the wing to stabilize the plane and prevent unwanted yaw during flight. 4. To cut angles in the tips, for flying without fins, use your ruler to measure from the leading corner of one wingtip, 2 (5 cm) in along the leading edge, towards the nose. Place a mark at that point with your pen. 5. Also measure back from the leading corner of the wingtip along the outside edge of the wing, and place a mark at 2 (5 cm). 6. Lay your straight edge from the 2 mark on the leading edge, to the 2 mark on the side of the wing. Use a sharp razor blade to cut this corner off of the wingtip. Do not round the corners. The flat surface is needed for stability and is part of the design.
6 7. Repeat on other wingtip. Make sure both wing tips are exactly the same. SPAR There is 1 flat 20 carbon spar included in the kit, which will be installed across the bottom width of the wing 8. On the bottom of the wing, lay a straight edge along the center of the wing, and place a mark at ( ) back from the nose 9. From the mark, use a square to measure out 10 to either side (20 inches total). Mark the 10 point with your pen. 10. Use your straight edge and a new sharp razor blade to cut a slit 1/2 (1 cm) deep enough for the flat carbon spar. 11. You can work baking soda into the slit to act as a catalyst for the CA glue for a quicker set of the glue. 12. Baking soda is in the basing syringe (red bulb) you see in the attached picture. 13. Sand the spar lightly to take the shine off it. Press the spar into the slit. Glue it in with CA glue. SHOCK CORD 14. The weakest point of a flying wing is the space between the elevons on the trailing edge.
7 In a head-on impact the weight of the wingtips tears the wing in half from the back forward. The Shock Cord ties the trailing edge of the wing together to prevent this damage from occurring. The Shock Cord can be glued in with Quick Grip glue or baking soda and CA. 15. Using a razor blade, cut a 3/8 ( ) deep slit around the entire perimeter (along the edge) of the wing. 16. We now like Quick Grip glue better than the CA glue and baking soda if you can find it. Do not use baking soda with Quick Grip. 17. Work a little baking soda if you are using CA glue in the slot and put some baking soda on the cord first to speed up curing later. 18. Make sure you have adequate ventilation and beware of the fumes. CA glue and baking soda have a fast reaction. 19. Insert the shock cord with the center of the cord at the tail, and the loose ends at the nose. Run the cord though a tube or the lower half of a ballpoint pen body. Keep tension on the cord as you work your way around the wing.
8 Tie the loose ends of the cord together at the nose, so that the knot tucks into the slot. Cut off excess cord, so that no cord is showing. 20. Using CA glue work your way around the wing slowly squeezing CA glue into the slit. Beware of fumes and extra glue. FORMICA PLATE Formica is thinner and stronger than plywood. 21. Place the Formica plates on the bottom of the wing, white side out, at the center of the trailing edge. The plate should hang over the trailing edge at least enough that the stainless steel motor mount won t be resting on the foam. 22. Make sure that the spar is not under the screw holes in the motor mount so it isn t damaged when screws are put in. 23. Center the plate, and mark with a pen on the EPP foam where the corners are. 24. Put low temperature hot glue on the foam (not the plate) where the plate will be, and quickly but accurately affix the plate. If you apply the glue to the plate it will cool and set before you can get it in position on the wing.
9 25. Do not attach the stainless steel motor mount at this point. That will be done after laminating the wing. SCOTCH EXTREME TAPE available from many office supply stores and Amazon 26. Scotch Extreme Tape will stick to EPP without a spray adhesive. It is lighter than many other reinforced tapes. It can hold up to 150 lbs of weight per inch. It is available at many office supply, hardware, and postage stores. Extreme tape needs to be covered with laminate or it will yellow and dry, and come off in UV sunlight. The tape needs to be tight for maximum strength. 27. Look at the taping pattern for the top and bottom of the ASSASSIN shown in the quick build Instructions at the first of the Instructions . This is reinforced for combat and adds about 2 oz to the plane. 28. The main points that benefit from the reinforced tape are the leading edge and the hinge line. 29. assassins can be built with 2" tape, lighter with 1" tape. 30. When 1 wide strips are needed, lay the strip on a piece of glass or a cutting table, then use a straight edge and sharp razor blade to split the 2 strip into two 1 strips.
10 31. The first set of tape will form an X over the Formica plate on the bottom of the wing and directly above it on the top of the wing to help the shock cord. The elevons will add more strength out farther on the wing when they are installed. 32. Put 2 strips of Extreme tape side to side that go from the spar forward on the bottom of the plane. Be careful not to add too much weight. (not shown in pictures) 33. Lay a 2 wide strip along the leading edge, the entire length of the wing, folding equally over the top and bottom of the wing, ELEVONS - Two elevons move up and down like an elevator and opposite for aileron function or roll. 34. EPP elevons will feel floppy until they are laminated and hinged to the wing. This flexibility keeps them from breaking in an impact. They are more durable than balsa elevons. Before cutting your elevons, you must determine which size of a propeller you will be using so you leave space for clearance. 35.