Transcription of ASSEMBL TALLAT TT for Multi-Slide Door Systems (JII043)
1 ASSEMBLY AND installation INSTRUCTIONSfor Multi-Slide Door Systems ( jii043 ) To prevent potential damage to interior flooring surfaces, it is critical that the system be located in an area under a 10 foot minimum overhang to prevent weather from reaching the opening. The Multi-Slide door system is not designed to prevent, nor warranted against any weather or water you for selecting JELD-WEN products. Attached are JELD-WEN s recommended installation instructions for Multi-Slide doors . Read these instructions thoroughly before beginning. They are designed to work in most existing applications, however; existing conditions may require use of alternative methods to these instructions.
2 If changes are needed, they are made at the installer s risk. For installations other than indicated in these instructions, contact a building professional. Not all exterior door types may be installed into every wall condition in all areas. Consult your local building code official (or Authority having jurisdiction) for applicable building codes and regulations. Local building code requirements supersede recommended installation Note! Any door installation such that the sill is higher than 35 feet above ground level or into a wall condition not specifically addressed in these instructions must be designed by an architect or structural engineer.
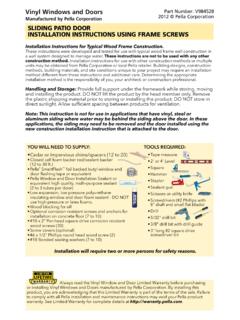
3 We recommend that all non pre-finished wood components be finished with an appropriate paint or stain prior to installation . See our Finishing document for details at Failure to properly finish or install square, level and plumb and on a flat surface (without peak and valleys) could result in denial of warranty claims for operational or performance to Installer: Provide a copy of these instructions to the building owner. By installing this product, you acknowledge the terms and conditions of the limited warranty as part of the terms of the allow sufficient time to properly prepare the rough opening, install the door, and ensure its proper INFORMATION AND GLOSSARYC onsiderations Before installation : Rough opening dimensions (see section 2, INSPECT ROUGH OPENING) The finished floor must be a maximum of 1/8" below the top of the track to properly contact the weatherstrip.
4 Consider the thickness of the finished floor when sizing the rough opening (excludes the 3/8" surface mounted track, which is mounted on top of the finished floor). If using the weather resistant track (1-1/4"), make sure the floor is designed to allow drainage tubes to properly drain into a location outside of the building. If installing a Pocketing unit, we assume pocket construction is to the interior and allows access into the pocket for installation of parts after panels. If planning on installing automation, increase the depth of the pocket by 8" per vertical trim attached to the edge of both of the meeting panels of a bi-parting door that bridges the gap between the panels when wood framework attached to the masonry inside a window or a door rough weatherstrip component that runs vertically along the stiles of either horizontal sliding sashes or sliding patio door panels.
5 When the window/door is closed, the interlocks engage, locking together, to provide resistance from air and/or water HoleA drilled hole that is no larger than the body of the screw (minus the threads).Rough OpeningThe framed opening in a wall where a door is to be instructions cover two door sill conditions: the step-down landing and the continuous slab landing. The installation methods vary slightly between landing Slab LandingStep-Down LandingASSEMBLY AND installation INSTRUCTIONSfor Multi-Slide Door Systems ( jii043 ) This installation guide specifically addresses masonry/block wall and stud-framed WALL CONSTRUCTIONThis installation assumes that a building professional has already properly fastened and sealed a framework of studs (often called a buck) to the concrete/masonry wall.
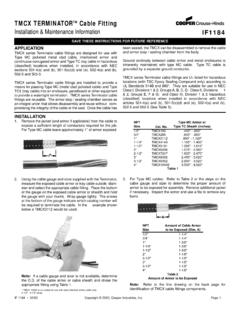
6 STUD-FRAMED WALL CONSTRUCTIONThe wall framing consists of vertical studs supporting a properly engineered header. The door will be mounted inside of the rough opening. SAFETY Read and fully understand ALL manufacturers instructions before beginning. Failure to follow proper installation and finishing instructions may result in the denial of warranty claims for operational or performance problems. Do not work alone. Two or more people are required. Use safe lifting techniques. Use caution when handling glass. Broken or cracked glass can cause serious injury. Wear protective gear ( safety glasses, gloves, ear protection, etc.)
7 Operate hand/power tools safely and follow manufacturers operating instructions. Use caution when working at elevated heights. If disturbing existing paint, take proper precautions if lead paint is suspected (commonly used before 1979). Your regional EPA ( ) or Consumer Product Safety Commission offices provide information regarding regulations and lead protection. WARNING: Drilling, sawing, sanding or machining wood products generates wood dust, a substance known to the State of California to cause cancer. Use a respirator or other safeguards to avoid inhaling wood AND DOOR HANDLING Heed material manufacturers handling and application instructions.
8 Protect adhesive surfaces from dirt, moisture, direct sunlight and folding over onto themselves. Handle in vertical position; do not drag on floor. Store door in dry, well-ventilated area in vertical, leaning position to allow air circulation; do not stack horizontally. Protect from exposure to direct sunlight during storage. Install only into vertical walls and when conditions are INJURY OCCURS, IMMEDIATELY SEEK MEDICAL ATTENTION!PROVIDED MATERIALSNote! Specific parts shown are dependent upon product configuration and every part will not apply to all configurations. #8 x 1-1/4" Flat head self-tapping screws for the head stop (for stacking Systems only) #8 x 1-1/2" Pan head screws for the post interlock (pocketing Systems only) installation #12 x 1-3/4" Flat head screws for the floor track installation #8 x 2" Flat head screws for pocket closer (pocketing Systems only) installation #8 x 2-1/2" Flat head screws for head track installation #8 x 3" Flat head screws for strike installation on the jamb for stacking Systems (excluding bi-parting Systems ) #8 x 3" Flat head screws for side jamb installation (excludes pocketing Systems )
9 2 BuckTrimmer studsHeaderSill areaKing studROUGH OPENINGSSAFETY AND HANDLINGMATERIALS AND TOOLS#8 x 2-1/2" Flat head#8 x 3" Flat head#8 x 1-1/2" Pan head#8 x 1-1/4" Flat head#8 x 2" Flat head#12 x 1-3/4" Flat headASSEMBLY AND installation INSTRUCTIONSfor Multi-Slide Door Systems ( jii043 ) NEEDED MATERIALSNote! Follow all material manufacturers instructions for proper use and compatibility. When using flashing, spray adhesive/primer, sealant and foam products, we recommend using the same manufacturer and verifying compatibility. It is the End User s responsibility to determine if dissimilar materials are compatible to the substrates in the application.
10 #8 x 1" screws (3) for securing each stationary panel. Non-compressible and non-water degradable shims. Sealant: We recommend OSI QUAD Max Sealant or equivalent. This can be used in any application and can be painted or ordered in a color matched product, if desired. Materials for waterproofing the sill: For self-adhered flashing, we recommend OSI Butyl Flash Tape or equivalent OR liquid applied flashing (Protecto Wrap LWM 200 or equivalent) OR jobsite fabricated sill pan. Polyurethane low expansion Window and Door foam: We recommend OSI QUAD Foam or TOOLSPROVIDED PARTSATTACHED HARDWARE Handle package Finger pull Astragal and strike plate (bi-parting Systems only)SHIPPED LOOSEMain Frame Head tracks Floor tracks Locking and/or stationary side jamb component based on configuration.