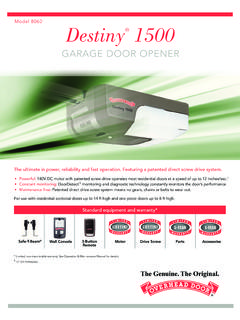
Transcription of Automatic Chain Drive/Belt Drive - Overhead Door
1 AutomaticChain Drive /Belt DriveGarage DoorOperatorSystemOwner s ManualSAVE FOR FUTURE REFERENCEC ustomer ServiceCALL: VISIT SeriesCDB SeriesAUTOMATIC GARAGE DOOR OPERATOR SYSTEMSHANG MANUAL NEAR YOUR WALL CONTROLAs required by lawComplete with Remote Controland SERIES II ElectronicsOperator MUST be installed with the included SERIES II Wall Control!Self-diagnostic Electronic Sensory Protection System (SAFE-T-BEAM SYSTEM) MUST Be Installed To Close Door!TABLE OF CONTENTSSECTIONPAGESAFETY INFORMATION .. 2-4 PARTS IDENTIFICATION .. 5-6 ASSEMBLY1 OPERATOR ASSEMBLY .. 10-111A Channel and Power Head Assembly ..101B Boom and Power Head Assembly ..10-11 INSTALLATION2 DETERMINE DOOR TYPE AND MOUNTING METHOD .. 112A Installation on Track Guided doors .. 12-142B Installation on Trackless doors .. 15-173 SAFE-T-BEAM (STB) SYSTEM INSTALLATION .. 18-19 Self-diagnostic STB System Troubleshooting .. 194 WALL CONTROL INSTALLATION.
2 205 CONNECT OPERATOR TO POWER .. 216 MAIN LIMIT SWITCH SETTINGS .. 22 OPERATION7 FORCE ADJUSTMENT .. 23 Contact Reverse .. 238 FINE LIMIT SWITCH ADJUSTMENTS .. 249 REMOTE CONTROLS .. 24-2510 BATTERY & VISOR CLIP INSTALLATION .. 2511 LIGHT BULB AND LENS INSTALLATION .. 26 MAINTENANCE ..27 TROUBLESHOOTING GUIDE .. 28 WIRING DIAGRAM .. 29 ACCESSORIES ..30 WARRANTY ..32 Things to consider if you are planning to do-it-yourself. Whether you are replacing an existing garage door operator or installing an operator in yourgarage for the first time, there are some pre-installation issues which need to be are as follows:The Overhead Door Corporation recommends that you read and fully understandall information and instructions contained herein before choosing a Do-It-Yourself installation. Any questions should be directed to the Overhead Door Corporation or anauthorized Overhead Door avoid damage to your door and/or operator, make sure you disable any doorlocks prior to installing your CHECK LIST FOR OR your ceiling where the power head of your new unit will be how you will be mounting the power is possible that ceiling joists may not be in theexact position needed with respect to the garagedoor operator.
3 In any case, it may be necessaryto add an additional bracket and fasteners (notincluded with your new door operator kit).2 Check the wall directly above the door operator s header bracketmust be securely fastened to this wall. Insurethat the structure will provide a strong to see if the mounting location for the Safe-T-Beam System (STB)isclear from obstruction and has a wood surface available for attaching the brackets may also be attached toconcrete if necessary but extra tools and specialfasteners (not supplied) will be : 1-1/2" STB bracket adapters are availablethrough your local Overhead Door your garage door made of light-weight steel, aluminum, fiberglassor glass panels?Additional support bracingmust be added to these type doors . If this is thecase, please contact the door distributor or manufacturer so that they can furnish you with a bracing kit. 7 Insure that your door is properly balanced and moving WARNING BELOW. If your door sticks, binds, or is out of balance, have it adjusted by a springs, cables, pulleys, brackets andassociated hardware are under extreme tension and can cause serious injury (The issue numbers below refer to the circled numbers in the illustrations on page 3.)
4 8(NOT SHOWN) If your garage does not havea separate entry door, you might want to consider an emergency release kit (GER-2)for installation on your garage door. See page B at thecenter of this NOT USE EXTENSION CORD!Extension cords can cause dangerousoverheating NOT USE PORTABLE GENERATOR!This product is designed to operate onstandard house current. Do not use alternate power need a 110-120 Volt power supply you plan to plug the unit into a standard electrical outlet, is one available? The outlet should be no more than about 3 feet from thepower head once it is mounted. (The cord is 4 ft. inlength.) SEE WARNING SECTIONAL DOOR INSTALLATION5 TYPICALSUPPORTBRACKETEXTENSION SPRINGORTORSION SPRINGSAFE-T-BEAM BRACESADDEDHEADER BRACKETMOUNTING BOARD36 POWER CORDTO120V GROUNDEDOUTLET643123 TYPICAL (TRACK GUIDED) 1-PIECE DOOR INSTALLATION7 SECTIONAL DOORONE-PIECE DOORTYPICAL (TRACKLESS) 1-PIECE DOOR INSTALLATION4 WARNING:Garage doors are large, heavy objects that move with the help of springsunder high tension and electric motors.
5 Since moving objects, springs undertension, and electric motors can cause injuries, your safety and the safety ofothers depend on you reading the information in this manual. If you havequestions or do not understand the information presented, call your nearestservice representativeIn this section and those that follow, the words Danger, Warning,andCautionare used to emphasize important safety information. The word:DANGER means that severe injury or death will result from failure to follow that severe injury or death can result from failure to follow that property damage or injury can result from failure to follow word NOTEis used to indicate important steps to be followed or important OFPOTENTIAL HAZARDSPOTENTIALHAZARDEFFECTPREVENTIONKe ep people clear of opening while door is Notallow children to play with the door Notoperate a door that jams or one thathas a broken :Can CauseSerious Injuryor DeathTurn off power before removing operator replacing cover, make sure wires are notpinched or near moving must be properly :Can CauseSerious Injuryor DeathDo Nottry to remove, repair or adjust springsor anything to which door spring parts are fastened, such as, wood blocks, steel brackets, cables or other like and adjustments must be made by atrained service person using proper tools and.
6 Can CauseSerious Injuryor DeathSafe-T-Beam (STB) Non-Contact Reversing SystemPlaces an invisible beam across door opening that reverses the door during down travel to the fully open position if anything passes through beam. Safe-T-Reverse Contact Reversing SystemAutomatically stops and reverses a closing door within 2 seconds of contact with an Timed Reversed SystemAutomatically opens a closing door, if door does not close within 30 Guard ControlUsed to set the force required for opening and closing door. For maximum safety, set the minimum forcerequired to fully open and close Lighting SystemTwo light bulbs up to 60 Watts max. each are used for safer entries and exits. The light turns on when door isactivated and automatically turns off minutes Emergency ReleaseAllows the garage door to be opened or closed manually for emergencies or Monitoring System Automatically stops and reverses a closing door if the closing relay malfunctionsIMPORTANT INSTALLATIONINSTRUCTIONS1.
7 READ AND FOLLOW ALL SAFETY, INSTALL ATIONAND OPERATION INSTRUCTIONS. If youhave any questions or do not understand aninstruction, call your ser-vice Do Not install operator on an improperly balanced improperly balanced door could cause severeinjury. Repairs and adjustments to cables, spring assembly, and other hardwaremust be made by a trained service person using proper tools and Remove all ropes and disable all locks connected tothe door before installing Install door operator 7 feet or more above the the emergency release knob 6 feet above Do Not connect the operator to the source of power untilinstructed to do Locate the control button: Within sight of door. At a minimum height of 5 feet, so small children can-notreach it. Away from all moving parts of the Install the entrapment WARNING label next to the wall button or console. Install the emergency release tag on,or next to, the emergency releaseTo reduce the risk of severe injury or death:WARNING:SAFETY INFORMATIONOPERATOR INSTALLATIONSAFETY FEATURES(varies by model)NOTE: Accessories vary by - Shown full size.
8 See Parts List for Screw, 1/4 x 2 Cotter PinClevis PinBolt, 3/8 -16 x 7/8 Phillips Hex Head Screw, No. 10 x 1-1/4 Insulated StapleBolt, 5/16 -18 x 1/2 100691127981821279691929089 Pan Head Screw #6 x 1 12810 PARTS IDENTIFICATION FOR OR Screw, #4-24 x 1 , PhillipsHex Head ScrewNo. 8 x 3/4 Cold Head PinPan HeadPhillips ScrewNo. 8 x 5/8 Speed NutORNut, 3/8-161/4 -20 x 3/4 Self-Drilling ScrewBolt, #10-24 x 1/2 5 Wall Console ScrewWall Button Screwremotesvary by modelPhantom Power Head (DC)234567A89101121314151617181920112223 2425262728293021323334353637383931401212 121211193122626 Item Part Name1 Lens2 Front Cover3 Side Cover (by series/model)4 Top Plate Assembly5 Strain Relief6 Cord & Plug Assembly7A Component Panel (without rear light)7B Component Panel (with rear light)8 Bottom Cover9 Screw, #8 x .75 Phil Hx Hd/W Sf Tap10 Screw, #8 x .62 Slt Hx Hd/W Sf Tap11 Screw, #8 x .50 Slt Hx Hd/W Sf Tap12 Screw, #8 x .38 Slt Hx Hd/W Sf Tap13 Light Socket (by series/model)14 Terminal Block & Lug15 Assembly16 Receiver Assembly17 Limit Set Switch18 Sequencer Assembly19 Screw, #6 x.
9 38 Slt Hx Hd/W Sf Tap6 PARTS IDENTIFICATION FOR OR Part Name20 Transformer Assembly (by series/model)21 Rectifier Board Assembly22 Fuse (F1), UL23 Fuse (F2), UL24 Limit Gear Shroud25 Motor Bracket26 Screw, #10 x 3/8 HH27 Limit Plate/Pin Assembly28 Limit Switch29 Screw,#4-40 x 5/8 Slot HH w/Wshr,Sf Tap30 Motor Assembly31 Motor Adapter Plate32 Screw, #4 x 1/2 Slt HH w/Wshr33 Limit Worm Gear34 Limit Gear Bushing35 Limit Worm Drive36 Limit Worm Shim37 Limit Wheel38 Retaining Ring39 Limit CamItem Part Name40 Limit pinion , 8 tooth41 Capacitor42 Capacitor Clamp43 Screw, #10-24 x 1/2 , Slot HH Sf-Tap44 Nut, #10-32, Hex Serrated Flange45 Circuit Board46 Bracket47 Circuit Board Mount48 Screw, #10-16 x 5/8 , HH Sf Tap49 Top Gear Housing50 Middle Gear Housing51 Bottom Gear Housing52 Drive Shaft Bushing53 Drive Thrust Washer54 Drive Shaft55 1/2 Retaining Ring56 Main Drive Worm Gear57 Optical Interrupt Wheel58 Motor Flanged Bushing59 Motor Thrust WasherCombined Parts List7B7 Legacy Power Head (AC)
10 PARTS IDENTIFICATION FOR OR Part Name60 Poly Thrust Washer61 Main Drive Worm62 Screw, #8 x 3-1/8 Slot HH, Sf Tap63 Limit Switch Plate64 Screw, #6 x 3/8 Phillips w/Wshr, Sf Tap65 Screw, #4 x 5/8 , Slot HH w/Wshr, Sf Tap2101246121231245475671248121112403937 4526431265286341422541311453333550545758 5960596159583044862515253565519 ChannelItem Part Name66 Belt & Bullet Assembly - 7 6 Door(Belt Models Only)Belt & Bullet Assembly - 8 Door(Belt Models Only)Belt & Bullet Assembly - 10 Door(Belt Models Only)Belt & Bullet Assembly - 12 Door(Belt Models Only)67 Sprocket Bushing68 Sprocket, 10 Tooth - 7 6 & 8 doors ( Chain Models Only)Sprocket, 12 Tooth - 10 Door( Chain Models Only) Drive Sprocket, 18 Tooth - 7 6 & 8 doors (Belt Models Only) Drive Sprocket - 10 Door (Belt Models Only)69 Screw, #10-24 x .50 Hx Hd70 Sprocket Bracket ( Chain Models Only)Sprocket Bracket - 7 6 & 8 doors (Belt Models Only)Sprocket Bracket - 10 Door (Belt Only)Sprocket Bracket - 12 Door (Belt Only)71 Screw, #10-24 x.