Transcription of Balance Shaft Timing Gear Alignment on 2010-2016 GM 2.4L ...
1 Page 1 of 3 This information is provided from the best available sources. However, AERA does not assume responsibility for data accuracy or consequences of its application. Members and others are not authorized to reproduce or distribute this material in any form, or issue it to their branches, divisions, or subsidiaries, etc. at a different location, without written permission. AERA Engine Builders Association. All rights reserved. Balance Shaft Timing Gear Alignment on 2010-2016 GM VIN C, K & W Engines The AERA Technical Committee offers the following information regarding Balance Shaft Alignment marks for 2010-2016 GM VIN C, K & W engines. This information should be considered anytime the front Timing chains have been removed.
2 Important: If the Balance shafts are not properly timed to the engine, the engine may vibrate or make noise. There are two possible chain configurations for these engines. Both configurations use a unique chain link to line up with the intake side Balance Shaft sprocket Timing mark. The first design uses a unique link color (1). The second design uses a black anodized link (3) with uniquely colored links on either side (2) as shown in Figure 1. Figure 1. Balance Shaft Chain Designs Determine the configuration of the Balance chain. First Design Chain 1. Install the Balance Shaft drive sprocket. 2. For the 1st design Balance chain, install the Balance Shaft drive chain with the colored links lined up with the marks on the Balance Shaft drive sprockets and the crankshaft sprocket.
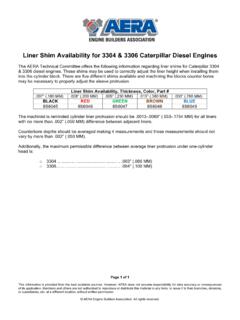
3 There are three colored links on the chain. Two links are of matching colors, and one link is of a unique color. Use the following procedure to line up the links with the sprockets: 3. Orient the chain so that the colored links are visible. Page 2 of 3 This information is provided from the best available sources. However, AERA does not assume responsibility for data accuracy or consequences of its application. Members and others are not authorized to reproduce or distribute this material in any form, or issue it to their branches, divisions, or subsidiaries, etc. at a different location, without written permission. AERA Engine Builders Association. All rights reserved. 4. Place the uniquely colored link (1) so that it lines up with the Timing mark on the intake side Balance Shaft sprocket.
4 5. Working clockwise around the chain, place the first matching colored link (2) in line with the Timing mark on the crankshaft drive sprocket, approximately 6 o'clock position on the crank sprocket. 6. Place the chain (3) on the water pump drive sprocket. The Alignment is not critical. 7. Align the last matching colored link (4) with the Timing mark on the exhaust side Balance Shaft drive sprocket. Second Design Chain 1. For the 2nd design Balance chain, install the Balance Shaft drive chain with the black anodized links lined up with the marks on the Balance Shaft drive sprockets and the crankshaft sprocket. There are three Timing links with a black anodized finish on the chain. One black anodized link has uniquely colored links on either side.
5 Use the following procedure to line up the links with the sprockets: 2. Orient the chain so that the colored links are visible. 3. Place the black anodized link (1), with uniquely colored links on either side, so that it lines up with the Timing mark on the intake side Balance Shaft sprocket. 4. Working clockwise around the chain, place the next black anodized link (2) in line with the Timing mark on the crankshaft drive sprocket, approximately 6 o'clock position on the crank sprocket. 5. Place the chain (3) on the water pump drive sprocket. The Alignment is not critical. 6. Align the last black anodized link (4) with the Timing mark on the exhaust side Balance Shaft drive sprocket. Figure 2.
6 Chain ID Locations Page 3 of 3 This information is provided from the best available sources. However, AERA does not assume responsibility for data accuracy or consequences of its application. Members and others are not authorized to reproduce or distribute this material in any form, or issue it to their branches, divisions, or subsidiaries, etc. at a different location, without written permission. AERA Engine Builders Association. All rights reserved. Caution: Use the correct fastener in the correct location. Replacement fasteners must be the correct part number for that application. Do not use paints, lubricants, or corrosion inhibitors on fasteners, or fastener joint surfaces, unless specified.
7 These coatings affect fastener torque and joint clamping force and may damage the fastener. Use the correct tightening sequence and specifications when installing fasteners in-order-to avoid damage to parts and systems. When using fasteners that are threaded directly into plastic, use extreme care not to strip the mating plastic part(s). Use hand tools only, and do not use any kind of impact or power tools. Fastener should be hand tightened, fully seated, and not stripped. For Both Design Chains Install the upper and small Balance Shaft drive chain guides and bolts and tighten to 106 IN/LBS (12 Nm). Install the adjustable Balance Shaft chain guide and bolt and tighten to 89 IN/LBS (10 Nm). Reset the Timing chain tensioner by performing the following steps: Rotate the tensioner plunger 90 degrees in its bore and compress the plunger.
8 Rotate the tensioner back to the original 12 o'clock position and insert a paper clip through the hole in the plunger body and into the hole in the tensioner plunger. Install the Balance Shaft drive chain tensioner and bolts and tighten to 89 IN/LBS (10 Nm). Remove the paper clip from the Balance Shaft drive chain tensioner. You re now ready to install the camshaft Timing chain, sprocket, and tensioner.