Transcription of Bandsaw Tune-Up + Installing a bandsaw blade - …
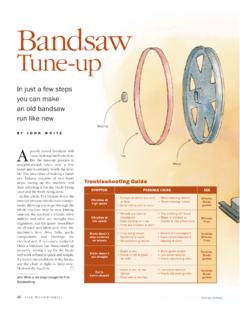
1 Bandsaw Tune -upIn just a few steps you can make an old Bandsaw run like newBY JOHN WHITE Pulleys on motor are wornor bent Drive belt is stiff or worn Wheel-bearing failure Thrust-bearing failure blade is dull Fence is not aligned for drift Worn guide blocks Low blade tension Poorly adjusted guides blade is dull or toonarrow Feed rate is too fast Low blade tension Poorly adjusted guides Tires are grooved,hardened or worn Wheel-bearing failure Wheels are misaligned Tracking mechanism isslipping or bent Wheels are bent or misaligned Dust buildup on tires Tires are cracked or worn Tire is lifting off wheel blade is cracked orkinked or has a bad weldVibration atlow speedBlade doesn t cut straightpoorly tuned Bandsaw willcause nothing but the Tune-Up process isstraightforward, takes only a fewhours and is certainly worth the trou-ble. The procedure of making a band-saw behave consists of two basicsteps: tuning up the machine andthen adjusting it for the blade beingused and the work being done.
2 In this article, I ve broken down thetune-up process into its main compo-nents, allowing you to go through thewhole machine step by step. Duringtune-up, the machine s wheels, drivepulleys and table are brought intoalignment, and the guide assembliesare cleaned and lubricated. Also, themachine s tires, drive belts, guidecomponents and bearings arechecked and, if necessary, a Bandsaw has been tuned upproperly, setting it up for the bladeand work at hand is quick and you run into problems in the future,use the chart at right to help trou-bleshoot the machine. John White is the shop manager for doesn t stay centered on wheelsWheels,BladeguidesWheels,TiresTens ion,Wheels,TiresTension,BladeguidesTensi on,BladeguidesTroubleshooting GuideSYMPTOM SEEPOSSIBLE CAUSE Vibration athigh speed46 FINE WOODWORKINGB earingTireWheelDrawings: Jim RicheyCut is barrel-shapedJULY/AUGUST 200247 TENSIONR emove cover and cleanup tensioner.
3 With thecover removed (above), itis easy to access the ten-sioner. Once the tensioneris removed, check to besure the axle isn t bent,and then file the slides onboth sides tensioning-and-tracking as-sembly controls the position ofthe upper wheel. Remove the upperwheel and cover to get at the assembly. Inspect the pivoting cast-ing that supports the axle for cracksor bends from overtensioning. Acracked or bent casting should be re-placed. If the axle is loose, which iscommon, don t worry it will tighten up when tension is ap-plied. Use light oil to lubricate the pivot a few years of use, the slides on both sides of thesquare main casting will probably have a step worn intothem use a file to smooth down the worn faces and thesharp edges left on the top of the grooves in the a stick lubricant on the slides before sliding the as-sembly back into the frame. The original tensioning spring on a 14-in. Bandsaw is al-most always crushed, making it impossible to tension theblade properly.
4 The spring can be replaced with a heavy-duty version from Iturra Designs (888-722-7078) withouthaving to remove the upper wheel and blade cover (see thephoto above and FWW#147, p. 83). The last step in servicing the top end of the saw is to re-move the tension and tracking bolts clean the threadswith a wire brush and round off the ends with a file. Use astick lubricant on the bolts before you reinstall adjusterUpper axlePivotingcastingTensioning-and-tracki ngassemblyUpperguide postTrackingadjusterTensionspringUpper guideassemblyTableLower guideassembly48 FINE WOODWORKINGP hotos: Erika MarksWHEELSH aving the upper wheelaligned directly above thelower wheel allows the bandsawblade to track better and putsless stress on the saw and theblade. On a 14-in. Bandsaw ,checking the alignment is the table and lay a longstraightedge across the faces ofboth wheels. If the wheels are outof alignment, you ll see a gap be-tween the straightedge and onewheel.
5 On a Delta saw, the wheelalignment is adjusted by addingor removing shims on the upper axle. On Jet and most oth-er Taiwanese-made saws, the upper wheel can t beshimmed without placing excess pressure on the wheelbearings. These saws are aligned by shimming behind thelower wheel. Iturra Designs sells inexpensive sets of grad-uated shims for both Delta and imported with the old, in with the Bandsaw wheel has two bearings: Even if only one is fail-ing, they should both be replaced. The wheel bearings must be tapped out with a hammer andpunch (left). When Installing a new bearing, gently tap it into place using a soft hammer againstthe outer race (right).Check the alignment. Begin by placing a long straightedge (White uses a ) across both wheels. Then adjust the tracking mechanism to bring the upperwheel parallel to the straightedge. Shim out the upperwheel. If the rims ofboth wheels aren ttouching the straight-edge, use shims tobring them into align-ment.
6 On Delta sawsyou can shim the upper wheel; for Taiwanese-madesaws, shim the lower test the wheel bearings, remove the saw s blade and rotate the wheel throughseveral revolutions with the tip of a fingeragainst one of the spokes. You may feel aslight drag, but the motion should be smoothand silent. Even small amounts of roughnessor a grinding sound indicate a contaminatedbearing. If there is only a small amount ofcatching, the saw is still usable, but newbearings should be installed soon. If there iscontinuous roughness or grinding noises, thesaw shouldn t be used until new bearingshave been and replacingwheel bearingsJULY/AUGUST 200249 Tires are simply oversized rubberbands. But they should be checkedregularly, because the rubber becomesworn, cracked or hardened and cancause tracking problems and tire should have an obvious crown andbe smooth and free of grooves. Pressyour thumbnail into the tire; it shouldpress in easily, and the surface shouldspring back.
7 A lack of springback is asign that the tire has hardened andneeds to be replaced. To remove a tire,use a screwdriver to lift it over the rim. Ifthe old tire was glued on, clean off theadhesive using acetone. The new tireshould snap into a groove in the rim ofthe wheel (see the photos below). Installing a tire. Stretch the tire over thewheel (top). To even out the tension on thetire, slide a screwdriver between the wheeland tire, then rotate the wheel while holdingthe screwdriver in one spot (bottom). TIRESTABLETo get square cuts on a Bandsaw , the table mustbe aligned square to both the sides and back ofthe blade . To align the table, first back off the bladeguides and then adjust the blade to full tension andproper tracking. Place a square on the side of theblade and adjust the stop bolt (see the middle pho-to at left) to square up the table. Once the table hasbeen adjusted, zero out the pointer on the table-tiltscale. To square the table to the back of the blade ,loosen the table bolts from underneath, remove thetable and place shims between the trunnions andthe table casting.
8 This process may take a little trialand error, but you only have to do it once, and it isdefinitely worth the time. There s only one way to squarethe table to the back of theblade. You need to insert shimsbetween the table and the trun-nions until the blade and thetable are aligned. While you havethe top off, be sure to clean upand lubricate the trunnions. Square the tabletop to the sideof the blade . Tip the table and ad-just the stop bolt mounted on thetrunnion support FRONT TO BACKALIGNING SIDE TO SIDET ableSquareStop boltTrunnionsTrunnionsTableShimSquare50 FINE WOODWORKINGBLADE GUIDESThe guide assemblies on a 14-in. saware mechanically simple but have anumber of parts that can wear out orjam up. Start by replacing any thrustbearing that is noisy or won t rotatefreely. Then remove the bearing supportand guide-block holders, file off anypaint and burrs and inspect all parts forcracks or worn threads. Remove all ofthe setscrews and round off their endswith a file the smoothed ends will holdbetter.
9 Remove the knob that locks theguide post and shape the tip of itsthreaded end to match the groove in theguide post. Clean and lubricate thethreads and the other parts of theguides as you reassemble them. The guide blocks should be smooth,flat and square. Clamp the blocks in theholder with their faces touching; thereshould be no gaps between the lower guide assembly on theDelta 14-in. Bandsaw is more complexthan the upper guide assembly, but thesame logic applies to Tune-Up . The lowerguide assembly on a Taiwanese-madesaw is tuned up the same way as the up-per guide the upper thrustbearing. The blade shouldride along only the outeredge of the bearing. If oneface is scarred from use, flipover the bearing and use theback the guide assembly with the the Allen screw on the upper guide assembly and adjust the assembly until thefaces of the guide blocks are parallel to the blade . Replace the lower thrust bearing. Removethe nut on the end of the guide rod and slideoff the tube to free up the bearing.
10 Clean upeverything and, if necessary, slide a new bear-ing into GUIDE ASSEMBLYU pper thrustbearingMountingrodGuide-blockholde rLOWER GUIDE ASSEMBLYG uideblockUpperguide postPositionadjusterGuide-blockassemblyS etscrewsThrust-bearingadjusterGuide-bloc kadjusterThrust-bearingguide rodLower thrustbearingGuideblockGuideblockWrenchI nstalling a Bandsaw bladeWith the saw unplugged, pull back the guides and thethrust bearings and place the new blade on the the upper guide assembly to clear the stock you ll becutting by 1 4in. to 1 the tracking adjustment in adjusts theblade toward the back of the the upper wheel by hand while alternatelyincreasing the tension and adjusting the trackingto keep the blade centered on the upper the blade1wA Bandsaw is not properly tuned until you have installed the blade and made sure it is tensionedand tracking properly and that the guides are set correctly. Following the steps here makes thisa quick and straightforward John White, author of Care and Repair of Shop Machines (The Taunton Press, Sept.)