Transcription of Basic Rifle Cleaning Tutorial with Pictures - M14.CA, M14 ...
1 Page 1 of 17 Basic Rifle Cleaning Tutorial with Pictures Taken from a post by tonyben on the M-14 Firing Line Last Updated April 19, 2009 The current political climate gives me the feeling that there is going to be an influx of new members with new rifles and new questions. One of the common questions that gets asked that is easily misinterpreted is the question of Cleaning the Rifle . Your Rifle should be cleaned after every range trip or after every 20 shots or so if you are competing in a match. The action should not be required to be removed from the stock during normal Cleaning . Proper Rifle Position for Cleaning If you have a Rifle that resides in a USGI stock or a wood stock that is not bedded, there will be no ill effects if you do remove the action from the stock for regular maintenance, but again, it is not necessary. The first suggestion we usually tell new members is to clean the Rifle upside down.
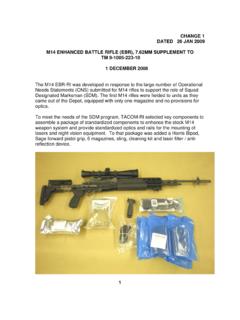
2 Now before you go on and dangle yourself from the rafters by your feet or try to clean your Rifle while doing a hand stand or stand the Rifle on its flash suppressor, I will include a picture of what it means to clean your Rifle upside down. This means the magazine well should be pointed toward the ceiling and the barrel pointed at the wall. Why upside down you ask? That s a good question! For the gas operating system to work, gas from the fired round needs to be bled off into the gas system. This is achieved by a little hole in the barrel that lets gas into the gas cylinder which cycles the action. When we introduce oils and solvents into the barrel, the oils and solvents will follow the path of gravity. If we leave the Rifle in the cradle, right side up, then those chemicals will flow into the gas system. Now the M14/M1A type rifles are made to operate with the gas system completely free of oils and solvents, otherwise the carbon will form a paste and begin to cause cycling problems in your beloved Rifle .
3 To prevent this, it is advised that the Rifle be cleaned upside down to prevent chemicals from flowing where they shouldn t be Page 2 of 17 1. Properly position your Rifle in your gun vice, rest, or Cleaning bench Page 3 of 17 Protecting the Muzzle Crown Now that we have defined the position that the Rifle should be cleaned at, let s look to some other issues that need to be addressed. Now the M14/M1A type rifles can t be cleaned like the AR s. You need to punch the bore from the muzzle end. One of the critical areas to be aware of when doing this is the muzzle crown. This is a critical component that must be guarded and treated with care because if it is damaged, it can severely degrade accuracy. To remedy this problem we use what is called a bore guide. This is an essential tool to have for proper maintenance of your Rifle . This will ensure that your Cleaning rod will not contact or scratch the muzzle crown.
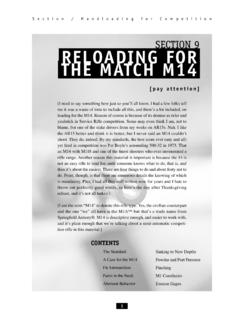
4 Note: A bore guide can be made out of a 12ga shotshell. Simply get a fired 12ga shell and pop out the primer. My Cleaning rod was thin enough to slide right into the primer hole without modification. Other rods with thicker shafts may require you to enlarge the hole to fit your rod diameter. The shell is just the right size to slide over the USGI or USGI reproduction flash suppressors. I don't have aftermarket muzzle brakes so I don't know if they fit. Here is a picture of a Dewey Bore guide along with some other items that are very useful for proper maintenance of your Cleaning port, a brass jag, a bronze bore brush, a chamber brush and a 30 cal Cleaning patch ripped in half. (side note, the Dewey bore guides sometimes have burrs on the bronze insert. This can damage your Cleaning rod. Use a drill bit or a chamfer/deburring tool to remove the burrs on the insert) **Optional 12ga shell pictured in place of the Dewey bore guide** It is suggested that one piece Cleaning rods are ideal to use when Cleaning the M14/M1A Rifle because a sectioned rod is more likely to bend at a union which will cause a raised edge which can scratch the rifling on the way through your barrel.
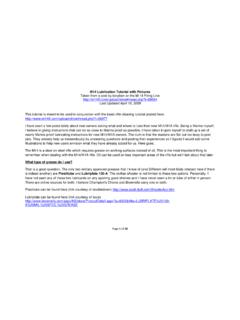
5 Many people suggest a coated rod or a stainless steel rod. I also use a brass jag and a half of a 30 caliber Cleaning patch to run down the barrel. A whole patch will be too tight with a jag, or at least it is with mine. Page 4 of 17 2. (left to right) patches, bronze Cleaning brush, ratcheting chamber brush, Cleaning port, brass jag, & bore guide Page 5 of 17 3. Optional Shotgun Shell used as a bore guide Page 6 of 17 Properly Using the Possum Hollow Cleaning Port Now let s talk about that funny white thing in the picture. That is a Possum Hollow Cleaning port. This can be bought from Midway and Sinclair sells their own version. You see, when you punch the bore, sometimes your Cleaning rod can go a little too far and hit the face of the bolt. Just a slight tap will disengage the bolt stop and the bolt will slam home sending the Cleaning rod right back out the way it came with great force.
6 This can also bend your rod or bore brush and make for a not so good day at the range. It also has a handy little rubber o-ring that prevents solvents from flowing into parts of your Rifle where it doesn t belong. You can also leave an unloaded magazine in the Rifle which will keep your bolt release from disengaging. Some shooters use an empty stripper clip and stick it into the stripper clip guide to act as a block for the bolt. Still others use a block of wood to keep the bolt restrained. It s your choice and those are your options. When I install my Cleaning port, I like to release the bolt (gently) and let it rest against the port. This will keep the port in place and prevent any abrupt incidents while Cleaning . IMPORTANT NOTE: When applying solvent to your bore brush and chamber brush, do so with a squirt bottle or eye dropper. DO NOT DIP A DIRTY BRUSH INTO A BOTTLE OF CLEAN SOLVENT!
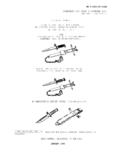
7 !!!! This will contaminate the solvent and introduce unwanted debris and particles into your bore. I have made this mistake myself as a novice and I don't know how much life I took off my barrel, but I will never do it again! Page 7 of 17 4. Proper use of the Cleaning Port Tool (2 pics) Page 8 of 17 Page 9 of 17 Cleaning the Chamber with the Ratcheting Chamber Brush Before punching the bore, keep the Rifle right side up, insert an empty magazine and clean the chamber with the ratcheting chamber brush. Apply some Cleaning solvent of choice and insert the brush into the chamber. Give it about 8 full turns and remove. Wipe off the excess solvent that may drip out f the chamber to preserve your bedding job and lubricant. Remove the empty magazine. Leave the rest of the solvent in the chamber until you have finished Cleaning the bore. Immediately insert the chamber Cleaning port and invert the Rifle before any solvent has the chance to flow toward the gas port and continue.
8 Page 10 of 17 5. Using the ratcheting chamber brush to clean the chamber Page 11 of 17 Cleaning the Bore After you have completely cleaned the bore go back and clean the chamber with a chamber mop or wrap a Cleaning patch around your chamber brush and insert to clean off any residual solvents left in the chamber. When using the bore guide, slide the guide on before you screw on your attachment. Feed the attachment into the flash suppressor and as soon as it is inserted into the crown, slide the bore guide over the flash suppressor. Hold it there with your free hand throughout the push and pull of the rod. If you are using a Cleaning jag and a patch, the patch will fall off as soon as it is clear of the chamber and you will be pulling out an empty jag. IMPORTANT NOTE: If you are using a jag, do not flip a dirty patch over and use the "clean" side!! This will still introduce debris into the bore.
9 Use a clean patch for every application. As the barrel becomes dry, debris that is run through the bore via a patch or dry bore brush will scratch the rifling in the barrel. The only thing that should be run through a dry barrel is a clean patch. If you are using an eyelet style patch holder, pull the dirty patch off at the chamber before you pull the rod back out the muzzle. This will keep contaminants and debris from making their way back to the muzzle. Page 12 of 17 6. Attaching a patch to the jag Page 13 of 17 7. Using the bore guide to safely run the Cleaning rod and its attachments safely through the bore (2 pics) Page 14 of 17 Page 15 of 17 8. When pulling the bore brush out, slow down towards the end of the stroke, otherwise, once the brush is clear of the muzzle it will jam up in the bore guide and those precious bristles will be mangled.
10 Page 16 of 17 Some experts suggest that you remove the bore brush from the Cleaning rod at the end of the stroke and Cleaning the bore brush between punches. The theory is that keeping the muzzle clean is of the utmost importance. By pushing a brush through and pulling it back out, you pull the debris back toward the muzzle which is the last place you want it. It is suggested that you keep the movement of debris going in one direction; from muzzle to bore. 9. Removal of the bore brush at the end of each stroke (optional) Page 17 of 17 Once you have finished punching and patching the barrel, clean all the solvents off the bore guide and flash suppressor. Now you can turn your Rifle right side up and remove the Cleaning port. I suggest inserting an empty magazine in the Rifle at this point to prevent unwanted bolt release. You can now clean the face of the bolt with a nylon brush and touch up any areas that may have lost grease during firing or Cleaning Some of you may be asking about the Otis Cleaning system or the Bore Snake method.