Transcription of Basic Snare Drum Tuning - pearldrum.com
1 Basic Snare drum Tuning by Tom FreerPlease follow these simple and Basic instructions for Tuning and adjusting your Pearl Snare drum . In order for you to get and maintain the best possible sound out of your instrument, it will be important to save this sheet so that you can "tune up" the drum as the heads become broken in, and replace heads when necessary. YOU WILL NEED THE FOLLOWING TOOLS TO PROCEED: 1. drum KEY 2. RULER STEP ONE: Loosen the top head completely. Place the drum on a flat surface and unscrew all the tension rods so that there is no tension on the top head. You don't need to take them out, just loosen them all the way. Next, begin to tighten down each rod just until they touch the counter hoop (or rim) WITHOUT PULLING IT DOWN.
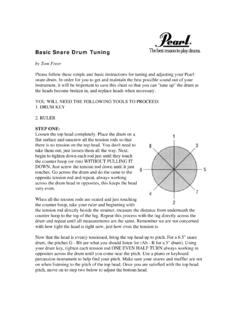
2 Just screw the tension rod down until it just touches. Go across the drum and do the same to the opposite tension rod and repeat, always working across the drum head in opposites, this keeps the head very even. When all the tension rods are seated and just touching the counter hoop, take your ruler and beginning with the tension rod directly beside the strainer, measure the distance from underneath the counter hoop to the top of the lug. Repeat this process with the lug directly across the drum and repeat until all measurements are the same. Remember we are not concerned with how tight the head is right now, just how even the tension is. Now that the head is evenly tensioned, bring the top head up to pitch. For a " Snare drum , the pitches G - Bb are what you should listen for (Ab - B for a 5" drum ).
3 Using your drum key, tighten each tension rod ONE EVEN HALF TURN always working in opposites across the drum until you come near the pitch. Use a piano or keyboard percussion instrument to help find your pitch. Make sure your snares and muffler are not on when listening to the pitch of the top head. Once you are satisfied with the top head pitch, move on to step two below to adjust the bottom head. STEP TWO: Turn the drum over and follow the exact same procedures described in step one above to evenly tension the bottom head. The bottom head will require more tension than the top head in the end, and will be at a higher pitch. Don't be alarmed by wrinkles that might appear on the bottom head, be patient and tension all the rods evenly as in step one. Once all the rods are evenly tensioned and the measurements are all the same by checking with the ruler, begin tightening the rods in EVEN HALF TURNS always working across the drum in opposites.
4 Bring the pitch of the bottom head up until it sounds a perfect fourth to a perfect fifth higher than the top head. This means if your top head sounds like the note A, then the bottom head should sound like D or E above that. This is a little hard to hear sometimes, and you need to do this in a very quite room with no distractions. You can hear it best if you place the drum on your stand and lightly tap the top head near the rim and then the bottom head also near the rim in order to hear the interval relationship and the note you are looking for. Again, use a piano or keyboard percussion instrument as your guide and you can't go wrong! FINAL STEP - FINE Tuning Fine Tuning the top head will help the drum ring longer and sound better. Simply tap the head very near the rim and very softly right in front of each tension rod.
5 Listen for exactly the same pitch at each station. If one spot sounds very much higher or lower than the other, make asmall adjustment with your drum key. Remember not toover adjust, turn the rod only one quarter turn in eidirection and then LISTEN again. Turn on your Snare strainer and readjust your Snare tension if necessary. Make sure they are responding at all dynamic levels. At this point you may also want to adjust your Snare muffler to make the top head sound a little drier if need ther ed. Remember to keep this manual and your Snare drum key handy at all times, so that you can readjust your drum whenever you need to as the heads get broken in over the first few months. If you memorize these simple steps, you will become an expert Snare drum tuner and have the best sounding drum around!
6