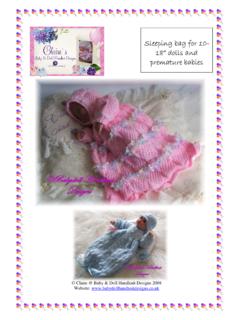
Transcription of Bedtime Sleepsuit, hat and poser for 7and poser …
1 Claire @ Baby & Doll Handknit Designs 2007 Website: 1 Bedtime SleepsuBedtime SleepsuBedtime SleepsuBedtime sleepsuit , hat it, hat it, hat it, hat and poser for 7and poser for 7and poser for 7and poser for 7----12 12 12 12 OOAK dolls and OOAK dolls and OOAK dolls and OOAK dolls and rebornsrebornsrebornsreborns Claire @ Baby & Doll Handknit Designs 2007 Website: 2 Sleepy Bedtime set 7 Sleepy Bedtime set 7 Sleepy Bedtime set 7 Sleepy Bedtime set 7----12121212 dolls and OOAK babies dolls and OOAK babies dolls and OOAK babies dolls and OOAK babies Materials 7-8 Doll 50g of 3 ply yarn (US: fingering) for suit, hat and colour within blanket(MC) 50g of 3 ply yarn for blanket(CC) Needles: One pair of 2 mm(UK 13)(US 1) Circular needle (I used 2 mm as it was the smallest I had and it worked fine.)
2 Any from 2-3mm would be fine) 9-10 Doll 50g of 4 ply yarn (US: sport) for suit, hat and colour within blanket (MC) 50g of 4 ply yarn for blanket(CC) Needles: One pair of 3 mm(UK 10)(US 3) and one pair of 2 mm(UK 12)(US 2) Circular needle (I used 3 mm. Any from 3mm 3 mm would be fine) 11-12 Doll Approx 75g of DK yarn (US: light worsted) for suit, hat and colour within blanket (MC) Approx 75g of DK yarn for blanket(CC) Needles: One pair of 3 mm(UK10) (US 3)and one pair of 4 mm(UK 8) (US 6) Circular needle (I used 3 mm. Any from 3 mm 3 mm would be fine) All sizes 258 hole piece of eyelet lace (buy approx 3m) 8 Press studs/snap fasteners 4 buttons to cover front fasteners Any desired embellishments Wadding and felt/fleece if blanket to be padded Author s note: the blanket can be knitted as a shawl if you knit a few more rows to increase its length to a square and knit a longer edging to fit.
3 Abbreviations K: knit P: purl G-st: garter stitch St-st: Stocking stitch Dec: decrease Inc: increase by knitting into front and back of stitch M1: make st by picking up bar between current and next st and knitting into the back of it Sl 1: slip next stitch Psso: Pass slipped stitch(es) over Yfwd: Yarn forward K2 tog: knit next 2 stitches together Rs: right side Ws: wrong side Cont: continue Patt: pattern MC: Main Colour CC: Contrast colour **The pattern is written using the terms larger and smaller needles. Check the material list and see what yarn and needles are required for your doll. Then knit the pattern using the larger of the given needle sizes as larger and the smaller of the given needles for your size as smaller ** sleepsuit Left leg Foot Using larger needles cast on 15sts. 1st row: P 2nd row: K2, m1, K2, m1, K4, m1, K3, m1, K4 (19sts) 3rd row: P 4th row: K3, m1, K2, m1, K6, m1, K3, m1, K5 (23sts) 5th row: P 6th row: K14, m1, K3, m1, K6 (25sts) P 1 row.
4 Instep 1st row: K16, K2togtbl, turn. 2nd row: P3, P2tog, turn 3rd row: K3, K2togtbl, turn Repeat 2nd and 3rd rows once more, then 2nd row once more. Next row: K across all sts from lh needle inc 1 st in centre of row. (20sts) Next row: P across sts Cont in st-st inc 1 st at each end of 3rd and every foll 4th row until Claire @ Baby & Doll Handknit Designs 2007 Website: 3 there are 26 sts. Cont without shaping for a further 7 rows thus ending with a ws row. If for a larger doll extra rows can be worked here if necessary. Break yarn. Leave sts on holder or safety pin. Right leg Foot Using larger needles cast on 15sts. 1st row: P 2nd row: K4, m1, K3, m1, K4, m1, K2, m1, K2 (19sts) 3rd row: P 4th row: K5, m1, K3, m1, K6, m1, K2, m1, K3 (23sts) 5th row: P 6th row: K6, m1, K3, m1, K14 (25sts) P1 row.
5 Instep 1st row: K9, K2togtbl, turn. 2nd row: P3, P2tog, turn 3rd row: K3, K2togtbl, turn Repeat 2nd and 3rd rows once more, then 2nd row once more. Next row: K across all stsfrom lh needle inc 1 st in centre of row. (20sts) Next row: P across sts Cont in st-st inc 1 st at each end of 3rd and every foll 4th row until there are 26 sts. Cont without shaping for a further 7 rows thus ending with a ws row. If for a larger doll extra rows can be worked here if necessary. Do not break yarn. Body Knit across right leg, turn and cast on 3sts, turn, knit across left leg. (55sts) Work 23 rows in st-st, ending with ws row. Divide for sleeves K11, cast off 4, K24 (25 on needle), cast off 4, K10 (11 on needle) Left front Cont on last set of sts. Work 8 rows in st-st.
6 Shape neck Cast off 2 sts. Dec 1 st at neck edge on next 2 rows. (7sts) Work 4 rows straight. Cast off. Back Rejoin yarn to middle set of 25 sts. Work in st-st for 15 rows. Shape shoulders Cast off 7sts, K10 (11sts on needle), cast off rem 7sts. Leave rem centre 11sts on safety pin or holder. Right front Rejoin yarn to last set of 11 sts. Work 9 rows in st-st. Shape neck Cast off 2 sts. Dec 1st at neck edge on next 2 rows. Work 3 rows straight. Cast off rem 7sts. Sleeves Using smaller needles cast on 16sts. Work 4 rows in K1, P1 rib. Change to larger needles and cont in st-st. Inc 1 st at each end of 3rd and every foll 4th row until you have 24sts. Work 7 more rows straight. Cast off. Gusset Using larger needles cast on 3sts.
7 K 1 row. Work in st-st inc 1 st at each end of next 3 rows. (9sts) Work 2 rows straight. Dec 1 st at each end of next 3 rows. P 1 row. Cast off. Neckband Join shoulder seams. Using smaller needles pick up and K 10 sts up right front, K across 11sts of back and pick up and K 10 sts down left front. Work 3 rows in K1, P1 rib. Cast off in rib. Bands and edgings Sew gusset into place by joining 3 cast on sts of gusset to 3 cast on sts between legs. Join inc sts of gusset to legs at either side stopping at widest point so that dec sts and cast off edge are not attached to anything. Making sure that foot is correctly aligned (folded flat so shaping is foot-shaped ), join bottom foot seam. Join leg seam to halfway along the leg.
8 Repeat this for other leg. Turn work right way out. Back leg edging Using smaller needles pick up and K 10sts up left leg back from top of seam to gusset, 10sts around gusset edge, and 10sts down right leg back to top of seam. Work 3 rows in K1, P1 rib. Cast off in rib. Right front edging Using smaller needles pick up and K 12sts from leg seam to top of leg. Pick up and K 30sts up front edge to neckband. Work 3 rows in K1, P1 rib. Cast off in rib. Left front edging Using smaller needles pick up and K 30sts down front edge from neckband to leg top. Pick up and K 12sts from here to leg seam. Work 3 rows in K1, P1 rib. Cast off in rib. Making up Join sleeve seams. Pin sleeves into place and sew in neatly. Sew back leg edging in place by attaching ends on inside of front edgings at either side so that it lies flat against them.
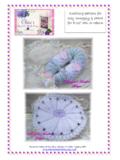
9 Sew on snap fasteners/press-studs evenly along leg edgings. Two on each leg and 5 up front. Add 4 buttons to front to cover sewing of press-studs up front. Add any desired embellishments. Beanie Using larger needles cast on 44sts and work 6 rows in st-st. Reverse Claire @ Baby & Doll Handknit Designs 2007 Website: 4 st-st by working next row as a P row and continue for 17 rows more (including 1st reverse row) Decrease 1st row: K1, *K2tog, K4 rep from * to last st, K1 (37sts) 2nd and alt rows: P 3rd row: K1, *K2tog, K3, rep from * to last st, K1 (30sts) 5th row: K1, *K2tog, K2, rep from * to last st, K1 (23sts) 7th row: K1, *K2tog, K1, rep from * to last st, K1 (16sts) 8th row(alt): *P2tog, rep from * to end (8sts) Cut yarn, leaving a long enough thread to sew back seam.
10 Thread wool through remaining sts and pull up tightly and fasten. Using this wool sew seam from centre to bottom edge. Making up Turn back brim and add a few stitches to hold in place. Add any desired embellishments and/or a pom-pom to top. Blanket Using larger needles cast on 79 sts and work in g-st for 7 rows. Create a 4 stitch g-st border at either end by working the first and last 4 sts of every row in CC and g-st (you will need to have a small amount of CC for this border at the left hand end on the MC rows.) Ensure that you cross yarn at back of work to prevent gaps in your knitting. Cont in patt as follows between these borders: 1st row (MC)(ws): K1, P3, *keeping yarn at front of work Sl 3 purlwise, P3, rep from * to last st, K1 2nd row (MC): P1, K3, *keeping yarn at back of work,Sl 3 purlwise, K3, rep from * to last st, P1 3rd row (CC): K1, P3, *K3, P3, rep from * to last st, K1 4th row (CC: P1, K3, *P3, K3, rep from * to last st, P1 5th row (CC): K5, insert point of rh needle upwards under the 2 strands in front of the slipped sts and K the next st, then lift the 2 strands off over the point of the rh needle (called pull up loop), K5, rep from * to end 6th row (CC): K1, P3, *K3, P3, rep from * to last st, K1 7th row (MC).)