Transcription of BEFORE YOU BEGIN - Rubbermaid
1 Congratulations and thank you for the purchase of your Rubbermaid Big Max storage building. BEFORE you BEGIN assembly please be sure to check your local building codes, ordinances and restrictions, and applicable neighborhood governances. BEFORE YOU BEGIN SURFACE PREPARATION To ensure proper assembly and performance your shed needs to be built on a solid, level surface. A cement or patio surface, or a treated-wood platform is YOU BEGIN LOCATIONWhen choosing a location in your yard make sure you choose an area with easy access and one that provides proper drain-age for water to run away from the shed location.
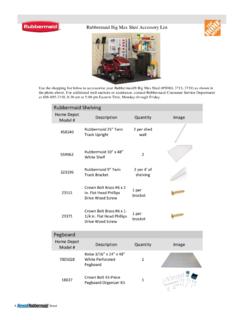
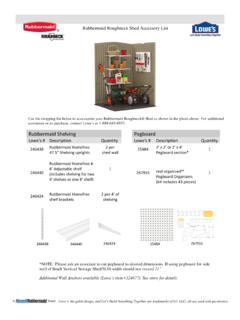
2 Prior to beginning the assembly please complete the following items: Thoroughly review all assembly steps (it is important that the steps are followed in the correct order) Review the parts list and make sure that no parts are missingIMPORTANT DO NOT RETURN TO THE STORE For assistance with your Big Max Storage Building or for additional product information call our toll-free Consumer Service number: 1-888-895-2110, or visit us online at 5H8094 "84"85 " Description Assembly Letter Quantity Required Tools Two Person AssemblyFloorFront FloorJ1 Back FloorK1 WallsSide Panel "A"A2 Side Panel "B"B2 Left Back PanelC1 Right Back PanelD1 Left Front PanelE1 Right Front PanelF1 Wall ConnectorQ15 DoorsLeft Door PanelG1 Right Door PanelH1 Door Reinforcement DR2 Hinge Reinforcement HR2 Door WindowLL2 Gasket for Door Window MM2 Lock HaspX1 Door HandleT1 Door MagnetKK2 Barrel Bolt HH2 Hardware#14 x 3/4" Combo Pan Head ScrewAA138#8 x 1/2" Combo Pan Head ScrewBB22#8 SAE Flat
3 WasherCC22 -20 x " Hex BoltDD11 -20 Hex Nylon Lock NutEE11 Roof Pin FF6 Roof Pin Assembly Tool GG1 RoofLower Roof Panel 7'M2 Upper Roof Panel Underlap 7'N1 Upper Roof Panel Overlap 7'P1 Front GableU1 Back GableR1 SkylightL4 Gasket for Skylight4 Door Header SupportDH1 Truss RafterTR2 Truss Collar TieTC1 Truss BracketTB2 PurlinPL4 Safety GlassesPhillips ScrewdriverRubber MalletLiquid Soap(2) Step Stools/StepladdersDrillGlovesUtility Knife5H80 BIG MAX7' x 7' RESIN STORAGE BUILDING ASSEMBLYP reassembly: Review ALL assembly steps BEFORE beginning construction.
4 Review the parts list and make sure that no parts are : To simplify assembly and to ensure proper engagement of all components, apply a mild detergent to dovetail and snap fits BEFORE "84"85 "JAKEBQQQCDBAXTLLLLKKDHMMMMTRTCPLTBHHDRH RHRFHGRUNPMM123 Build a solid, level surface for the shed foundation; minimum foundation dimensions are shown. Consult your local building authority for ordinances or restrictions BEFORE building any structure at your home. Note: Minimum dimensions for foundations the Front Floor (J) on the foundation. Connect Front Floor (J) to Back Floor (K), install Screws (AA) 14 places.
5 Using a screwdriver, knock out the tabs for the door hinge 2 places on Front Floor (J). Using a utility knife, cut the long sides of each wall slot tab and then use a screwdriver to knock it out 8 places on Front Floor (J) and 12 places on Back Floor (K).Optional Step:If desired, recessed anchor locations (8 places) can be used to secure the Floor to the Foundation, see Step a screwdriver, punch out the screw holes on the top of Side Panel (A) 3 Side Panel (A) into Front Floor (J). Hold Side Panel (A) to prevent it from PLAN:Size the construction site to fit the entire STEP: If desired, recessed anchor locations (8 places) can be used to anchor the shed floor to a foundation after Step "86"ANCHORLOCATIONS84"851/2"76"75"61/2"6 1/2"4"4"4"4"4"4"30 "30 "33"3 "84"85 "Caution: When installing screws, do not : Always use gloves when using the utility HolesclickJJAKAA (14)47 Using a screwdriver, punch out the screw holes on the top of Left Front Panel (E) 3 places.
6 Lubricate dovetails on Side Panel (A) 5 places with liquid soap. Connect Left Front Panel (E) onto dovetails of Side Panel (A). Engage snap on bottom of Left Front Panel (E) into Front Floor (J).Lubricate dovetails on Side Panel (B) 5 places with liquid soap. Connect Left Back Panel (C) onto dovetails of Side Panel (B). Engage snaps on bottom of Left Back Panel (C) into Back Floor (K).click12 Screw Holes125 Using a screwdriver, punch out the screw holes on the top of Side Panel (B) 3 the lap joint between Side Panel (A) and Side Panel (B). Snap Side Panel (B) into Back Floor (K).
7 ClickScrew Holes6 Install Wall Connector (Q) 5 a screwdriver, punch out the screw holes on the top of Right Front Panel (F) 3 places. Lubricate dovetails on Side Panel (B) 5 places with liquid soap. Connect Right Front Panel (F) onto dovetails of Side Panel (B). Engage snap on bottom of Right Front Panel (F) into Front Floor (J).Using a screwdriver, punch out the screw holes on the top of Side Panel (B) 3 Side Panel (B) into Front Floor (J). Hold Side Panel (B) to prevent it from a screwdriver, punch out the screw holes on the top of Side Panel (A) 3 the lap joint between Side Panel (A) and Side Panel (B).
8 Snap Side Panel (A) into Back Floor (K).Install Wall Connector (Q) 5 Holesclick12 Screw HolesclickScrew Holesclick1212clickclickclickclickclick1 2 JJFFBBKBBBBAAAAQ12131415 Install Wall Connector (Q) 5 dovetails on Side Panel (A) 5 places with liquid soap. Connect Right Back Panel (D) onto dovetails of Side Panel (A). Align the lap joint between Left Back Panel (C) and Right Back Panel (D). Snap Right Back Panel (D) into Back Floor (K).Using a screwdriver, punch out the screw holes around the perimeter of Back Gable (R) 22 places. If venting is desired, use the utility knife to cut out vent slots 3 places from inside of gable BEFORE assembly.
9 Connect Back Gable (R) onto the back wall, install Screws (AA) 10 the Left Door Panel (G) face down. Slide the Hinge Reinforcement (HR) into the hole on the top door pin. The Hinge Reinforcement (HR) will slide in until it is 1/8 above the end of the door HolesScrew HolesScrew HolesScrew HolesCaution: When installing screws, do not : Make sure the screws hit the targets on the back wall : Always use gloves when using the utility GABLE (R)BACK WALLSCREW (AA)AACCDDDRGKCDQCDAA (10)HRHR16171819 Install the Gasket (MM) into the gasket groove in the door.
10 Start at the top and middle by pushing the gasket into the groove. Continue until the Gasket (MM) is fully installed. There will be a small gap between the ends of the the inside of the Door Reinforcement (DR) along the full length with liquid at the top of the door, slide the Door Reinforcement (DR) onto the groove located on the handle side of the door. The Door Reinforcement (DR) will slide to the stop at the bottom of the off the protective paper from Window (LL). Install Window (LL) onto the door by matching up the holes and installing the Screws (BB) and Washers (CC) 11 places.