Transcription of Bi-Metric™ Operative Technique - Välkommen till …
1 Bi-Metric Operative TechniqueThe Bi-Metric primary femoral component range was initially developed in 1984 and has been one of Biomet s most successful implants. Based on the tapered stem geometry principle that implant longevity is reliant on optimum stress distribution into the proximal femur, the Biomet range of femoral components has delivered over 21 years of clinical for both cementless and cemented applications in a wide range of diameters, the Bi-Metric femoral components can be combined with all of the Biomet articulation and acetabular systems making it one of the most versatile systems available UK Ltd, as the manufacturer of this device, does not practice medicine and does not recommend any particular surgical Technique for use on a specific patient. The surgeon who performs any implant procedure is responsible for determining and utilising the appropriate techniques for implanting the prosthesis in each particular patient.
2 Biomet UK Ltd is not responsible for selection of the appropriate surgical Technique to be utilised for an individual TechniqueBi-Metric Hip System - Operative technique1. Pre- Operative planningSelection of the correct femoral component is attained through careful pre- Operative planning. This can be achieved manually by means of x-ray templates, or digitally by means of a PACS pre- Operative planningThe Bi-Metric Hip System provides a comprehensive selection of femoral x-ray templates in 110%, 115% and 120% templates are positioned over the AP and Lateral x-rays to best decide the correct implant size, modular head neck length and whether a standard or lateralised Bi-Metric stem is required to restore the patient s natural pre- Operative planningThe Bi-Metric Hip System digital templates are available through various digital template providers. When using digital templating for a primary THR, it is necessary to use a magnification marker with a known dimension.
3 This is required in order for the system to calculate the correct soon as the correct magnification has been determined, the system can be used to best decide the correct implant size, modular head neck length and whether a standard or lateralised Bi-Metric stem is required to restore the patient s natural Bi-metric Hip System2. Surgical exposureThe Bi-Metric femoral component can be implanted using any of the standard approaches for total hip replacement. The aim of the approach selected is to provide adequate visualisation of both the acetabulum and proximal Femoral neck osteotomyOnce the femoral head has been dislocated from the acetabulum, the femoral neck resection can be completed by: a) using the appropriate femoral resection templates (figure 3); or b) using the femoral resection guide in conjunction with the intramedullary reamer (figure 4).figure 3figure 4figure 59 Operative Technique5.
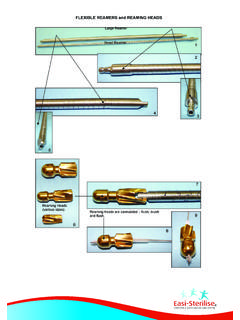
4 Preparation of the femurTo help avoid undersizing, varus positioning and to allow for correct alignment of the reamer and broach, it may be necessary to remove a small section of the medial cortex from the greater can be achieved by one of two methods. The first involves the use of the special box chisel (Figure 6), or by using the starter drill and intra-medullary reamers (Figures 7 & 8). Whatever Technique is employed, the aim is to provide a lateral starting point for the intra-medullary reamers and 6figure 7figure 84. Preparation of the acetabulum and insertion of componentWhen complete visualization of the acetabulum is achieved preparation of the acetabulum and component insertion must be carried out as instructed in appropriate Operative Bi-metric Hip System5b. Broaching the proximal femurStarting with the smallest broach available, attach the broach to the broach handle as shown (figure 10) and begin preparing the proximal femur (Figure 11).
5 The Bi-Metric broaches have been designed to follow the prepared distal canal. It is also important to ensure the broach is orientated so that the medial/lateral axis of the broach is parallel with that of the anatomic medial/lateral axis of the femoral neck, as this will determine the angle of anteversion for the implanted femoral component. Sequentially larger broaches are then used until either complete stability is achieved, or the stem size selected during pre- Operative planning has been reached. The angled surface of the femoral broach should then be level with the resected femoral neck (figure 12). If the femoral broach has finished below the level of the resected calcar, a calcar trimmer can be used to plane the calcar flush with the angled surface of the broach. (Fig 13)5a. Reaming the distal femurOnce the femoral canal has been located, begin reaming with the smallest tapered reamer.
6 Subsequent reaming in 1mm increments is then used to enlarge the intra-medullary canal until cortical chatter is encountered. (Figure 9) Reaming should not be carried out using power 9figure 10figure 11figure 12figure 1311 Operative Techniquefigure 14figure 166. Trial reduction - BroachFor cementless implants the final broach used corresponds with the femoral component to be implanted. ( 13mm broach = 13mm implant) However, for cemented implants the final broach used is 2mm larger than the femoral component to be implanted. ( 13mm broach = 11mm implant)With the final broach in position, the trial neck can be locked into place (Figures 14). The selected trial modular head is than attached to the trial neck and the hip joint reduced. The joint is then assessed for joint stability and leg length. Trial modular heads are available in numerous offsets to facilitate a stable joint.
7 However, should it not be possible attain joint stability without over increasing the leg length, the trial neck is removed and the lateralised version of the trial neck is then attached to the broach. The trial reduction procedure is repeated until joint stability and the desired leg length has been achieved (Figure 15 & 16).Once the trial reduction has been completed, carefully remove the trial modular head and trial neck from the broach. The broach handle is then re-attached to the broach and the complete assembly carefully removed from the femur to avoid enlarging the prepared canal. To promote the in-growth of bone into the porous coating, irrigation and drying of the femoral canal is not offsetLateralised offset(Standard +6mm)figure 1512 The Bi-metric Hip System7. Femoral component insertion CementlessWhen implanting a cementless implant, the definitive implant is equivalent to the last broach used.
8 (ie. 13mm broach = 13mm implant)Select the desired stem and attach it to the inserter handle (Figure 17). The stem is then impacted until the edge of the porous coating is aligned with the rim of the planed calcar (Figure 18). The inserter handle is then 17figure 1813 Operative Technique8. Femoral component insertion CementedWhen implanting a cemented implant, the definitive implant is 2mm smaller than the last broach used. ( 13mm broach = 11mm implant)Prior to implanting the desired stem, the femoral canal must be prepared in the following , the femoral canal must be closed with an adequate cement restrictor. This is used to facilitate the pressurisation of the cement within the femur. The correct size restrictor is selected by using the trials/gauges to correctly size the femoral canal and the restrictor is driven into the femur using the insertion device. It is essential that the restrictor is tight inside the femur and that it is placed at least 2cm distal to the distal tip of the selected to insertion of the cement, it is important that the femur is thoroughly cleaned by pulse lavage and dried to provide a clean dry surface into which the cement can should always take place in a retrograde fashion.
9 When the canal has been sufficiently filled with cement, the nozzle of the cement gun is shortened and the proximal pressurisation flange attached. The cement gun and pressurisation flange is then re-inserted into the proximal femur and pressurisation continues until immediately prior to stem insertion. The time at which the stem is inserted into the cement will vary on the type of cement used and the theatre temperature. Typically, for Refobacin R bone cement with a theatre temperature of 21 C mixed in the OptiVac cement-mixing system, the stem can be introduced 4 - 5 minutes after mixing has commenced. Select the desired stem and attach it to the inserter handle as shown (Figure 19). The stem is then inserted down the centre of the canal in one continuous movement. During insertion of the stem, pressure must be maintained within the canal by sealing or closing the medial calcar (Figure 20).
10 Pressure is then maintained on the stem through the inserter handle until the cement has 19figure 2014 The Bi-metric Hip System9. Trial reduction - ImplantIf desired, a further trial reduction can be completed after the implantation of the femoral stem and prior to placement of the modular head onto the taper (Figure 21). This is important because the femoral component may not in every instance seat exactly to the same depth as the broach and planed calcar. If this is the case, then it is recommended that a further trial reduction is carried 23figure 22figure 2110. Modular head impactionThe selected modular head is positioned on the clean male taper of the femoral stem with hand pressure only. Alternatively, a combination of hand pressure and a twisting motion can be used. The modular head is finally seated in position by means of a gentle tap utilising the femoral head impaction device and mallet (Figure 22)Modular heads should never be heavily impacted onto the trunnion as this may cause damage to highly polished surface of the modular the correct modular femoral head has been attached to the femoral component, the hip joint can be reduced (Figure 23).