Transcription of Big Green Egg Table Basic Plans - texd.com
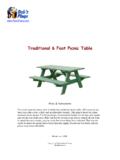
1 Big Green Egg TableBasic PlansBasic Plans (with instructions and parts list) for building a wood Table for your Big Green Egg ceramic cookerMarch 21, 2007 Greetings,In March 2002, I assembled a Basic treated wood Table for my small size Big Green Egg. At thattime I documented my parts, steps, and prices. What follows is the result of that feel free to use these Plans , modifying as you wish. Please also feel free to share theseplans with others, but only if you share the Plans in full, including this cover page. If you wishto put these Plans on your own website, I ask that you do so by link as I will occasionally add anote to the Plans based on feedback I receive.
2 If you simply upload the PDF to your website,your copy may become you did not download these Plans from , I would suggestthat you do ,Tex DuncanBGE Table 29 X 48 X 37 ( ) These instructions written by Michael Tex Duncan Email me if you have suggestions for added notes/steps. Use these instructions at your own risk ( don t cut your fingers off or burn your deck down). Parts: Legs: 4 x 4 x 36ish (qty 4) Top and Shelf Frame: 1 x 4 x 44 (qty 4) & 1 x 4 x 24 (qty 8) Top Deck: 5/4 x 6 x 48 (qty 5) Shelf Deck: 1 x 4 x 44 (qty 5); 1 x 4 x 35-1/2 (qty 2) Shelf Insulation: 12 to 16 inch paver stone (qty 1) Deck Screws (1 lb) Galvanized Carriage Bolts (w/washers, nuts) (qty 16) Shopping list (be sure to get lumber that is not Take your time): (16) 3/8 x 5 galvanized carriage bolts, nuts, flat washers (1 lb) coated deck screws (2-1/2 coarse thread) (can also be galv.)
3 Drywall screws) (1) treated 4x4 x 12ft (cut at store into quarters measure, as quarters will be ~ ) (3) treated 5/4x6 x 8ft (8) treated 1x4 x 8ft (1) paver stone Estimated cost at Home Depot/Lowes (Texas prices): $85 Time: 1 hour shopping; hours assembly Tools Needed: Circular Saw (or hand saw, but will take much longer) Drill with 3/8 bit, screwdriver bit, and 1/16 bit or similar (pre-drilling screw holes) Router or jig saw Hammer (inserting carriage bolts) Crescent wrench (or 9/16 socket or box wrench) Measuring tape Corner Square (roofing squares are great for this) Assembly: 1. Attach the shelf frame to the legs at the Y inches from the top of the legs to the top of the shelf frame, with the 24 sides flush to the edge of the legs, and the 44 sides going past the edge of the legs, making it flush with the 24 side.
4 Once built, Y will be the distance from the top of the paver stone to the top of the Table top. To calculate Y, Y = (dimension B on Table Plans ) (height of Table top planking (5/4 here)) + (height of shelf planking (3/4 here)) + (height of paver stone) 2. Take two more 1x4 x 24 and screw them in as cross member supports at from each side ( Plans only show one, but you end up with a little extra lumber, so why not 2?) 3. Center one of the 44 shelf deck planks (the straightest one) on the shelf frame and attach with screws. NOTE: For screws at the end of the plank, pre-drill to avoid splitting wood. 4. Now put a screw flush against the side of the plank and screw in about into both of the center cross members.
5 These two screws will be your spacers for the next plank. Put the next plank flush against the spacer screws and attach, bending as necessary to straighten. Remove spacers and repeat on other side. Use these spacers on each plank to allow drainage. 5. The second to last plank on each side will need to have a notch cut out of both ends to fit around the leg. This can be measured by eye, marked with a square, and cut out with a small hand saw, bowing saw, power jig saw, chisel, router, or whatever you have/prefer. 6. The last plank on each side will hang over the edge by a fraction of an inch. If you prefer, you can rip cut the piece to fit flush on a Table saw.
6 Since the last plank does not reach the ends of the frame, you will want to attach it to the front edge of the frame. 7. Attach the top frame to the legs with bolts, making the frame flush with the tops of the legs. 8. Attach one of your 24 cross members as far to the end of the Table where you want to position your BGE on as you can. If you want it to be up against the side of the legs, drill holes large enough so that you can slide it over the bolt end (and nut). Position the second cross member NO LESS than measurement A away from the first cross member. (The Plans only show one cross member on the top, as well, but this second cross member on the top is critical, as you ll see as you go along).
7 9. Attach the top planks just as you did the bottom planks, starting with the center one and working your way out with spacer screws. If the planks are slightly uneven in size, make them all flush on one side, and let them hang over by an extra or so on the uneven side. Then you can take one pass with a circular saw to cut off the uneven ends once all the planks are in place. 10. Draw the hole you need to cut for your BGE, being sure to get it between your cross member supports. Cut the hole out using a router (quick, clean, and easy) or jig saw (will take a little more patience). You can probably even use one of those sawing drill bits they advertise on television, assuming you have a powerful and sturdy drill.
8 I probably wouldn t do that with a small cordless drill though. (As parts of planks fall to the shelf below, you will see the importance of the added cross member.) 11. Clean up the sawdust, put your paving stone in place and hoist your egg in. You re all done. (see additional notes below) NOTES: The reason I specify having the 4x4x 12ft cut into quarters at the store instead of 4 36 pieces is that once they have made 3 cuts and you have 3 36 legs and one 37 leg, most of those big places (Home Depot, Lowes, etc) won t cut that extra inch off, leaving you to do it yourself, which is a pain with 4x4s. If you just measure it in advance of going to the guy at the saw, you can ask for the appropriate lengths.
9 Better yet, you can mark it yourself before taking it to him. Be sure the holes you drill for your carriage bolts do not cross inside the legs. A collision means having to drill a new hole. The long argued debate in decking is whether to go bark side up or bark side down. There are so many arguments in favor of each that the answer doesn t seem to be in sight. My best advice: pick the best-looking side of the wood, and have that face up. And then buy a cover for your Table to help it last longer anyway. Big Green Egg makes one (size large fits this project nicely) or you can go to a discount department store that carries those giant gas grills and find a cheapo one there.
10 If any of your shelf planks are bent, you can bend them back by putting them against the spacer screws bowed away from the screws, screwing down one end in its proper place, then leveraging against the spacer screws to straighten it and screw down the other end. Screwing it down in the center on the cross members will ensure that the board stays straight as you remove the spacer screws. If you notice your cross members splitting as you screw planks to them, just start pre-drilling your screw holes. If you want to have a rolling cart, use 54-60 boards with one end rounded off for the top frame. You will still attach them to the legs with the overlap one end, but extending out on the rounded end of the boards.