Transcription of BOEING 737 EFIS UNIT for the PMDG
1 BOEING 737 EFIS unit for the PMDG. Built using Encoder Support on Leo Bodnar's BU0836 card February 24th 2008. (added 8th November 2008. BU0836X connections). I have been lucky enough to have a BU0836 Joystick controller card here from Leo Bodnar which is capable of reading rotary encoder's via it's normal direct or matrix switch inputs. So after a few days of experiments I decided to build a working EFIS unit for my indoor' PMDG 737 Test Rig'. NOTE: BU0836 and Encoders. Leo tells me that any card purchased since the 1st December 2007 has the firmware for encoders already written on it. But, until you flash' the card using the utility to tell it what switch inputs are from encoders, it will perform exactly like a standard joystick controller.
2 Once the final version of the utility is right, it will be available on the Technical page of my website. It's very simple really, Plug in the Card, run the utility and simply tick which pairs of switch inputs you will use for the encoders. Leo tells me this is the same whether you use the direct (simple) or matrix inputs. The connection diagrams are available on Leo's website at Here's a copy of the utility I have. For the first build I have selected the four you can see. 1-2. will be for Mins, 5 6 will be for the ND Mode, 7. 8 for the ND Range and 11 12 for the Baro encoders. Switch inputs 3 4 and 9 10 will be used for the push to make' switches fitted into the encoders.
3 And we will need another 13. switch inputs for the remaining functions that we need on the EFIS unit For a more realistic build, we will have to use rotary encoders with a built in push switch'. because all the controls on the EFIS unit have several functions apart from the obvious. This card will only accept inputs from simple 2 bit binary (gray scale) encoders having one switching action per d tente. My encoder of choice is the CTS288 which is readily available, very cheaply from Opencockpits in Spain. I have not tried any other encoder yet because all the others I have are 4 bit. Here's a link to the data sheet for the CTS288 so you can compare other encoders for an alternative.
4 The CTS part no is 288 VCC0F161B2, my thanks to David Bowles for that. Above is the switching table from the CTS288. See why it's called binary? The contact between each input is either open or closed ( 0 or 1 ) in relation to the common. So for example, if you look at position 3, both A & B are in contact with the common. Now turn the encoder one click either way and the contact state changes. If you turned it anti clockwise then only A is in contact with the common and if you turned it clockwise only B is in contact with the common. So a switch change state has taken place. Your control card will see this switch change state and know which way you have turned the encoder.
5 It can then act accordingly. This is the CTS288 Rotary Encoder c/w Push to Make' Switch. They are available from the Opencockpits shop at They are relatively inexpensive, nice quality and robust. This is exactly how they work. If you look at the drawing below of the CTS288, it has 5 connector pins, a set of two which are the push to make switch and a set of three which are the encoder contacts. These are labelled A, B & C. with C being the common. Remember the A, B and C relationship because we are going to use that when connecting up to the BU0836 joystick controller. The push to make' switch can be connected any way round because it's just a simple contact switch.
6 Here's how I connected it all up to the BU0836 controller. The C and R designations represent which Column and Row I have connected to on the Matrix. The S designation represents the Switch No. that the Column/Row pair operate on. There is a full A4 .pdf file of the connection diagram on my website at Remembering the Row is the common' in any group of 6 switches, I have used a 1N4001 diode on every switch to prevent loopback' of switching signals steering the switching from the Column to the Row. I find the easiest way to construct a Matrix is by using simple stripboard and PCB connectors. The stripboard has copper strips running down the length.
7 It is punched with standard 1/10 pitch holes which allows me to use the PCB. connectors which are again standard pitch. These have a pin on them which you simply push thru the holes and solder to the copper strip. Easy, Cheap and quick to make. This is the actual Matrix Board I made for the EFIS. Less than 2 hours and I even stopped for a coffee :o). Stripboard and Connectors available in the UK from Stripboard Part No. 34-0515. Connectors Part No. 77-2446. Having made all the connections, it's off to the control panel to test them. They all work Great :o). Ok, so what we have done up to now is connect push button switches, toggle switches and CTS288.
8 Rotary encoders to the BU0836 Joystick Controller to Emulate Joystick Button Presses. The encoders will give us accurate directional repeated switching. The more we turn the encoder, the more times it will emulate a joystick button push (like repeatedly pressing that button). The Push and Toggle switches are pretty straight forward. Right now all the switches are working, it's time to make them operate the EFIS functions in the PMDG, so go into the PMDG/Keyboard Commands Menu. Select EFIS in the Command Category Dropdown List and then Print the commands out because you are going to need to refer to them shortly. Please don't take any notice of my Key commands, I have my own much simplified system of key commands.
9 You will have to assign what you have in your print out because these are the commands that your own setup uses. You are going to need a registered copy of FSUIPC. for the next stage of the setup you did register it didn't you :o). At the time of writing I have With FS running open up FSUIPC and on the Buttons and Switches Menu Page you will be able to have FSUIPC see' the joystick card input when you turn an Encoder or press a button. It will then return a Joystick # & Button # to identify that input. Check the Select for key press box and in the box below set the key to be sent when you operate that component. Now systematically work your way across the switches (remember there's 25) until you have assigned all the keys to each input that correspond with your PMDG Key Command Assignments.
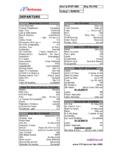
10 That's it, now go fly and check that each of the encoders/pushbuttons and switches do exactly what you expect. Frontplate - BOEING 737NG EFIS unit . Well we want it to look the part don't we :o) So, I went ahead and ordered an EFIS Faceplate kit from Opencockpits here: You can also buy these from Manolo at (nice guy). This is how it costed out: Faceplate - 30 euro 4 CTS288 Encoders 12 Euro 12 tactile switches 6 euro 4 Grey Knob 8 euro Opencockpits Shipping -15 euro BU0836 Card 32 euro delivered 2 (On)-Off-(On) switches 2 euro Stripboard 3 euro Connectors 3 euro Cable 1 euro Total Cost 112 euro / 82 / $163. Constructing the EFIS Using the BU0836X Board.