Transcription of By: Missy Billingsley - Classic Sewing Magazine
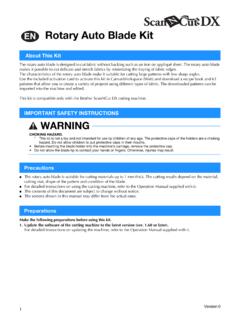
1 By: Missy Billingsley This little carrot is sew cute! It's a pincushion! It's a coaster! It's a treat bag! It could be all of the above! Depending on how you place the fabric on the back or whether you fill it with treats or polyfil. You have a design with many variations! Supplies: Supplies listed are based on ONE Carrot 1/8 yard 5 various orange fabrics yard back fabric yard Baby Lock Ultrasoft or lightweight fleece (my favorite is Pellon 987F). Cut away stabilizer heavy or light depending on the firmness you want in the finished bag Embroidery thread Embroidery hoop 5 x 7 size Ribbon/Trim various widths cut about 6 long or length of choice Cutting 5 pieces 3 x 7 of each various orange fabric 2 6 x 12 back fabrics 1 6 x 8 Ultrasoft or fleece Various ribbons or rick rack trims 6 each or your choice of length 2016 Missy Billingsley 1 Cutie Pie Carrots - In the Hoop The Cutie Pie Carrots are super cute and made entirely in the embroidery hoop so please read through all instructions before beginning and follow them as you go.
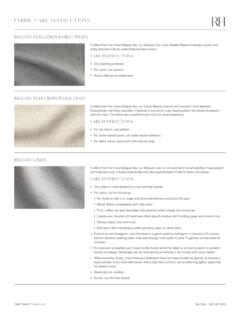
2 The options for the carrots will be talked about at the final color of the designs. The many colors used in the designs are so the machine will stop. You can choose any colors you like. 1. Open design for the Carrot into your machine. Hoop stabilizer, skip color number one and stitch color number 2. This is the overall area for the carrot design. (Photo 1). NOTE: Color number one in the design is a set of numbers that tells you the order of the fabrics. No need to sew it out and if you forget, it will be on stabilizer only and covered. Photo 1. 2. Place the Ultrasoft or fleece on top of the stitched outline and stitch color number 3. This will tack down the fleece and the placement for the first fabric . (Photo 2 & 3). Photo 2. Photo 3. 3. Place first fabric right side up covering stitched outline and stitch color number 4.
3 This will stitch down the first fabric of the design. (Photo 4 & 5). Trim excess fabric away from the inside stitching line of the carrot leaving the outside fabrics untrimmed. (Photo 6). Photo 4. Photo 5. Photo 6. 2016 Missy Billingsley 2 Cutie Pie Carrots - In the Hoop 4. Place fabric two right side down, aligning the edge of the fabric with the stitched line from the first fabric . Stitch color number 5 to sew this fabric in place. (Photo 7, 8 & 9). Photo 7. Photo 8. Photo 9. 5. Fold fabric over stitched line and finger press or use a small craft iron to press. Hold in place as you stitch color number 6. This will sew around the second fabric . (Photo 10 & 11). Trim excess fabric away from the stitching line inside the carrot. (Photo 12). Photo 10. Photo 11. Photo 12. 6. Place fabric three right side down, aligning the edge of the fabric with the stitched line from the previous fabric .
4 Stitch color number 7 to sew this Photo 13. fabric in place. (Photo 13, 14 & 15). Photo 14. Photo 15. 2016 Missy Billingsley 3 Cutie Pie Carrots - In the Hoop 7. Fold fabric over stitched line and finger press or use a small craft iron to press. Hold in place as you stitch color number 8. This will sew around the third fabric . (Photo 16 & 17). Trim excess fabric away from the stitching line inside the carrot. (Photo 18). Photo 16. Photo 17. Photo 18. 8. Place fabric four right side down, aligning the edge of the fabric with the stitched line from the previous fabric . Stitch color number 9 to sew this fabric in place. (Photo 19 & 20). Photo 19. Photo 20. 9. Fold fabric over stitched line and finger press or use a small craft iron to press. Hold in place as you stitch color number 10. This will sew around the fourth fabric .
5 (Photo 21 & 22). Photo 21. Trim excess fabric away from the stitching line inside the carrot. (Photo 23). Photo 22. Photo 23. 2016 Missy Billingsley 4 Cutie Pie Carrots - In the Hoop 10. Place fabric five right side down, aligning the edge of the fabric with the stitched line from the previous fabric . Stitch color number 11 to sew this fabric in place. (Photo 24 & 25). Photo 24. Photo 25. 11. Fold fabric over stitched line and finger press or use a small craft iron to press. Hold in place as you stitch color number 12. This will sew around the fifth fabric . (Photo 26 & 27). Photo 26. Photo 27. 12. Stitch color numbers 13 & 14 to complete the decorative stitching. (Photo 28). HINT: If you want to add a name or monogram on the carrot anywhere, stitch that now before you proceed. Photo 28.
6 2016 Missy Billingsley 5 Cutie Pie Carrots - In the Hoop 13. Stitch color number 15. This is a placement line for the ribbons. (Photo 29 & 30). Photo 29. Photo 30. 14. Choose ribbons or trim and fold each one in half. (Photo 31 & 32). Photo 31. Photo 32. 15. Place ribbons on top of the stitched placement line with the raw edges above the stitching line and tape or hold in place. Stitch color number 16 to stitch down the ribbons. (Photo 33, 34 & 35). Photo 33. NOTE: Use embroidery tape to hold the ribbon ends down or carefully hold ribbons in place as you stitch this color. Photo 34. You can leave the ribbons as loops or cut the ends so it will be like a fringe top. Photo 35. 2016 Missy Billingsley 6 Cutie Pie Carrots - In the Hoop 16. Fold 6 x 12 fabrics in half to measure 6 x 6 and place one piece on top of bottom portion of design.
7 Ensure the bottom of the design is covered and the folded edge is above the center line of the embroidery hoop/design. (Photo 36 & 37). Photo 36. Photo 37. 17. Place second folded fabric on top of first folded fabric , with the folded edge to the center of the hoop. Ensure the top of the design is covered and the folded edge is below the center line of the embroidery hoop/design. (Photo 38 & 39). Photo 38. Photo 39. 18. Place a piece of tape across the folded edges of fabric OR hold VERY CAREFULLY as you stitch the final color. This will stitch all around the design with a straight stitch then a zig zag. (Photo 40 &. 41). Remove tape from design. The folded edges are an easy place for your presser foot to slip Photo 40. under so tape can be your best friend. Photo 41. 2016 Missy Billingsley 7 Cutie Pie Carrots - In the Hoop 19.
8 Remove from hoop and trim around design just outside the zig zag stitching line. (Photo 42 & 43). Photo 42. Photo 43. 20. Turn both folded fabrics right side out through the opening. By placing the folded fabrics in the order they were placed, it will create a pocket on the back. (Photo 44, 45 & 46). Use the pocket to add treats in or you can fill with polyfil to make a super cute pincushion. To complete the pincushion, use fusible web to close the overlapped fabrics or hand sew the opening closed. Photo 44. Photo 45. Photo 46. Copyright Notice Thank you for purchasing this set of designs from Missy B Stitchin. All designs and patterns created by Missy B Stitchin are protected by copyright laws. The design set you have purchased is for original customer use only. That means for your enjoyment, not your friends or neighbors.
9 You may not share, sell, trade, copy, loan, transfer, rent, lease or duplicate the pattern in any way without violating copyright law. You may use this pattern to create for yourself, friends, gifts and a limited number to sell. You may not use this design for mass production. You may print a copy of these instructions for your personal use. If you have any questions, please contact me. Happy Stitchin! Missy 2016 Missy Billingsley 8 Cutie Pie Carrots - In the Hoo