Transcription of CHAPTER 3 MEASURING TOOLS AND TECHNIQUES
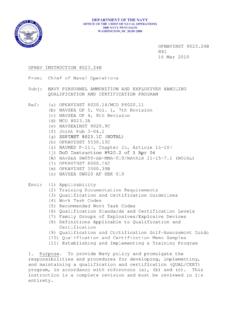
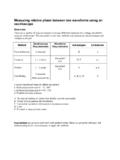
1 Figure 3-1 Common types of rules. CHAPTER 3 measuring tools and techniques As an Aviation Boatswain s Mate, Launch and Recovery Equipment (ABE), you will be performing maintenance and repair tasks on catapults and arresting gear equipment, so you must take accurate measurements during inspection, to determine the amount of wear or service life remaining on a particular item or to make sure replacement parts used to repair equipment meet established specifications. The accuracy of these measurements, often affecting the performance and failure rates of the concerned equipment, depends on the MEASURING tool you use and your ability to use it correctly.
2 LEARNING OBJECTIVES When you have completed this CHAPTER , you will be able to do the following: 1. List the different types of MEASURING TOOLS . 2. Describe the uses of different types of MEASURING TOOLS . 3. Describe the proper care of MEASURING TOOLS . COMMON MEASURING TOOLS You will use many different types of MEASURING TOOLS in the daily performance of your duties. Where exact measurements are required, use a micrometer caliper (mike). If you use the micrometer caliper properly, it will allow you to measure within one ten-thousandth ( ) of an inch accuracy. On the other hand, where accuracy is not extremely critical, a common straightedge rule or tape rule will suffice for most measurements.
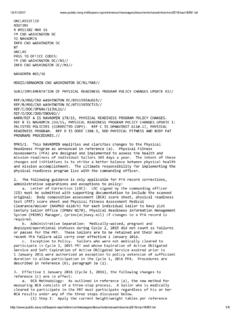
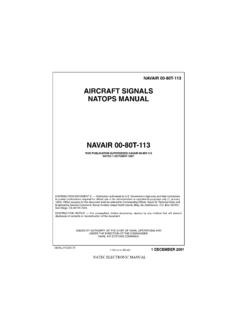
3 Rules and Tapes Figure 3-1 illustrates some of the commonly used straightedge and tape rules. Of all MEASURING TOOLS , the simplest and most common is the steel or wooden straightedge rule. This rule is usually 6 or 12 inches long, although other lengths are available. Steel rules may be flexible or nonflexible, but the thinner the rule is, the easier it is to measure accurately with it, because the division marks are closer to the work to be measured. 3-1 Figure 3-2 MEASURING and reading with a rule. Figure 3-3 MEASURING the length of a bolt or screw. Generally, a rule has four sets of graduated division marks, one on each edge of each side of the rule.
4 The longest lines represent the inch marks. On one edge, each inch is divided into 8 equal spaces, so each space represents 1/8 inch. The other edge of this side is divided into sixteenths. The 1/4 inch and 1/2 inch marks are commonly made longer than the smaller division marks to facilitate counting, but the graduations are not normally numbered individually, as they are sufficiently far apart to be counted without difficulty. The opposite side of the rule is similarly divided into 32 and 64 spaces per inch, and it is common practice to number every fourth division for easier reading.
5 There are many variations of the common rule. Sometimes the graduations are on one side only, sometimes a set of graduations is added across one end for MEASURING in narrow spaces, and sometimes only the first inch is divided into 64ths, with the remaining inches divided into 32nds and 16ths. Steel tapes are made from 6 to about 300 feet in length. The shorter lengths are frequently made with a curved cross section so that they are flexible enough to roll up, but remain rigid when extended. Long, flat tapes require support over their full length when MEASURING , or the natural sag will cause an error in reading.
6 MEASURING Procedures To take a measurement with a common rule, hold the rule with its edge on the surface of the object being measured. This will eliminate parallax and other errors that might result because of the thickness of the rule. Read the measurement at the graduation that coincides with the distance to be measured, and state it as being so many inches and fractions of an inch (Figure 3-2). Always reduce fractions to their lowest terms; for example, 6/8 inch would be called 3/4 inch. A hook or eye at the end of a tape or rule is normally part of the first measured inch.
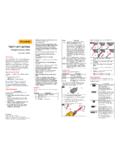
7 Bolts and screws are best measured by holding them up against a rigid rule or tape. Hold both the rule and the bolt or screw to be measured up to your eye level, so that your line of sight will not create error in reading the measurement. As shown in Figure 3-3, the bolts or screws with countersink-type heads are measured from the top of the head to the opposite end, while those with other types of heads are measured from the bottom of the head. 3-2 Figure 3-4 MEASURING the outside diameter of a pipe. Figure 3-5 MEASURING the inside diameter of a pipe. Outside Pipe Diameters To measure the outside diameter of a.
8 As shown in Figure 3-4, line up the end of the rule with one side of the pipe, using your thumb as a stop. Then, with the one end held in place with your thumb, swing the rule through an arc and take the maximum reading at the other side of the pipe. For most purposes, the measurement obtained by using this method is satisfactory. It is necessary that you know how to take this measurement, as the outside diameter of pipe is sometimes the only dimension given on pipe specifications. Inside Pipe Diameters To measure the inside diameter of a pipe with a rule, as shown in Figure 3-5, hold the rule so that one corner of the rule just rests on the inside of one side of the pipe.
9 Then, with one end thus held in place, swing the rule through an arc and read the diameter across the maximum inside distance. This method is satisfactory for an approximate inside measurement. Pipe Circumferences To measure the circumference of a pipe, you must use a flexible-type rule that will conform to the shape of the pipe. A fabric or steel flexible tape rule is adaptable to this job. When MEASURING the pipe, make sure the tape is wrapped squarely around the axis of the pipe to ensure that the measurement will not be more than the actual circumference of the pipe.
10 This is extremely important when you are MEASURING a large diameter pipe. NOTE Common tapes and rules usually are not graduated in units smaller than sixteenths. MEASURING in fractions smaller than sixteenths requires precision MEASURING tool such as micrometer. 3-3 Figure 3-6 MEASURING the circumference of a pipe with a tape. Figure 3-8 MEASURING an inside dimension with a tape rule. Hold the rule or tape as shown in Figure 3-6. Take the reading, using the 2-inch graduation, for example, as the reference point. Then subtract the reference from the total reading. In this case the correct reading is found by subtracting 2 inches from the actual reading.