Transcription of CISCO IP 7940/7960 - Minnesota State University, Mankato
1 | CISCO IP phone 7940 / 7960 SERIES | Instructional & Information Technology Services | Place a call on hold1. Press HOLD soft key2. Press RESUME soft key or your LINE button to resume call Place 2nd call on hold1. Place 1st call on hold2. Press HOLD soft key3. Press NEW CALL soft key or your LINE button4. Press END CALL soft key to end 2nd call5. Press RESUME soft key to return to 1st callNote: Use Navigation keys to alternate between 1st and 2nd call, and press RESUME soft key. Transfer a Call1. Press TRANSF soft key2. Dial number3. Announce call transfer (optional)4. Press TRANSF soft key again to complete the transfer Call Forward1. Press CFWDALL soft key (2 beeps)2. Dial number to forward calls to To Deactivate:1. Press CFWDALL soft key (1 beep)Note: See Web Interface Section for forwarding calls online Call Waiting1.
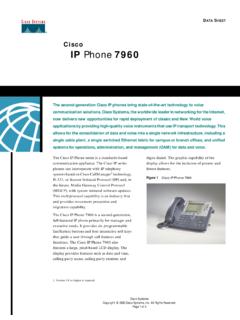
2 When you hear call waiting beep (single alert)2. Press ANSWER soft key (first call goes on hold)3. Use Navigation buttons to alternate between calls, and press RESUME soft key4. Press END CALL soft key to disconnect the selected callerTo join calls: Press TRANSF soft key to join the 2 incoming callers and exit call yourself or Press CONFRN soft key to join the 2 incoming callers and yourself in conference call 1. Indicator light2. LCD screen3. IP phone Series Line or speed dial5. Adjustable stand6. Directories7. Help8. Settings9. Speaker10. Mute11. Headset12. Volume13. Services14. Messages15. Navigation16. Dial pad17. Soft keys Place a Call Lift handset or For hands-free, press NEW CALL soft key or press SPEAKER button Dial the number Answer a Call Lift handset or For hands-free, press ANSWER soft key or SPEAKER button End a Call Hang up handset or Press END CALL soft key Check MessagesRed light on handset indicates new retrieve message(s):1.
3 Press MESSAGE button2. Follow prompts to check voice mail. Retrieve missed, received, placed calls1. Press DIRECTORIES button2. Use Navigation to highlight either missed, received or placed calls3. Press SELECT soft key4. Use Navigation to scroll through calls To dial a number: Press DIAL soft key (for internal calls) or Press EDIT DIAL soft key to add required extra digits to the number ( : 9, 1) Speed Dial To program speed dial buttons, see Web Interface Section. To dial:1. Press Speed dial button Redial last number called Press REDIAL soft key Speaker for hands-free turns on automatically or Lift handset Mute a Call Disables microphone1. Press MUTE button to activate2. Press MUTE button again to deactivate Switch between handset & speaker1.
4 If on SPEAKER, lift handset2. If on handset, press SPEAKER button and replace handset CISCO IP 7940/7960 QUICK REFERENCE06/02/04| CISCO IP phone 7940 / 7960 SERIES | Instructional & Information Technology Services | Place a Conference CallUp to six While on a call, press MORE soft key2. Press CONFRN soft key3. Call the next person4. Press CONFRN soft keyRepeat as necessary. Meet Me ConferenceRequires special phone number from IITS. To establish:1. Lift handset2. Press MORE soft key3. Press MEETME soft key 4. Dial assigned Meet Me number Join a Meet Me call:1. Dial the assigned MEET ME conference number Internal directory1. Press DIRECTORIES key2. Use Navigation to scroll to CORPORATE DIRECTORY3. Press SELECT soft key4.
5 Enter first or last name using dial pad (keep pressing a number key to toggle between letters; use << soft key to backspace and delete a letter)5. Press SEARCH key6. Use Navigation to highlight the name of the person you wish to call7. Press DIAL soft keyThe Settings button allows you to personalize some of the features ofyour phone . A screen menu will assist you in adjusting various settingssuch as ringer type and contrast. Scroll through the options using the Navigation keys. Volume Ringer1. Press [+] or [-] VOLUME keys to increase or decrease volume2. Setting is saved automaticallyconfigure from the drop-down menu on the main menu page. Change your PINC lick [CHANGE YOUR PIN] on the main menu. Enter 12345 as the current PIN, and select a new personal PIN consisting of 7-20 new PIN will be required to subscribe and activate special services such as My Address Book and Fast Dial.
6 Call forward1. On the main menu, click [FORWARD ALL CALLS TO A DIFFERENT NUMBER] 2. Check box of phone extension you wish to forward3. Select either voice mail (you must have voice mail to use this option!) or this number (and enter the phone number where you want your calls to go)4. Click [UPDATE]5. To stop call forwarding, clear the check box of the extension that is being forwarded, and click [UPDATE] Configure speed dial1. On the main menu, click [ADD UPDATE YOUR SPEED DIALS]2. The next screen will display the number of speed dials options available for your Enter the phone number in first text box and the name you would like to have displayed on your phone set in the second text Remember to affix a 9 to all external numbers5.
7 Click [UPDATE] Change message waiting lampThe default setting for this option is Use System Policy . It is recommended that you leave this in place. The additional options are Always light and Never light . If you choose Never light , you will not have visual notification of new, incoming voice messages. Speaker, handset and headset1. Press [+] or [-] VOLUME keys when handset, speaker or headset is in use2. Press SAVE soft key to save setting Ringer type1. Press SETTINGS button2. Use Navigation button to scroll to RING TYPE3. Press SELECT soft key4. Press PLAY soft key to hear sample ring5. Press OK soft key to activate6. Press SAVE soft key LCD display contrast1. Press SETTINGS button2. Use Navigation to scroll to CONTRAST3.
8 Press SELECT soft key4. Press UP or DOWN to increase or decrease contrast5. Press OK soft key6. Press SAVE soft keyEach user has their own personal Web site to allow them to manage some of the advanced phone features, such as: setting up speed dial forwarding calls activating and setting up Fast Dial activating and setting up My Address Book Accessing Call ManagerThe Call Manager for your phone is accessed through your personal account on the MyConcordia Portal at For information about using the Portal, see the downloadable user guide at you have accessed your personal portal page, click [CONFIGURE MY phone ]. Select phone deviceIf you have multiple phone sets, you must select the one you wish to phone SETTINGSQUICK WEB INTERFACE (CALL MANAGER)| CISCO IP phone 7940 / 7960 SERIES | Instructional & Information Technology Services |Select a user locale profile (language) The User Locale determines the language on the phone s display and on the Web site.
9 To change the language option:1. Select the language of your choice from the drop-down menu2. Click [UPDATE] My Address BookStore and retrieve telephone numbers. To use this service, it must first be activated online (one time only). Activate Service (online):1. From the main menu, click [CONFIGURE YOUR CISCO IP phone SERVICES]2. Click [MY ADDRESS BOOK] under Your Subscribed Services 3. Enter 9 for the Outside Access Code 4. Enter User name (your phone number + 1 Ex.: phone number 8483432 User ID will be 84834321) and new PIN 5. Click [UPDATE] Add entries (online):1. From the main menu, click [CONFIGURE YOUR CISCO PERSONAL ADDRESS BOOK]2. Click [ADD A NEW ENTRY]3. Enter information and click [INSERT] Add entries (on the phone ):* Note that My Address Book must first be activated online1.
10 Press SERVICES button2. Use Navigation key to scroll to My Address Book 3. Press SELECT soft key4. Press SUBMIT soft key5. Press NEW soft key6. Use dial pad to enter name (keep pressing a key to toggle between letters)7. Press SUBMIT soft key8. Use dial pad to enter phone number(s)9. Enter 4 digits for internal; enter 1 for long distance (9 is not necessary)10. Press SUBMIT soft key (success message)11. Press OK soft key Dial a number:1. Press SERVICES button2. Use Navigation key to scroll to My Address Book 3. Press SELECT soft key4. Enter partial (or whole) Last, First or Nickname using the dial pad 5. Press SUBMIT soft key (you may skip step 4 and scroll through entries)6. Select a name from the list7.