Transcription of Cisco IP Phone 7961 User Guide - Arizona State University
1 Cisco IP Phone 7941 and 7961 user Guide Pg. 1 1 Programmable buttons Depending on configuration, programmable buttons provide access to: Phone lines (line buttons) Speed-dial numbers (speed-dial buttons) The buttons illuminate to indicate Phone line status: Green, steady Active call on this line (off-hook) Green, blinking Call on hold on this line Amber, steady Privacy feature enabled (Default, All Phones have Privacy) Amber, blinking Incoming call ringing on this line Red Shared line, currently in use No color No call activity on this line (on-hook) 2 Phone Screen Shows Phone features.
2 See the Phone Screen Features on next page. 3 Footstand button Allows you to adjust the angle of the Phone base. 4 Messages button Typically auto-dials your voice message service 5 Directories button Opens/closes the Directories Menu. Use it to access call logs and Corporate Directory. 6 Help button Activates the Help menu. 7 Settings button Opens/closes the Settings menu. Use it to control Phone screen contrast and ring sounds. 8 Services button Opens/closes the Services menu. Provides access to IP Phone Services 9 Volume button Controls the volume and other settings. 10 Speaker button Toggles the speakerphone on or off.
3 When the speakerphone is on, the button is lit. 11 Mute button Toggles the mute feature on or off. When mute is on, the button is lit. 12 Headset button Toggles the headset on or off. When the headset is on, the button is lit. 13 Navigation button Allows you to scroll through menus and highlight items. Use in conjunction with softkeys to activate highlighted items. 14 Keypad Allows you to dial Phone numbers, enter letters, and choose menu items. 15 Softkey buttons Each button activates a softkey option, displayed on your Phone screen. 16 Handset light strip Indicates an incoming call or new voice message. Phone Screen Features This is what your main Phone screen might look like with an active call.
4 The following table provides a basic overview of Phone screen features. 1 Primary Phone line Displays the ten digit telephone number sent for caller id. 2 Icons for programmable buttons Icons indicate how programmable buttons are setup on your Phone : Phone line icon Corresponds to a Phone line and reflects the call or line State . You might have multiple Phone lines. See Quick Reference Guide for list of other icons. Speed-dial number icon If available, corresponds to a speed-dial. 3 Softkey labels Each displays a softkey function. To activate a softkey function, press the softkey button.
5 4 Status line Displays audio mode icons, status information, and prompts 5 Call activity area Displays current calls per line, including caller ID, call duration, and call State for the highlighted line. 6 Phone tab Indicates call activity. 7 Feature tabs Each feature menu has a corresponding tab. The tab is visible when the feature menu is open. Press feature button (Settings, Directories, Messages, Services) to switch between open menus. Understanding Line and Call Icons: Your Phone displays icons to help you determine the call and line State (whether the call is on hold, ringing, connected, and so on). On-hook line No call activity on this line.
6 If you are dialing on-hook (pre-dial), the call is not in progress until you go off-hook. Off-hook line You are actively dialing a number or an outgoing call is ringing. Connected call You are currently connected to the other party. Many Phone features require that you have a connected call. Ringing line An incoming call is ringing on one of your lines. Call on hold You have put this call on hold. (When displayed next to a Phone line, this icon indicates that all calls on the line are on hold.) Remote-in-use Another Phone that shares your line has a connected call. Message Waiting New message(s) in your mailbox. Option Selected Line item has been selected on the Phone display.
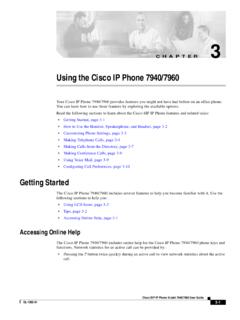
7 ACCESSING ONLINE HELP 1. Press the button, then press any softkey feature or button on the Phone to display help information for that softkey feature or button. Or, pause for the help menu. USING THE LCD ICONS 1. The icons on the screen change depending on the task you are performing. Pg. 2 HANDSET, SPEAKERPHONE AND HEADSET VOLUME 1. To increase or decrease the volume of your handset, speaker or headset during a call or after invoking dial tone, press the up or down (Volume) button. The Volume button adjusts the volume for the currently active condition (handset, speaker or headset).
8 2. To save the setting, press Save softkey. ADJUSTING THE RINGER VOLUME 1. Press the up or down Volume button while the handset is in the cradle and the headset and speakerphone buttons are off. Press the Volume (- or +) button repeatedly until you reach the desired volume level. The new ringer volume is saved automatically. CHANGING THE RINGER SOUND 1. Press the Settings button and select, user Preferences, then select [Rings]. 2. Navigate to a Phone line or default setting, and press [Select]. 3. Use the Navigation button to scroll through the ring types, you can press the [Play] softkey to play a sample of a highlighted ring type.
9 4. When you find a ring type (sound) that you like, press [Select] . 5. Press [Cancel] to revert to the previously saved setting, or press [Save]. 6. Press [Default] to apply the default ring setting to a selected Phone line. 7. Press [Exit] softkey to return to the main Phone screen (Exit softkey may have to be pressed several times to return to the regular Phone screen). CHANGING THE LCD CONTRAST 1. Press the Settings button and select [ user Preferences], then select [Contrast]. 2. If unable to read Phone screen, press [Settings] button and then 1,4 on the keypad.
10 3. Press the Up or Down softkeys or the volume button to set the desired level. 4. Press the [Save] softkey, or press [Cancel] to revert to the previously saved setting. 5. Press the [Exit] softkey to return to the main Phone screen. (Exit softkey may have to be pressed several times to return to the regular Phone screen). PLACING A Phone CALL 1. Pre-dial (dial on-hook, without first getting dial tone). Do one of the following: a. Enter a Phone number. (The Auto-Dial feature might pop up to suggest matching Phone numbers from your Placed Calls Log.) b. Press the Navigation button to scroll and/or select a Phone number from your Placed Calls log.