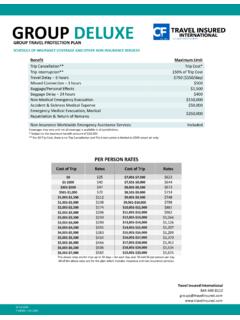
Transcription of CloudPM GM Functions User Guide - MSI Solutions
1 CloudPM GM Functions Multi-Systems Inc. December 12, 2012 Page 1 of 7 CloudPM GM Functions Multi-Systems Inc. December 12, 2012 Page 2 of 7 Table of Contents Accounting .. 3 Rooms and 5 Rooms .. 5 Property Settings .. 6 Misc. Codes .. 6 Security and Permissions .. 7 Phone Extensions .. 7 CloudPM GM Functions Multi-Systems Inc. December 12, 2012 Page 3 of 7 GM Functions The GM Functions module is where the CloudPM database is created and maintained. 1. To access the GM Functions module, Choose GM Functions from the navigation bar on the left hand side of the screen.
2 Note: You can either click on GM Functions or right click on GM Functions and choose to Open in same tab or Open in a new tab from the Main Screen. Accounting 1. Once you are on the GM Functions screen, click on the Accounting button on the navigation bar on the left hand side of the screen. A sub menu will open up with different headings. 2. Groups allow you to link charge and payment codes to a common accounting group. For example, you may have 3 different taxes. By linking the 3 taxes to a Taxes accounting group you will see what total taxes will be and have an individual break out of each tax as well. Note: Accounting Groups are required for certain CloudPM functionality to work correctly and are required for certain Department Codes. Not all posting or charging codes require Accounting Groups - but are recommended. To create a Group, click on the New button, provide a Description & Sort Order (if necessary).
3 Click on the Save button when finished. Click on the Cancel button to back out of your input without saving. Refresh refreshes your screen. The Inactive box, allows you to prevent a group from being used. At this time, there is no option to delete an Accounting Group. 3. Department Codes is where you create and modify your charge and payment codes. Note: Once completed, if you highlight a Department Code you will see a summary of the code at the bottom of the screen. Some Department Codes are required in CloudPM . To create a Department Code, click on the New button. Enter the new Code (maximum of 6 characters can use a combination of numbers and letters, recommend using capitol letters), create a Description (a brief description is recommended), attach to an accounting Group. Choose whether it s a Debit or a Credit, (if it is a Credit choose the Payment type from the drop down) and choose the different Allow options you want to apply.
4 Under the Require column check the appropriate boxes if necessary. Under the Apply Taxes column, check the appropriate taxes you want to apply to this code and choose whether you want the tax to be Inclusive part of the charge or non inclusive it will post as a separate line item. The Comm column sets the code commissionable and is driven by the addition a travel agent to a guest record. The Rpt Cash column allows a payment code to be flagged as a code that affects the cash drawer Cash or Check. If you want a default amount to be applied to a code, it can be added in the Default Amt column. CloudPM GM Functions Multi-Systems Inc. December 12, 2012 Page 4 of 7 The Sort column allows for the arrangement of where a code will appear on a screen or where it will be listed in a report.
5 The Inactive column allows for inactivating of a department code. Deleting codes is not an option in CloudPM . Click on the Save button when finished. Click on the Cancel button to back out of your input without saving. Refresh refreshes your screen. 4. Taxes are where you setup the tax structure within CloudPM . Note: After creating the Tax it will be necessary to go back to the Department Codes and Apply Taxes to the correct codes. Click on New and create a Tax Code & Description. In the Post To column choose the appropriate department code. Note: The tax code will need to be created in the Department Code section, prior to setting up your Taxes. If you try and add the Post To and the tax code does not appear, it is because it was not created as a Department Code. Choose the appropriate radio button in the Applies To drop down and the Tax Rate drop down.
6 Set a Start Date and if necessary a Min Amt (minimum amount) before the tax takes effect. Click on the Save button when finished. Click on the Cancel button to back out of your input without saving. Refresh refreshes your screen. 5. Fiscal Calendar allows you to set up your reporting dates in CloudPM . Most sites use the 12 Calendar Month option, but you will note that there are other options that may be chosen. Click on New. A pop-up box with years appears. Choose the year you want to add, click on the appropriate radio button and then click on the Auto Fill button. You will then see the Fiscal Year Calendar fill in for the year selected. Note: You can still edit a start or end date, even though you used the Auto Fill button. It is recommended that you set up several years into the future, so you don t run into issues when setting rates and creating reservations.
7 Click on the Save button when finished. Click on the Cancel button to back out of your input without saving. Refresh refreshes your screen. The Delete button will delete a Fiscal Calendar. 6. The Exchange Rates section deals with setting up currency exchanges. Note: You must have a Default Rate set up in CloudPM . The default needs to have an Exchange Rate of and the Rate Precision needs to be 2. Click on New and add a Currency Code & Currency Description, followed by an Exchange Rate & a Rate Precision (the number of places after the decimal point). 7. The Ex. Rate Change Log shows you when exchange rates are setup, changed and who set them up or updated them. This is a view only screen you are not able to perform any edits or additions. CloudPM GM Functions Multi-Systems Inc. December 12, 2012 Page 5 of 7 Rooms and Rates 1.
8 Once you are on the GM Functions screen, click on the Rooms and Rates button on the navigation bar on the left hand side of the screen. A sub menu will open up with different headings. 2. The first sub menu is Market Segments. To add a new Market Segment, click on New, create a Code, add a Description, and a Sort Order (if desired if you do not add a Sort Order it will display in build order ). The Inactive box, allows you to inactivate a code so it doesn t get used. Note: There is no delete option. 3. Rate Code Maint is where you create and maintain your rate codes in CloudPM . To create a new rate code, click on New in the top middle of the screen. A pop-up box will appear, that allows you to either add a Plan Rate (a set discounted rate) or an Adjustment Rate (a rate code that is an increase or decrease of an existing rate code). Note: More information on creating rate codes is available in another CloudPM user Guide .
9 The drop down on the top left of the main screen, helps to filter rate codes so it becomes easier for you to find, when maintaining them. Once you choose the desired filter, the Search button will search for the desired rate codes. Refresh updates the screen. 4. Booking Rules allows you to set Restrictions regarding rate codes. The New button allows you to create a new Booking Rule, the Edit button allows you to make changes and the Delete button, deletes any Booking Rules that you want to delete. 5. GTD/Cancel Policy allows you to set your guarantee and cancellation policies. The New button allows you to create a new guarantee and cancellation policy, and the Delete button deletes a policy you want to eliminate. 6. Allocations allow you to set aside a specific number of rooms for a particular rate code. The New button lets you create a new allocation, the Edit button allows you to make changes and the Delete button, deletes any Allocations that you want to delete.
10 7. It must be noted that Packages in CloudPM are built to not include room rates. The user can then add a Package Code to whatever rate code that they desire. This offers more flexibility. Elements of a package are created using Special Request codes and will post as lump sum on the guest folio. There are two parts in creating a package. First, you create the package code and description and secondly, you add the elements (request codes). Note: More information on creating Packages is available in another CloudPM user Guide . 8. Special Requests is the area in CloudPM that allows you to build your billable and non-billable services or special request codes. Your package elements are also built in this module as well. The New button allows you to create a new code and the Delete button allows you to delete a request code. Rooms 1. Once you are on the GM Functions screen, click on the Rooms button on the navigation bar on the left hand side of the screen.