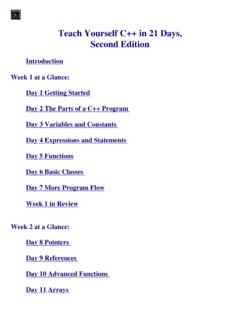
Transcription of Collecting and Shooting the Enfield No. 4 - Rifle ...
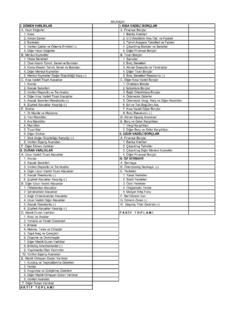
1 Enfield No. 4 rifle disassembly and reassembly Instructions Enfield No. 4 Parts Legend 1 Striker Screw27 Sear Hinge Sprig2 Cocking Piece28 Magazine Catch3 Breechbolt29 Sear Spring4 Main Spring30 Sear5 Striker31 Body, No. 4 Receiver6 Breechbolt Head32 Trigger7 Extractor33 Trigger Pin8 Extractor Screw34 Trigger Guard9 Extractor Spring35 Magazine10 Bolt - Assembled36 Front Guard Screw11 Locking Bolt Screw37 Guard Screw Lock Washer12 Locking Bolt Spring38 Fore-End13 Locking Bolt39 Handguard, Front14 Safety Catch40 Swivel Band15 Rear Guard Screw41 Swivel Band Screw16 Magazine Catch Screw42 Sling Swivel17 Ejector Screw43 Upper Band Screw18 Rear Sight44 Upper BandPage 1 of 25 Collecting and Shooting the Enfield No.
2 4 - Rifle disassembly and Reassembly12/26/2003 Spacer45 Handguard, Rear20 Rear Sight Hinge Pin46 Foresight Protector Screw21 Sight Detent Plunger47 Foresight Protector 22 Detent Spring48 Stock Bolt23 Hinge Pin Lock Pin49 Stock Bolt Lock Washer24 Bolt Release Stop50 Buttplate25 Bolt Release 51 Buttplate Screw26 Bolt Release Spring52 Lower Band*Numbers correspond with parts diagram above, not steps :I will be adding detailed variation information regarding differences between the No. 4 Mk 1 and Mk 2 that effect disassembly and reassembly . The primary difference is related to the bolt removal. disassembly Instructions 1) You will need several tools to disassemble the No.
3 4: 1. Flat Blade Screwdriver Medium 2. Flat Blade Screwdriver Large 3. Pliers Large Page 2 of 25 Collecting and Shooting the Enfield No. 4 - Rifle disassembly and Reassembly12/26/2003 ) Point Rifle in safe direction and remove the magazine from the Rifle . 3) Open the bolt and pull to the rear of the action body (receiver). Note: Examine Rifle to make sure it is unloaded. 4) Depress the bolt release (if your Rifle has one). Rotate the breechbolt head counter clockwise. Pull the bolt assembly out of Rifle . 5) Lift the rear 3 of 25 Collecting and Shooting the Enfield No. 4 - Rifle disassembly and Reassembly12/26/2003 ) Remove the bolt. 7) Unscrew the upper band ) Remove the upper band 4 of 25 Collecting and Shooting the Enfield No.
4 4 - Rifle disassembly and Reassembly12/26/2003 ) Unscrew the swivel band ) Remove the swivel band ) Unscrew both rear swivel 5 of 25 Collecting and Shooting the Enfield No. 4 - Rifle disassembly and Reassembly12/26/2003 ) Remove both rear swivel ) Remove the rear ) Remove the swivel 6 of 25 Collecting and Shooting the Enfield No. 4 - Rifle disassembly and Reassembly12/26/2003 ) Remove the front hand ) Remove the rear hand guard. 17) Unscrew front guard 7 of 25 Collecting and Shooting the Enfield No. 4 - Rifle disassembly and Reassembly12/26/2003 ) Remove front guard ) Unscrew rear guard ) Remove rear guard 8 of 25 Collecting and Shooting the Enfield No. 4 - Rifle disassembly and Reassembly12/26/2003 ) Remove trigger ) Unscrew and remove the locking bolt ) Remove the locking bolt 9 of 25 Collecting and Shooting the Enfield No.
5 4 - Rifle disassembly and Reassembly12/26/2003 ) Remove the locking bolt and safety catch. Set aside ) Unscrew fore-end ) Remove fore-end 10 of 25 Collecting and Shooting the Enfield No. 4 - Rifle disassembly and Reassembly12/26/2003 27) Loosen and remove buttplate ) Remove ) Remove felt wad with a cut-off clothes hanger (as shown in figure 29).Page 11 of 25 Collecting and Shooting the Enfield No. 4 - Rifle disassembly and Reassembly12/26/2003 ) Hanger easily hooks felt wad (as shown in figure 30).31) Insert large flat blade screwdriver into buttstock and place in groove of stock ) Using large pliers, unscrew stock bolt 12 of 25 Collecting and Shooting the Enfield No.
6 4 - Rifle disassembly and Reassembly12/26/2003 ) Remove ) Slide upper band onto barrel and off of fore-end. Remove upper band from barrel and set ) Remove Instructions Page 13 of 25 Collecting and Shooting the Enfield No. 4 - Rifle disassembly and Reassembly12/26/2003 ) Slide upper band onto fore-end. 37) Pivot the fore-end stock into the butt socket (as shown in figure 37).38) Reinstall upper band on 14 of 25 Collecting and Shooting the Enfield No. 4 - Rifle disassembly and Reassembly12/26/2003 ) Make sure lower band is positioned correctly (as shown in figure 39).40) Replace fore-end ) Tighten fore-end 15 of 25 Collecting and Shooting the Enfield No. 4 - Rifle disassembly and Reassembly12/26/2003 ) Reinsert buttstock into butt ) Insert a large flat blade screw driver into the butt stock trap.
7 44) Using a pair of pliers, turn large flat blade screw driver clockwise until stock bolt is 16 of 25 Collecting and Shooting the Enfield No. 4 - Rifle disassembly and Reassembly12/26/2003 ) Reinsert the stock bolt wad into the butt stock trap of the butt stock. 46) Using clothes hanger, push the stock bolt wad all of the way down until it rest flat on the stock ) Install the 17 of 25 Collecting and Shooting the Enfield No. 4 - Rifle disassembly and Reassembly12/26/2003 ) Replace and tighten both buttplate ) Figure 49 shows the correctly installed ) Figure 50 shows the already assembled safety catch and locking 18 of 25 Collecting and Shooting the Enfield No. 4 - Rifle disassembly and Reassembly12/26/2003 ) Install safety catch and locking bolt (as shown in figure 51).
8 52) Figure 52 shows the safety spring. Note at the top of each part; the safety catch has a channel that the corresponding guide on the safety spring fits into to. 53) Reinstall the locking bolt screw. Page 19 of 25 Collecting and Shooting the Enfield No. 4 - Rifle disassembly and Reassembly12/26/2003 ) Hand tighten so the locking bolt screw is snug, but the safety still functions ) Make sure safety cycles on and off without ) Reinstall rear hand 20 of 25 Collecting and Shooting the Enfield No. 4 - Rifle disassembly and Reassembly12/26/2003 ) Reinstall front handguard. Make sure you install front under upper band and then pivot ) Replace the swivel ) Replace the upper band 21 of 25 Collecting and Shooting the Enfield No.
9 4 - Rifle disassembly and Reassembly12/26/2003 ) Tighten the upper band ) Replace trigger ) Replace rear guard 22 of 25 Collecting and Shooting the Enfield No. 4 - Rifle disassembly and Reassembly12/26/2003 ) Tighten rear guard ) Reinstall the front trigger guard ) Tighten the front trigger guard 23 of 25 Collecting and Shooting the Enfield No. 4 - Rifle disassembly and Reassembly12/26/2003 ) Reinstall the sling ) Tighten the swivel ) Replace and tighten the swivel band 24 of 25 Collecting and Shooting the Enfield No. 4 - Rifle disassembly and Reassembly12/26/2003 Copyright 2003 Jamie Mangrum 69) Lift rear ) Insert bolt with breechbolt head point up. Depress bolt catch (if Rifle has one).
10 71) Slide bolt 25 of 25 Collecting and Shooting the Enfield No. 4 - Rifle disassembly and Reassembly12/26/2003