Transcription of Collecting Soil Samples for Testing - Purdue University
1 CONSUMER HORTICULTUREC ollecting soil Samples for TestingKyle Daniel & Rosie Lerner, Department of Horticulture and Landscape Architecture Jason Ackerson, Department of AgronomyA previous version of this publication was written by Mike Dana and Rosie Credits: All photos by the authors except Figure 1 by Mary your landscape and garden soil for its nutrient status is an easy and relatively inexpensive planning tool. Yet, it is all too common for landscapers and gardeners to apply fertilizer, lime, sulfur, or other materials to their soils without knowing the current status of their soils. Sometimes, these applications may do more harm than good. Applying too much fertilizer, lime, sulfur, and even organic matter, manures, and the like can lead to soil test will reveal the current nutrient status in your soils and whether you need to add any nutrients as fertilizer.
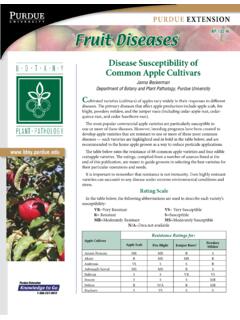
2 This publication describes the best practices for when and how to sample your , a soil Testing lab will measure the phosphorus, potassium, soil pH, and organic matter in your soils (Figure 1).1 | Collecting soil Samples for Testing CONSUMER HORTICULTURE | HO-71-WHO-71-WCONSUMER HORTICULTURE | HO-71-W2 | Collecting soil Samples for Testing Most labs do not include a nitrogen test because soils do not retain nitrogen, so it must be replenished every year. Tests for other nutrients may be available at additional cost. Labs may test plant tissue in combination with a soil test if you suspect that specific nutrients (especially micronutrients) are deficient. In most situations, a tissue test will not be pH Every soil test should provide you with your soil s pH, which measures the acidity or alkalinity in your soil .
3 soil pH affects how available most nutrients are for plant uptake. Nutrients in the soil are most readily available to plants when the soil pH is between and 7. When soils are more acidic or more alkaline, the nutrients may be in the soil , but the soil pH makes it more difficult for plants to use those a soil s pH can be difficult, as changing the pH from 7 to 6 is ten times more acidic than neutral, while changing it from 7 to 5 is 100 times more acidic than neutral. The good news is that most garden plants will grow satisfactorily within a wide range of soil pH. However, most horticultural plants grow best when the soil pH is between and (slightly acidic). If you need to raise the pH (and make the soil more alkaline), you add lime. If you need to lower the pH (and make the soil more acidic), you add sulfur or acidifying nitrogen.
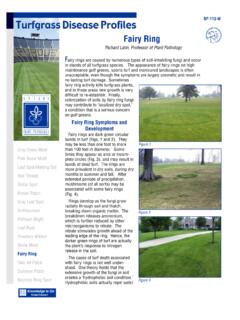
4 Figure 1. Common soil test results include pH, phosphorous, potassium, calcium, magnesium, organic matter, and cation exchange HORTICULTURE | HO-71-W3 | Collecting soil Samples for Testing Some gardening books advise a general lime application to garden plants. Yet most Indiana gardens have a soil pH that is already near neutral, if not slightly alkaline. So, applying lime will not help (and may hurt) nutrient availability in these soils. You should only apply lime or sulfur on the basis of a soil test. Things to Consider Before You Sample To get an accurate soil test, you need to carefully collect and prepare soil Samples . This section describes how to collect a good the Right Tool A soil probe (Figure 2) or auger is ideal for taking soil Samples . If you don t have a probe, you can use a sharp spade, long knife, or trowel just be sure you remove the same amount of soil from each sampling area.
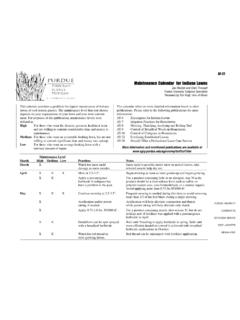
5 Know When to Sample You should test your soil every three to five years. However, if you have specific plants with particular fertility and soil pH requirements, test more often. Be sure to collect your soil sample and test it well before you plant, so you have time to treat the soil . You can sample soil any time the soil is suitable for spading or rototilling, but late summer or early fall gives enough lead time to plan ahead. However, if a situation develops that suggests soil fertility may be the problem, then you should collect Samples immediately. Taking soil Samples from the normal and abnormal plant growth areas is helpful for comparison (Figure 3). You can use a soil probe to obtain soil from multiple locations around the landscape bed or garden. Take Samples to a depth of 6-8 inches.
6 You should collect separate Samples for soil tests from different sections within your yard, landscape, or garden. Each section should be distinct from the others. In this illustration, zone 1 is the front yard lawn, zone 2 is a shrub/flower bed, zone 3 is the back yard lawn, and zone 4 is a vegetable 2. Figure 3. 1234 Steps for Collecting a SampleDiagram Your PropertyThe first step of gathering a good soil sample is to draw a diagram of your property and indicate where you will take soil Samples from. It s important for you to take Samples from different parts of your property that have different characteristics. For example, you will likely want a different soil test for a front yard, a shrub bed, a vegetable garden, and so on. When you diagram your property, plot the areas you sample, and keep the diagram for future reference.
7 Sampling these areas separately will allow you tailor fertilizer and lime/sulfur application to the soils and vegetation from each area your sample will use only a small portion of the soil , it is very important the sample represents the area. Usually, the best way to do this is to take several core Samples (with a soil probe) or slices from different spots, evenly distributed, in the area. Try to take Samples so that individual Samples are spaced out evenly, this way Samples will better represent the whole sample area. You will mix all of these smaller subsamples together, and then prepare a single soil sample from those several cores or slices rather than to have several tests made within an many Samples should you collect from each area? For a large area (like a yard) collect 10-15 cores For a smaller area (like narrow shrub or flower border) collect 4-6 coresBe sure to keep an accurate record of the areas that you sample.
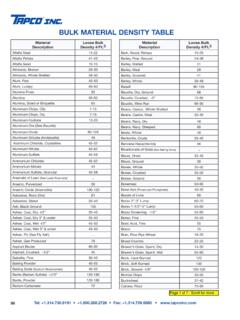
8 Includethis information in the soil report (called a field record), so you will be able tointerpret the Your Samples Remove surface debris (such as plant residues, mulch, or turf thatch) from the soil before you insert the soil probe, spade, or trowel. Next, take several core Samples (with a soil probe) or slices (from a spade or trowel) from each area you want to test. Place your Samples for each area in its own clean bucket one bucket for the front yard, another for the shrub bed, and so much soil should you collect? Sample gardens and shrub and landscape beds to a depth of 6-8 inches (Figure 4) Sample turf areas to a depth of 3-inches depth Take Samples from the tree root zones from the surface to a depth of 8-12 inches You should also: Sample row crops (in gardens) between the rows to avoid where you might have applied fertilizer in bands Sample light, and dark-colored areas, limed and unlimed areas separately Sample front and back yards separately if they have been managed differently or contain different types of fill soil CONSUMER HORTICULTURE | HO-71-W4 | Collecting soil Samples for Testing The depth from which you collect a soil sample will be different for trees, shrubs, and grass.
9 Figure 4. Dry and Mix SamplesBreak up any lumps in each sample bucket, and remove all stones, debris, and other material that is not , allow the Samples to dry at room temperature (do not use artificial heat like an oven). After the soil is dry, mix all the soil core Samples well and crush them so that all the soil is about the size of wheat grains or smaller (but do not pulverize). Mix these Samples together in each bucket until you have a fairly homogenous sample that will provide you with an average for each area. Collect and Submit Your Sample After you ve mixed your Samples , remove 1 pint of soil per area. Place this sample in a clean, labeled container and submit it to the soil Testing lab according to their Many private laboratories in and around Indiana offer a wide range of soil and tissue Testing services.
10 Contact the laboratory of your choice for pricing and other information before submitting your Samples . You can find a list of certified soil Testing laboratories from the Purdue Plant and Pest Diagnostic Laboratory: (look for the link to the PDF on this page). Though the lab will provide fertilizer recommendations, these may not be specific for horticultural can also check with the Purdue Extension office in your county to see if more local services are available. You can locate your county office Find Out More Fertilizing Woody Plants ( Purdue Extension publication HO-140-W) provides more information about fertilizing woody Greenhouse and Nursery Production: soil pH (HO-240-W) provides more information about soil pH. Both publications are available from the Education Store: HORTICULTURE | HO-71-W5 | Collecting soil Samples for Testing It is the policy of the Purdue University Cooperative Extension Service that all persons have equal opportunity and access to its educational programs, services, activities, and facilities without regard to race, religion, color, sex, age, national origin or ancestry, marital status, parental status, sexual orientation, disability or status as a veteran.