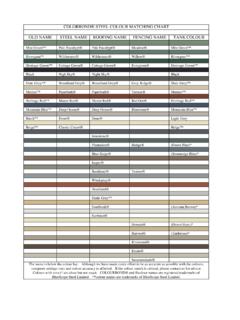
Transcription of COLORBOND® STEEL FENCING
1 colorbond STEEL FENCINGA STEP-BY-STEP GUIDE TO INSTALLING YOUR FENCEF ence colour Basalt This installation guide does not cover fences taller than metres. Please seek advice from your supplier. Describe your site details when ordering materials (see Site details section below). Identify the soil type for your fence site. Refer to the Table in Step 1. This will determine the concrete required for the job. Make sure you know the whereabouts of underground electricity, gas or water mains before you begin digging. Ring 1100 Dial before you dig . Check your local council regulations on boundary FENCING . Ensure you read through this guide completely before you begin to ensure you fully understand the installation process. Check the delivered material for the correct number of components and general condition. Not all coloured STEEL FENCING is made from colorbond STEEL so make sure you get what you pay for. Check our 2 simple steps on the back page to identify genuine colorbond * Self-Drilling Screw Gun with Clutch System Spirit Level or Magnetic Level Rubber Mallet String Line and Marker Pegs Scissor Shovel and/ or Spade Wheelbarrow and Larry Hoe Spud Bar Earth Leakage Circuit PROTECTIVE EQUIPMENT* Safety Glasses Protective Gloves Hat & Sun Lotion Safety Footwear Ear Muffs (if cutting required) Overalls (if cutting required).
2 OPTIONAL EQUIPMENT* Nibbler (if cutting required) Tin Snips (if cutting required) Concrete Mixer Post Hole Digger.* Most pieces of equipment are available for hire at tool hire DETAILSF encing made from colorbond STEEL is the result of decades of performance-monitoring under some of Australia s harshest conditions. This happens at exposure testing sites across Australia. So you can be sure FENCING made from colorbond STEEL is designed and made for durability in Australian , there are important site details to consider in the design of your fence. These include: potential wind effects on your fence (governed by the wind region you live in and surrounding developments and vegetation) soil type the slope of the THESE DETAILS TO YOUR colorbond STEEL FENCE DISTRIBUTOR TO HELP THEM TAILOR A DESIGN THAT S BEST FOR YOU. If in proximity to severe marine conditions or bounding swimming pools, please seek specific advice from BlueScope STEEL Direct on 1800 022 999. WIND REGION A = NormalWIND REGION B = IntermediateWIND REGION OTHER = CyclonicAre you a homeowner looking to install your own colorbond STEEL fence or an installer looking to find information to help you install a colorbond STEEL fence?
3 This colorbond STEEL FENCING Installation guide has been designed to provide you with the basic steps in installing your fence. As every site is different, we also recommend speaking with your colorbond STEEL supplier or calling BlueScope STEEL Direct on 1800 022 999 for installation information specific to your site. EQUIPMENTREQUIREMENTSIMPORTANT! It is recommended that the reader pays particular attention to those items identified as IMPORTANT in this brochure to ensure satisfactory long-term AREGION BOTHERBRISBANEB efore you start,read thisMARKER PEGSMARK OUT POST CENTRES= BOTTOM RAIL LENGTH + 10 mm (TYPICAL DIMENSIONS MAY BE 2350 TO 2365mm) DIAMETER OF ALL HOLES IS 200mm DIG HOLES ACCORDING TO DEPTH CHART BELOWSTART POST MAY BE EXISTING OR TEMPORARY PEG23602360236023602360 TOP LINE BOTTOM LINEESTABLISH POST POSITIONS USING THE BOTTOM RAIL AS A MEASURING 1 SECTION 3 SECTION 2 SET UP TOP AND BOTTOM STRING LINES ESTABLISHINGCOMMON SLOPING MARKING OUT SLOPING SITESh/3hPOSTPOSTB.
4 CUTTING OF SHEETS FOR A RAKED FENCEA dditional information It s highly recommended that you invest a small amount of extra effort to rake your fence on sloping or uneven ground rather than stepping the panels. It achieves a better overall appearance as well as providing a stronger sitesVertical slitting of sheets may be required if slope is greater than 1 in 8. This may reduce the three sheet coverage to a point where one of the sheets may require vertical slitting. On colorbond STEEL and ZINCALUME STEEL this can be achieved using a straight edge and scoring with a tungsten tipped hand cutter available at most hardware stores, then bending and snapping the top rail angles can be adjusted to create a smoother angle if desired. Note that the post height required will increase, so allow for this when fixing the posts in the OR UNEVEN SITESMARKING OUT YOUR POST HOLESSTEP 1 IMPORTANT! Post lengths required will increase accordingly to cater for these ground ! Post hole sizes are suitable for Wind Regions A and B and all Terrain Categories except Cat 1 (very exposed open terrain).
5 Seek manufacturer s guidance for other wind regions or Cat 1 TYPEMINIMUM HOLE DEPTHAPPROXIMATE CONCRETE REQUIRED Recommended 20 MPa Standard Concrete MixRock400mm1 bag per hole (20kg bag)Clay/Firm Earth600mm2 bags per hole (20kg bags)Sand/Loose Fill900mm3 bags per hole (20kg bags)The preferred method of cutting sheets is to use a nibbler or tin step-by-stepguide to installationDWELLING2 DWELLING1= Square Hollow Section (SHS)= Fence PostDimensions of the SHS and fence posts will vary according to the fence supplier. Contact your distributor for is highly recommended that you taper the last two panels of your fence at an unsupported end, particularly where your fence extends beyond the front of your sheets as per the instructions in the sloping or uneven sites minimal extra effort in tapering the unsupported end will provide a better looking fence than a stepped fence and is much stronger than leaving it at full : A LONGER TOP RAIL WILL BE REQUIRED FOR THE TWO TAPERED PANELSREMEMBER THAT THE LEADING POST AT THE FREE END SHOULD INCLUDE A SHSNORMALHEIGHTOFFENCEEND POSTS, CORNER POSTS AND JUNCTIONSSECURING POSTSSTEP 2 EXAMPLE FOR 2365mm POST CENTRESFENCE HEIGHTTAPERED END HEIGHTTOP RAIL LENGTH IF TAPERED PER TWO PANELS1500mm750mm2385mm1800mm900mm2400mm 2 FASTENERS100mm max from top of post (below depth of rail)10 16 x16mmself-drilling screwplacingsScrews to conform to AS3566 Class 3 (minimum) SCREWSPACING300mm CENTRESA.
6 FASTENING POSTS TOGETHERSHEET LENGTH+ 10mm(MAX. HEIGHT1800mm)ALIGN VERTICALLYWITH SPIRIT LEVEL INBOTH DIRECTIONSSLOPE TOP OF CONCRETEAWAY FROM POST(TO DRAIN AWAY WATER)ADD WATER AND MIX WELL PRIOR TO POURINGBOTTOM RAILHEIGHTmin. 50mmDO NOT ALLOW SOIL,GARDEN FILL AND/ORDIRT TO COME INCONTACT WITH POSTSAS THIS MAY CAUSETHE POST TO CORRODE PLACE FIRST POST IN HOLE ADJUST TO CORRECT HEIGHT SUPPORT POST WITH TEMPORARY BRACE FILL HOLE WITH FULLY MIXED, WET CONCRETE VIBRATE AND COMPACT THE CONCRETE TO REMOVE FIXING POST IN GROUNDTAPERING THE FRONT OF YOUR FENCEEXAMPLE OF CORRECT LAP DETAIL FOR INFILL SHEET PROFILESEXAMPLE OF CORRECT LAP DETAIL FOR INFILL SHEET PROFILES Insert bottom rail between posts to determine exact location of next post. Adjust bottom rail to correct height it is important to maintain a minimum gap of 50mm between bottom of rail and ground. Screw fix the rails at this stage. Place top rail into post and fix with self drilling screws on both sides of posts.
7 Ensure that the self-drilling screws are not fully tightened, as they need to be removed when inserting sheets. Ensure the position of the top rail is protruding 2mm above the top of the posts to reduce the risk of injury. Continue this procedure until fence length is achieved. Allow the concrete to cure overnight. Note: Longer curing period may be required in very cold and/or wet weather. Unscrew top rail and remove. Fit infill sheets into bottom rail ensuring correct lap as per diagrams (right). Place top rail on infill sheets working from one end to the other, locating the profile in the rail. A gentle tap with a rubber mallet may help. Secure the top rail with self-drilling screws on both sides. Hose down when finished to remove any swarf such as drill filings or remnants from the nibbling process. Check installation. 1 To keep your fence looking its best, simply wash down periodically with water when cleaning the car or watering the garden. A soft broom should be sufficient to remove any cobwebs.
8 Pay particular attention to the area under the top rail, which is sheltered from natural washing by rain. 2 DO NOT build up soil, garden fill and/or dirt against the bottom rails and posts of your fence as this will retain water and lead to corrosion. DO NOT use your fence as a retaining wall, as it is not designed for this purpose. 3 Avoid spraying the fence with garden sprays or fertilisers as these can damage the surface. If this occurs wash the fence down with water. 4 Adequate drainage is needed to ensure that water does not pond in the bottom rail and to assist in the removal of debris. This is often achieved by pre-punched holes in the bottom rail, or by designing the posts such that there is a clearance between the ends of the bottom rail and the posts. 5 DO NOT use touch up paint. Minor scratches should be left alone or the infill sheet replaced. Touch up paint will weather differently than colorbond STEEL . 6 FENCING is backed by a warranty of up to 10 years from BlueScope1.
9 Warranty is subject to application and eligibility criteria which includes but is not limited to: Installation > 1km from Marine or Industrial (source of Industrial particulate fallout) environment. To find out more visit article 17 - Choosing the right grade of colorbond STEEL at Fence is installed to manufacturer s guidelines Fence is maintained regularly. For maintenance of colorbond STEEL see Technical Bulletin 4 at INSTALLING INFILL SHEETSSTEP 3*MAINTENANCE AND WARRANTY OF YOUR FENCE 1 2 39 320075 079260 1. Warranty subject to application and eligibility criteria. For full terms and conditions and to determine the eligibility of your fence for the warranty visit or call BlueScope STEEL on 1800 022 BlueScope, in cooperation with manufacturers of cold-formed STEEL residential FENCING , has taken considerable care to develop guidelines that are practical and effective, BlueScope acknowledges alternate methods maybe used with the same effect.
10 It remains your responsibility at all times to ensure that the methods you use (including those included in these guidelines) are suitable for the particular situation and where appropriate you should take any additional required installation guide utilises information provided by manufacturers of cold-formed STEEL residential FENCING . Whilst care has been taken in the preparation and compilation of the material contained herein, no responsibility or liability shall be accepted by the Authors and/or BlueScope STEEL Limited for any use to which it is put. Information contained in this installation guide is subject to change without notice. Refer to for up-to-date technical , BlueScope, the BlueScope brand mark and colour names are registered trademarks of BlueScope STEEL Limited. Activate and TM colour names are trademarks of BlueScope STEEL Limited. 2016 BlueScope STEEL Limited ABN 16 000 011 058. All rights SURE IT S THE REAL THINGNot all coloured STEEL FENCING is made from colorbond STEEL so make sure you get what you pay for.