Transcription of Complete Genomics Sample Quality Control Protocol
1 Complete Genomics data is for Research Use Only and not for use in the treatment or diagnosis of any human subject. Information, descriptions and specifications in this publication are subject to change without notice. Copyright 2011 Complete Genomics Incorporated. All rights reserved . UG_QC-02 Sample Quality Control Protocol Updated August 2012 DNA Quantitation .. 2 Materials Required .. 2 Preparing a PicoGreen Working Solution .. 2 Preparing the DNA 3 Preparing DNA Standards .. 4 Determining DNA Quantitation .. 4 Expected DNA Quantitation Reproducibility .. 5 Gel Electrophoresis .. 6 Materials Required .. 6 Preparing the Agarose Gel .. 6 Loading and Performing Electrophoresis of the DNA samples .. 7 Inspecting Gel Images .. 8 These instructions describe the procedures used by Complete Genomics to quantitate and verify the integrity of DNA samples submitted for Complete genome sequencing. Sample acceptance is based on results of this QC process. DNA is quantitated using the Quant-iTTM PicoGreen dsDNA kit from Invitrogen and integrity is verified using agarose gel electrophoresis.
2 Complete Genomics uses liquid handling robotic systems for all liquid transfer steps in this process, but the same procedure can be applied using manual pipettes. Complete Genomics Sample Quality Control Protocol DNA Quantitation Complete Genomics , Inc. 2 DNA Quantitation Note: The quantitation instructions include modifications to those provided by Invitrogen in the Quant-iT PicoGreen dsDNA kit user manual: The process of quantitating samples to prepare for submission to Complete Genomics includes the following steps: Preparing a PicoGreen Working Solution Preparing the DNA samples Preparing DNA Standards Determining DNA Quantitation The document also includes a description of the variation in DNA quantitation over time to help you assess the success of your process: Expected DNA Quantitation Reproducibility . Materials Required Quant-iTTM PicoGreen dsDNA kit (Invitrogen, Cat # P7589) Control DNA of known concentration (75 to 150 ng/ L) Tecan SpectraFluor fluorescent plate reader, or equivalent 96-well full-skirted PCR plate ( VWR, Cat # 10011-228), or equivalent UV-star 96-well micro-plate (VWR, Cat # 82050-788), or equivalent 1X TE, pH Plate vortexer Plate centrifuge Adhesive plate seals or plate heat sealer Aluminum foil Preparing a PicoGreen Working Solution The PicoGreen reagent is diluted in preparation for DNA quantitation.
3 Note: The PicoGreen working solution must be made fresh on the day of use. For best results, the solution should be used within a few hours of its preparation. Further, the PicoGreen solution should be protected from light, by covering it with foil or placing it in the dark, as the reagent is susceptible to photo degradation. Prepare a 1:200 dilution of the PicoGreen reagent in a 15 mL conical tube according to Table 1. Mix well by vortexing. Table 1: Preparation of diluted PicoGreen Reagent Number of samples 1X TE, pH Volume (mL) PicoGreen Reagent Volume ( L) 1-24 4 20 25-48 7 35 48-72 9 45 73-96 11 55 Complete Genomics Sample Quality Control Protocol DNA Quantitation Complete Genomics , Inc. 3 Preparing the DNA samples The following steps describe diluting DNA samples by a factor of 1:1,200 in a three-step serial dilution and placing the samples into the quantitation plate. samples can be quantitated only in columns 1 to 11 of the 96-well quantitation plate (maximum of 88 samples ); column 12 is reserved for the Lambda DNA standards.
4 Note: For accurate concentration, DNA should be in the approximate concentration range of 30 to 300 ng/ L. 1. If frozen, thaw DNA samples completely. 2. Mix DNA samples thoroughly by vortexing for 20 seconds on a plate mixer at setting 8. Centrifuge briefly to collect contents at the bottom of the plate wells. 3. Prepare Dilution Plate 1: Label a PCR plate as Dilution Plate 1 . Add 15 L 1X TE pH to each well positions for which a Sample will be quantitated. Add 15 L 1X TE pH to one additional well for a Control DNA Sample . Transfer 5 L from each DNA Sample to the corresponding well on Dilution Plate 1 (1:4 dilution). Add 5 L of a Control DNA Sample at a concentration of 100 ng/ L to the Control well. Seal the plate and mix by vortexing for 20 seconds at setting 8. Centrifuge briefly to collect contents at the bottom of the plate wells. 4. Prepare Dilution Plate 2: Label a PCR plate as Dilution Plate 2 . Add 42 L 1X TE pH, to all well positions for which a Sample will be quantitated.
5 Transfer 3 L from each well in Dilution Plate 1 to the corresponding well on Dilution Plate 2 (1:15 dilution). Seal the plate and mix by vortexing for 20 seconds at setting 8. Centrifuge briefly to collect contents at the bottom of the plate wells. 5. Prepare Quantitation Plate: Label a UV-star 96-well micro-plate as Quantitation Plate Add 95 L 1X TE pH to well positions for which a Sample will be quantitated. Transfer 5 L from each well in Dilution Plate 2 to the corresponding well on the Quantitation Plate (1:20 dilution). Seal the plate and mix by vortexing for 20 seconds at setting 8. Centrifuge briefly to collect contents at the bottom of the plate wells. Complete Genomics Sample Quality Control Protocol DNA Quantitation Complete Genomics , Inc. 4 Preparing DNA Standards The following steps describe preparing a Lambda DNA working solution and serially diluting it in column 12 of the Quantitation Plate to create a standard curve. 1. Remove the 100 g/mL Lambda DNA standard stock tube from the PicoGreen kit and mix well by vortexing.
6 Spin briefly to collect contents to the bottom of the tube. 2. Prepare a Lambda DNA working solution at a concentration of 500 ng/mL by adding 5 L Lambda stock DNA to 995 L 1X TE, pH (1:200 dilution). Mix well by pulse vortexing for 10 to 20 seconds. Spin briefly to collect contents to the bottom of the tube. 3. Prepare a serial dilution of the Lambda DNA working solution in 100 L volumes as follows: Add 100 L 1X TE pH, to wells B12-H12 of the Quantitation Plate. Add 100 L of the Lambda DNA working solution (500 ng/mL) to wells A12 and B12 of the Quantitation Plate. Mix the contents of well B12 by pipetting up and down 10 times to result in a DNA concentration of 250 ng/mL. Transfer 100 L from well B12 to well C12 and mix by pipetting up and down 10 times to result in a DNA concentration of 125 ng/mL. 4. Continue in this manner to prepare dilutions at ng/mL (well D12), ng/mL (well E12), ng/mL (well F12) and ng/mL (well G12) as indicated in Table 2. Table 2: Lambda DNA Serial Dilution Well Final Lambda DNA Concentration (ng/mL) A12 500 B12 250 C12 125 D12 E12 F12 G12 H12 0 5.
7 Discard 100 L of the ng/mL dilution from well G12. Do NOT add it to well H12. Well H12 will contain 100 L 1X TE pH representing 0 ng/mL of the Lambda DNA standard. Determining DNA Quantitation The following steps describe adding PicoGreen reagent to all samples , incubating the Quantitation Plate, and determining Sample concentrations from standard curve after measuring fluorescence in a plate reader. 1. Add the reagent to the samples as follows: Add 100 L of the PicoGreen working solution to each well of the Quantitation plate that contains a Sample ( Control or standard DNA). Seal the plate and mix by pulse vortexing for 30-45 seconds at setting 8. Centrifuge briefly to collect contents at the bottom of the plate wells. Cover the plate with aluminum foil and incubate at room temperature for 10 minutes. Complete Genomics Sample Quality Control Protocol DNA Quantitation Complete Genomics , Inc. 5 2. Wipe the bottom of the Quantitation Plate with a KimWipe cleaning tissue.
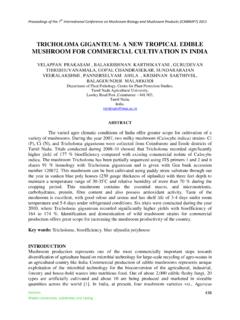
8 3. Carefully remove the seal and place the plate in the microplate reader following the manufacturer s instructions. An excitation wavelength of 480 nm and an emission wavelength of 520 nm should be used. 4. Generate a standard curve by plotting the fluorescence values determined for the Lambda DNA standards against the corresponding DNA concentrations. The slope of a line fitted to this curve should be between 21 and 27. If the slope is outside this range, you need to discard this Quantitation Plate and generate a new Quantitation Plate and repeat the quantitation. 5. Calculate the concentrations for each Sample DNA and the Control DNA from the standard curve using a dilution factor of 1,200. Verify that the concentration determined for the Control DNA is in the expected range. Expected DNA Quantitation Reproducibility As an estimate of expected day-to-day reproducibility, we have included a run chart of the slopes of standard curves during a six-month period (Figure 1). Within our hands, we expect a +/- 15% range in slope (21 to 27) over time.
9 Worst case, this should translate to +/- 15% variation in our quantitative measurements and those of our customers who follow this procedure. Data are provided below. Figure 1: Consistency in Standard Curve Slopes Over the Course of Six Months DNA QuantitationStandard Curve SlopesComplete Genomics Sample Quality Control Protocol Gel Electrophoresis Complete Genomics , Inc. 6 Gel Electrophoresis The process of verifying the integrity of your samples using agarose gel electrophoresis includes the following steps: Preparing the Agarose Gel Complete Genomics Sample Quality Control Protocol Gel Electrophoresis Complete Genomics , Inc. 7 Loading and Performing Electrophoresis of the DNA samples Inspecting Gel Images Materials Required Agarose (IBI Scientific, Cat # IB70042), or equivalent 1X TBE buffer 96-well full-skirted PCR plate ( VWR, Cat # 10011-228), or equivalent GeneRuler 1 kb Plus DNA Ladder(Fermentas, Cat # SM1333), or equivalent 5X gel loading dye (Amresco, Cat # E274), or equivalent Lonza GelStar nucleic acid gel stain (Fisher Scientific, Cat # BMA 50535), or equivalent Gel documentation system (AlphaImager from Protein Simple), or equivalent Gel electrophoresis system (Thermo Scientific D2 wide gel system, Cat # D2), or equivalent Power source Preparing the Agarose Gel The following steps describe preparing a agarose gel in a gel mold.
10 1. Mix g of agarose with 60 mL of 1X TBE buffer in a conical flask. 2. Heat the mixture in a microwave until the agarose is completely dissolved (approximately one minute). 3. Mix well by swirling and allow to cool to 50 55oC. 4. Prepare gel casting tray by sealing the ends of the gel chamber with tape or appropriate casting system. Place an appropriate number of combs in a gel tray. 5. Add 1 L of GelStar staining reagent to the cooled gel, mix well by swirling, and pour into the gel tray. 6. Allow gel to set for 15 to 30 minutes at room temperature. 7. Remove comb(s), place the gel in electrophoresis chamber and cover with 1X TBE buffer. Complete Genomics Sample Quality Control Protocol Gel Electrophoresis Complete Genomics , Inc. 8 Loading and Performing Electrophoresis of the DNA samples The following steps describe preparing dye for the electrophoresis, putting samples and dye in the agarose gel, including a DNA ladder, and performing the electrophoresis. 1. Prepare a gel loading dye by mixing 50 L of 5X gel loading dye with 100 L TE.