Transcription of Configuring IPsec VPN with a FortiGate and a Cisco ASA
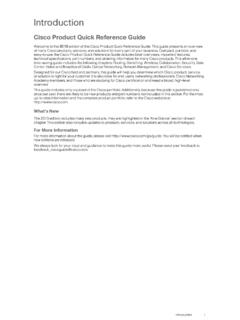
1 InternetIPsec VPNIPsec VPNF ortiGateCISCO ASASite 1 Site 2 LANLAN1. Configuring the Cisco device using the IPsec VPN Wizard2. Configuring the FortiGate tunnel phases3. Configuring the FortiGate policies4. Configuring the static route in the FortiGate5. ResultsConfiguring IPsec VPN with a FortiGate and a Cisco ASAThe following recipe describes how to configure a site-to-site IPsec VPN tunnel. In this example, one site is behind a FortiGate and another site is behind a Cisco ASA. Using FortiOS and Cisco ASDM , the example demonstrates how to configure the tunnel between each site, avoiding overlapping subnets, so that a secure tunnel can be established with the desired security profiles applied. The procedure assumes that both devices are configured with appropriate internal and external the Cisco device using the IPsec VPN WizardIn the Cisco ASDM, under the Wizard menu, select IPsec VPN the options that appear, select Site-to-site, with the VPN Tunnel Interface set to outside, then click the Peer IP Address field, enter the IP address of the FortiGate unit through which the SSL VPN traffic will Authentication Method, enter a secure Pre-Shared Key.
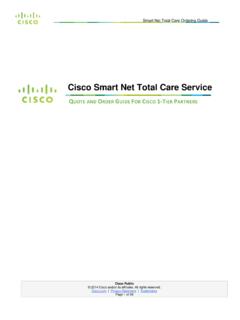
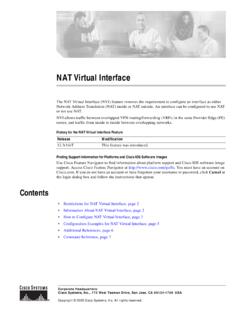
2 You will use the same key when Configuring the FortiGate tunnel phases. Choose something more secure than Password .When you are satisfied, click next steps in the IPsec VPN Wizard is to establish the tunnel phases 1 and encryption settings established here must match the encryption settings configured later in the Phase 1 with AES-256 Encryption and SHA the Diffie-Hellman Group to Phase 1 with AES-256 Encryption and SHA PFS and set the Diffie-Hellman Group to the Local Network and Remote Next and review the configuration before you click tunnel configuration on the Cisco ASA is complete. Now you must configure the FortiGate with similar settings, except for the remote the FortiGate tunnel phasesIn the FortiOS GUI, navigate to VPN > IPsec > Auto Key (IKE) and select Create Phase the tunnel, statically assign the IP Address of the remote gateway, and set the Local Interface to Preshared Key for Authentication Method and enter the same preshared key you chose when Configuring the Cisco IPsec VPN this phase to match the encryption settings configured on the Cisco device and click Create Phase Phase 1, which you just configured, and ensure that the encryption settings match the Phase 2 encryption settings configured on the Cisco , under Quick Mode Selector, specify the Source address and Destination address at the endpoints of the the FortiGate policiesNavigate to Policy > Policy > Policy and create firewall policies that allow inbound and outbound traffic over the the first (outbound)
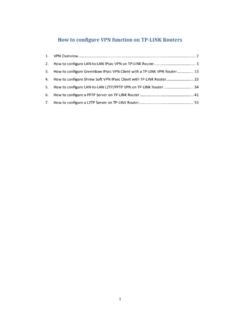
3 Policy, set the Incoming Interface to lan and set the Source Address to the Outgoing Interface to the tunnel interface and set the Destination Address to all. Configure the Schedule and Service as the second (inbound) policy to allow traffic to flow in the opposite direction, and configure the Schedule and Service as the static route in the FortiGateNavigate to Router > Static > Static Routes and select Create a static route with the Destination IP/Mask matching the address of the Cisco local network (by default, ).Under Device, select the site-to-site tunnel, and click tunnel should now be active. On the FortiGate , verify that the tunnel is up by navigating to VPN > Monitor > IPsec IPsec Monitor table will indicate the source and destination addresses, and the status of the tunnel (up or down) and its more detailed tunnel information, go to Log & Report > Event Log > VPN and view the the tunnel entry in the table to view the information in greater detail.