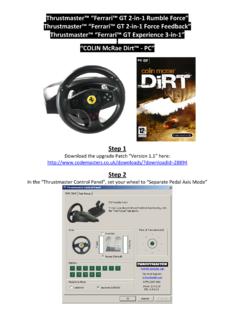
Transcription of CONTENTS
1 CONTENTS . 2. Keystroke 2. Introduction .. 2. First things to understand .. 2. The Script editor .. 4. The Edit button .. 4. The Tools button .. 5. Event 5. Device Analyzer .. 7. Running a script .. 8. Script CONTENTS .. 9. Minimal file CONTENTS .. 9.. 9. The function Toolbox .. 10. Linking axes with the MapAxis 10. MapAxis optional parameters .. 11. Virtual Axis Rotation with RotateDXAxis .. 13. Keystroke and DirectX button generation with the MapKey Function .. 14. The null keystroke .. 14. Single keystroke .. 14. Combo keystrokes .. 15. PULSE+ 16. DOWN+ and UP+ 16. Generating a keystroke with USB 16. Generating a DirectX button output .. 17. LED and backlighting 17. Using Macro Files .. 19. Multiple outputs on a single button .. 20. TEMPO Command .. 20. Layers .. 20. MapKeyUMD .. 21. MapKeyIO .. 21. 22. Generating an event when releasing a button with MapKeyR.
2 22. CHAIN function: Generating events at the same time .. 23. D() Delay 23. LOCK Command .. 24. 25. Axes .. 27. SetSCurve .. 27. SetJCurve .. 28. SetCustomCurve .. 28. Axis control with buttons .. 28. Axis trimming .. 29. KeyAxis: Generating events from an 31. AXMAP1 .. 31. AXMAP2 .. 33. LIST .. 34. 35. Extra functions .. 35. Launch software from a script .. 35. Reject a device from a virtual controller .. 35. Display a text message in the Script editor "Output Window" .. 36. Advanced features .. 37. EXEC: Opening Pandora's box .. 37. Managing 37. 39. DeferCall .. 40. Script 41. The following Keywords are supported .. 41. Operators .. 41. Generating keystrokes with pure script .. 42. Logical 43. Illustration .. 44. Creating your own function .. 46. Script editor Basics User Manual 1/60. Basics Keystroke basics Introduction You can write your own configuration files without the graphical user interface (GUI).
3 To do so, we will use our own programming language, which is usually called script . This language follows on directly from a document written by Dr. James Nutty Hallows: this document provided a complete overhaul of what a device programming language might be. With the HOTAS Cougar, Thrustmaster pushed the level of controller programmability to new levels. The basic structure of that script was well-suited to mid-core users, and its features generally satisfied everyone. Over time, however, some advanced coders began to feel frustrated and that the basic structure limited their creativity. This new programming language provides a solution for these users. This new language is very powerful. You can achieve the same objectives in different ways, by creating your own functions and linking them to certain external there are almost no limits to what you can do. To make it accessible to everybody, we have included many new functions which provide users with more possibilities than with the HOTAS Cougar.
4 These new functions also provide a good way to discover and learn how to use the script. Most of this manual will be dedicated to describing these functions, as a reference guide. The document then provides examples of using advanced programming. We recommend that you learn the functions provided first. If you are new to programmable controllers, we suggest that you learn to use the graphical user interface (GUI) first. This experience will really help you when you start to learn the script. The best way to learn the script is just to practice. While it may seem heavy-going to begin with, you will soon find it simple; in fact, the learning curve is very quick. Reading this manual will give you an overall understanding of the new script; however, practicing the script is the only way to really learn and understand it. This document gives you all the tools you need to get started.
5 First things to understand isn't just a simple graphical user interface it is also a powerful driver that is able to simulate other physical devices such as a mouse, keyboard or joystick. These devices allow us to simulate all the inputs we need to manage simulator software. All of the human action on the physical controllers will be merged into one single virtual device, and then sent to the flight simulator software. This virtual device may be a combination of several Thrustmaster controllers: Stick + Throttle Stick + Throttle + MFDs, etc. Here is what happens when you launch a configuration: The physical controllers are disconnected (virtually). A virtual controller is connected. You may then launch your flight simulator software. Advantages of this system: Different USB devices can interact directly. Configuration is easier in the flight simulator control panel, with just one ID to manage.
6 Management is simplified, with one program for all devices. Compatibility with older software is increased. 2/60 - Script editor Basics User Manual It's not difficult to write a configuration with the script; in fact we have included a number of functions that will make this simple. If you are familiar with the HOTAS Cougar script, you will notice that all the syntax is new, and that there are few differences that just make things more comfortable and flexible. Note: With these functions, you can already build powerful configurations but if necessary, you can create your own functions or rewrite a set of features as a unique function. The possibilities are huge and cannot be covered in a single manual. Once you have learned and used all of the predefined functions and want to look into the new language in more detail, we recommend that you spend some time discovering the C programming language.
7 With a few ideas, a bit of logic and some basic C knowledge, you will realize the real power of the script. This manual provides a few samples as examples; each one will show how to achieve your goals, sometimes using different methods. This virtual device and the new language let us do everything we want to do. We can create thousands of programming layers, link to external code and so on. But these features have a price and can quickly become complex. This is exactly what 99% of users hate so don't get too hung up on code. Instead, focus on your main requirements. With a little practice, you will find script editing powerful and faster to use than the graphical user interface. The functions provided were created to easily manage keystroke generation, axis and curve adjustments, which are the essential requirements. Using the Thrustmaster functions makes the script easy to read.
8 Everyone can use it and while it may look complicated due to the number of characters used, it's really very simple. Example: MapKey(&Joystick, TG1, 'x');. If you think that this line generates an x keystroke when you press the Joystick's TG1 (trigger first step) button, you are correct and are ready to learn more. Note for HOTAS Cougar users: The new script is totally different from the Cougar syntax. You will probably feel at home quickly, but try to put the old script out of your mind, as it could reduce your creativity. The script is a lower level code and, as such, is much more flexible. DirectX limits Whatever the number of devices inside the virtual controller, this controller will never be able to declare more axes and DirectX buttons than the official DirectX limits (32 buttons and 8 axes). This simply means that if you have more than 8 axes available on the real controllers, you cannot use all the buttons and axes programmed in the DirectX mode.
9 Any unused axes and buttons in DirectX can be used as digital axes and keystroke generators. Major rules: Respect the syntax: to begin with, you will probably spend more time solving syntax errors than writing your file. Always remember that the script is case sensitive, and that when you open a ( , you must close it with a ) . This is also true for a { . The script is a real programming language. The functions included allow you to use it easily, but if you go into more detail, this will be a good way to start learning to program in C. Script editor Basics User Manual 3/60. The Script editor The script is made up of text only, but we've built a dedicated editor to make reading and writing easier. You can access it from the Windows desktop or Start menuL it's called the Script editor . The CONTENTS of the Script editor are simple. On top there is the toolbar. To the left are the files used or linked to your script.}
10 The script is in the main area. The lower section contains the output window . Finally, there is a single line called the status bar . The toolbar is used to manage and test files. This is a shortcut to save the file. Lets you Undo and Redo a script content modification. Left-click on the Menu icon to open a list of available file management actions (Open, Save, Save As, Close, Print, etc.). The Edit button Clicking on the Edit button will give you access to the traditional text editing tools: Copy will store in memory a text selection that you've selected. Cut will store in memory and delete from the script a text selection that you've selected. Paste will insert the text selection stored in memory from your previous Cut or Copy action. Undo lets you cancel your most recent actions, step by step. Redo lets you redo the last modification, if you've clicked Undo.