Transcription of Coronado General Installation Guide
1 INSTALLATIONGUIDEO ctober 21, 2011 INDEXPage ..Pg. to Install Over Stucco ..Pg. Surface Preparation for Wood Sheathing, Dry Wall or Metal ..Pg. of Drystacked Stone ..Pg. Started with Quickstack ..Pg. Started with Idaho Drystack, Eastern Ledge and Honey Ledge ..Pg. Mixture Formulas ..Pg. vs. Grouted Installations ..Pg..Pg. Hints for Installing StoneVeneer ..Pg. 1211. Bond Coat Information ..Pg..Pg. for Installing Coronado Chiseled Sills ..Pg. 15 PREPARING FOR THEINSTALLATION OFSTONEVENEERPage3 Steel FrameSee ___ sectionCoronado Stone veneer can be applied to ANYSTRUCTURALLY SOUND AND PROPERLY PREPAREDSURFACE.
2 No foundation or structural changes arenecessary, as Coronado Stone veneer becomes an integralpart of the surface to which it is the quantities of Coronado Stone needed:1. Measure the length times the height in feet to arriveat the square footage of the area to be Subtract square footage of any large window or dooropenings in stone application Measure the linear feet of outside corners to determinethe amount of corners needed. One linear foot ofcorner covers approximately 3/4 of a square foot of Subtract 75% of the corners needed from the total flatsneeded.
3 Contractors generally add 10% extra stone toallow for breakage, cutting and you may require depending on Installation :Hammer, Wheelbarrow, Hoe, Mason's Trowel, Safety Glasses,Level, Chalk Line, Wood Stick, Grout Bag, Whisk Broom, SteelWool, Soft Wire Brush, Dust tools which could facilitate Installation : Coronado Nippers, Grinder with Diamond Cutting Blade,Staple Material's Needed:MORTAR Premixed type-S mortar or mix your own mortar(click for mortar mixture formulas). Iron oxide mortar color if desired.
4 Tile setters Polmer-Modified Thinset mortar. A silane-based breathable type, non-filmforming, non-yellowing sealer can be used whenneeded in areas of cascading water, leakygutters, balconies without gutters, splashingwater, high snow buildup and with local building authorities for building code vary from area to Stone Products are covered bya50 year limited warranty,when installed according to manufacturers RESISTANTBARRIER Coronado recommends two layers of Grade D 60 minute building paper individually applied and lapped in shingle fashion with a minimum of 2 horizontal and 6 vertical joints.
5 This weather resistant barrier should be used on all exterior and interior mortar applications except those over masonry. METALLATH or pound. self furring expanded galvanizeddiamond mesh metal lath or black metal lath(rust inhibitive). See the manufacturers spec sheet foryour specific Installation condition. Over open wood or steel studs, 18 gauge galvanizedwoven wire mesh with water proof membrane isrequired. Over metal or plywood (see metal lath above) Other code-compliant mesh or of Various Installation TypesWood FramePlywoodFoam boardSee ___ sectionCMU Walls(Concrete Masonry Unit)Tilt Up WallConcreteMasonryClean StuccoSee ___ sectionPainted or TreatedStuccoConcreteMasonrySee ___ sectionMASONRYSEALERASTENERS Galvanized roofing nails, rust resistant staples, concretenails.
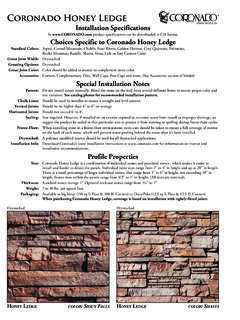
6 United States Gypsum Company's 1 " type S12 Pancake Head Super Tite screws used for installationto metal Stone VeneerScratch Galv. Metal LathMortarWeather Resistant Barrier(2 Layers)Max..5 Rigid Insulation Studs 16 Chiseled Stone Wall CapMortar8 CMU WallRebar Where OccursAdhesive Bond Coat AsPer Mfg. SpecsCoronado Stone Veneer1 1/4 to 2 Coronado Stone VeneerScratch Galv. Metal LathMortar8 Tilt-up WallRebar Where OccursCoronado Stone VeneerScratch Galv. Metal LathMortarWeather Resistant Barrier(2 Layers)Max.
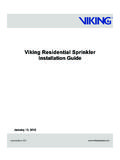
7 5 Rigid InsulationStuds 16 DETERMINE IFMETALLATH ISREQUIREDPage 4 Marking the stud location for nailing metal lath(figure 1): The first step is to find the studs and mark the wallwhere you will nail the or pound expanded metallath in place. Mark the studs 16" on Hints Older stucco homes- Stucco is sometimes very hard and the hardened steel nails have difficultypenetrating the stucco. It is helpful to hit the wall with a hammer, where you plan to drive the nail,to soften the stucco before nailing.
8 Hard concrete- Footings or poured in place concrete, use 1/2" to 3/4" hardened steel nails. Whendriving short nails, hold them in place with heavy paper. Nail driving- When driving hardened steel nails into concrete one or two hard blows to the nail isall that is necessary, that one extra blow after the nail is set will sometimes break it loose. Hot Weather- At temperatures above 80 F, wet wall to promote better bonding of the stone tothe is stucco?Normally stucco consists of 3 layers. The first layer called a scratch coat is a layer of cementusually 1/4" to 3/8" thick with a rough surface.
9 The second layer called a brown coat is a smooth leveling layernormally 3/8" to 3/4" thick. The third layer called a color coat is very thin no more than 1/8" thick consisting ofcement and color. When the stucco s color coat gets painted over with paint or some another bond breaker oneof the following methods should be followed:Metal Lathis thepreferred method when installing stone over painted stucco. Metal lath is not required overa brown coat or unpainted color coat. However, be sure that the color coat is unpainted.
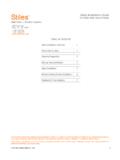
10 Look around the edgesof door jams and water faucets, etc., for signs of Blasting and/orWaterBlastingis also an option over a painted masonry surface. It is important torestore the walls to its original state. You must also power wash clean any sand residue left from sand on the lath (figure 2):Cover the entire surface with expanded metal lath,overlapping the joints approximately 2". Nails should beat 6" intervals into studs. Use 1 1/2" to 2" hardened steelnails over painted 1 Figure 216"16"GENERALFREEZE THAW ENVIRONMENTSSURFACEPREPARATIONFORWOODSHE ATHING, DRYWALLORMETALPage5 Thefirststep(Figure1)is tocovertheareawithwaterproofpaper, findthestudsandmarkthewallwhereyouwillna ilorscrewtheexpandedmetal lathinplace.