Transcription of CRA 180-Swing mech 5 - calredwood.org
1 RedwoodFor beauty and performance, redwood is naturally superior toother woods. That s why it s the first choice for decks, fences andmost outdoor projects. Redwood retains its beauty outdoors, shrinksand swells less than other woods and is less likely to warp, split,check or cup. With relatively little or no pitch, redwood is easy todrill, saw and shape. Redwood heartwood has natural durability andresistance to insects and will last longer outdoors than most knotty garden grades of redwood are ideal for outdoor grades are beautiful, durable and economical. Construction Heart/Deck Heartis all heartwood and con-tains knots; used for load-bearing applications near the ground. Deck Heart is graded for strength and is available in 2x4 and Common/Deck Commoncontains sapwoodand knots; used for decking and above-ground uses. Deck Commonis graded for strength and is available in 2x4 and 2x6. Merchantable Heart is all heartwood and contains larger knotsthan Construction grades; used near the soil.
2 Merchantablecontains sapwood and larger knots; used for fence boards, rails and above-ground accepts finishes better than most woods. Some heightenredwood s natural beauty, bringing out the color and the help the wood harmonize or contrast with surroundingstructures. Read the labels on all finish products before option Redwood performs better than most woods ifleft unfinished. This no-maintenance option will result in redwoodweather-bleaching to a soft driftwood water repellent finishis recommended to stabilize the color at stainsin redwood shades tint the wood without hiding the grain. Solid-color stains or paintsshould be applied over compatibleoil-based primers. FastenersUse only non-corrosive hardware such as aluminum, stainless steel or top quality hot-dipped galvanized screws or nails. Ordinary nails and screws will cause Enfrente Drive, Suite 200 Novato, CA 94949-7206 Telephone 415 382-0662 Toll Free 888 Cal-Redwood Fax 415 382-8531 THE SWINGO ther Construction TipsheetsAlso AvailableDeck Over ConcreteDeck ConstructionFreestanding DeckDeck Grades, Nails and FinishesCalistoga Spa SurroundFences for All ReasonsWindsor Shade ShelterLandscape Architecture Monterey Potting CenterMendocino BenchLake Tahoe GazeboPetaluma PlantersSonoma Picnic TableAdirondack ChairContact the California Redwood Association for more great publica-tions containing redwood technical and building information.
3 Callus toll free at 1-888-Cal-Redwood for a complete literature list or to ask for any of the titles listed here:REDWOODN aturally beautiful Easy to usePractical and economicalDurable and stable Resistant to decay and insectsREDWOODBUILD IT WITHA dirondack Swing Set each armrest in position on the frame, with its wide front endon top of the front upright and its narrow back end on the rearupright. Attach each armrest with four 21 2-inch screws, driveninto the uprights. Use one 11 4-inch screw to attach the armrest to the arm Seat slatsNext, cut five 1x4 slats for the seat of the that the front seat slat is 3 inches longer than the other four slats because it wraps around the front uprights. Cut a 11 2by 21 8-inch notch into both ends of the front seat slat toallow it to fit around the 2x4 uprights (see illustration). Again,use the router and roundover bit or orbital sander, if desired, tosoften the top edge of the front seat slat. Screw the front seat slatto the three seat supports using 21 2-inch Install the seat slatsSet the remaining four seat slatsonto the frame and space them equally.
4 Check to make sure bothends of each slat is flush with the outside of the seat each slat with six 11 4-inch screws. There should be aminimum of a 3 8-inch space between the last seat slat and theslats of the back. This space will allow rain and debris to washthrough to the ground and to not collect on the seat. 7. Apply a finishRedwood accepts a wide variety of woodfinishes. Regardless of which one you choose, be sure it s anexterior-grade finish. Begin by sanding the wood smooth either by hand or with an orbital finishing sander. Start with 100-grit sandpaper and sand all surfaces. If you re sanding by hand,be certain to sand with, not across, the wood grain. Sweep thechair clean of all dust and grit and then switch to 120-grit sandpaper for the final sanding. Refer to the Finishes section on the back of this brochure for various recommended finish options and their not apply a clear topcoat finish, such as varnish. It will eventually crack and blister, leaving you no option but to sand or strip off the old finish.
5 8. Add the chainsAs mentioned earlier, the swing is suspendedfrom four chains that are bolted to the 2x4 uprights. To attach thechains, start by boring two 7 8-inch-diameter chain holes througheach armrest, as shown in the armrest detail illustration (shownpreviously). Next, bore a 3 8-inch-diameter bolt hole through eachupright. Locate these holes three inches directly below the chainholes in the armrests. To hang the swing from a standard 8-foot-high ceiling, you ll needfour 6-foot lengths of No. 3/0 steel chain. Have the chain cut tolength at the hardware store. In each bolt hole, insert a 3 8-inch-diameter by 21 2-inch each bolt with a washer and locknut. Then, pass a lengthof chain through the hole in the armrest and slip the first link overthe end of the bolt. Add another washer and locknut to secure thechain. Repeat this procedure for the remaining three Hang the swingThe seat of the swing should be suspendedabout 20 to 22 inches above the porch floor. However, to avoid seriousinjury, it s very important that you bolt the chains to solid framingmembers, such as a ceiling joist or roof rafter.
6 Never hang theswing by screwing into plywood sheathing or thin ceiling planks. For the strongest connection,bore a hole through the middle of the framingmember and attach thechains with carriage bolts orthreaded eyebolts. Anotheroption is to bore pilot holesinto the bottom edge ofthe framing members andattach the chains with longlag screws or eye you will needTape measure, combination square,cordless drill/driver or electric drill, power miter saw or hand saw,sabre saw with adjustable baseplate, assorted twist-drill bits, counter-sink bit, adjustable wrench, 3 8- and 7 8-inch-diameter spade bits, hammer, orbital sander or sanding block, 100-and 120-gritsandpaper, 3 8-inch-diameter plug cutter and pencil : router with 1 4-inch-radius roundover "No. 3/0 chain3 8" x 2 1 2" carriage bolt,lock nuts, and washersUprightArmrest QuantitySizeLengthFramingFront uprights22x4135 16inchesRear uprights22x4143 4inchesSeat supports32x419 inchesFront rail11x4473 8inchesBackLower back rail11x4473 8inchesMiddle back rail11x450 inchesUpper back rails21x4161 2inchesBack slats61x436 inchesBack slats41x430 inchesArmsArm brackets21x31 46 inchesArmrests21x6271 2inchesSeatFront seat slat11x4473 8inchesSeat slats41x4443 8 Chain4No.
7 3/06 feetCarriage bolt, 4 sets3 8inch21 2incheslock nuts (2) and washers (3)Deck screws11 2pounds11 4inches1 pound13 4inches1 pound21 2inchesSandpaperas needed100, 120 gritMaterials For adirondack Swing 41 4"14"11 16"3" 6 1 2" 16 3 4"3 8" diameter bolt holesSpace slats evenly15 bevel1. Back slatsThe doublewide back of the swing is made upof 10 redwood 1x4 slats, which are cut to resemble two side-by-sideAdirondack chairs. Cut the six center slats to 36 inches long and the four end ones to 30 inches. Also, cut to length the two upperback rails and the middle back rail. These three 1x4 rails get screwedacross the rear of the slats. Bevel cut the upper edge of the middleback rail to 15 to support the swing s armrests at the back. Round off the bottom corners of the rail with a 13 4-inch five back slats one chair back on a flat surface andspace them equally. Secure or weight the slats to keep them alignedand square. Find and mark the centerline of the radius for thecurved ends of the center three, or longer, slats.
8 Use a compassor pencil and string to scribe or mark the radius lines for cutting. Use the curved slats as templates for cutting the curves in all theremaining back slats, including the four shorter side slats. Sandthe edges smooth with 120-grit Assemble the swing backNow, lay all ten back slats facedown on a clean surface, in order and spaced equally. Again, secureor weight them as before to keep them aligned and square. Leave at least a 3 4-inch space between the chair backs to accommodatethe center seat support laterIf you choose to counterbore the screws for the following three backrail attachments, you must use screws that are at least 1 4inchshorter than indicated Seat supports The 1x4 seat supports are specially shaped tocreate the comfortable contoured seat and slanted back. Refer to theseat-support pattern (shown below) for specific details. Note that the back end of each seat support is miter-cut to a 15 angle and a portion of the upper edge is trimmed away to accommodate thefive 1x4 seat slats.
9 Here s how to make the seat supports: Take one of the 20-inch-long1x4s and draw the grid of 2-inch squares onto its surface, as shownin the seat-support pattern. Then measure 19 inches from one endand mark the 15 cut. Next, usingthe pattern as a guide, mark the cutline through the squares in the along the segmented line with asabre saw and lightly sand the edgessmooth. Now, use this support as a template to mark the remainingtwo. That will ensure that all threesupports will be UprightsCut the two frontuprights from a 2x4, makingsure that both ends of each boardare perfectly square. Then rough cut the two rear uprights to about143 4 inches. Miter both ends of these 2x4 pieces to 15 .All of theuprights should finish at a height of 135 Assemble the frameBegin assembling the swing s frame by screwing the front rail to the two front uprights. Hold the verticaluprights flush with the ends of the front rail and attach each onewith two 13 4-inch screws. Follow the same procedure to attach thelower back rail to the rear uprights.
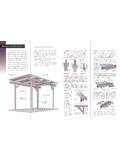
10 Next, screw a 1x4 seat support to the inside surface of each frontupright using 13 4-inch screws. Be sure the angled ends of the supports point toward the rear of the frame. Then, screw the backends of the seat supports to the inside of the rear uprights. Now use 21 2-inch screws to install the remaining seat support in themiddle of the frame by first screwing through the front rail and then through the lower back rail. BUILD THE SWING FRAMEA dirondack Swing This redwood swing is built primarily of 1x4s and 1x6s; the front andrear uprights are cut from 2x4s for maximum strength. Start byassembling the frame of the swing to form the seat section. Attach thefour 2x4 uprights, then begin installing the slats that form the backand seat of the swing. Remember to cut and measure as you go, using the Materials List as a guide. Fasten together all the parts with corrosion-resistant stainlesssteel or hot-dipped galvanized screws. To prevent the screws fromsplitting the wood, predrill pilot holes first, especially at board all visible surface screw holes with a 3 8-inch-diameterspade bit to a depth of about 1 4inch.