Transcription of Create an Authorization: Traveler Instructions
1 This document is maintained on the DTMO website at Printed copies may be obsolete. 1 6 5 Changing allowances updates all displayed allowances ( , field duty, leave) for the dates in the selected range, which may override previous entries. If duty conditions differ from day to day, change the dates individually or in smaller blocks. 4. Repeat steps 1-3 until all allowances are correct. If your TDY exceeds 30 (180) days in one location, your per diem rate is usually 75% (55%) of the locality rate. Accounting Note: Your organization may not allow you to select LOAs. Follow your local business rules. Select Accounting on the Progress Bar, then: 1. Select Add LOA and add an Accounting Label for each LOA you need to use. 2. If you added multiple LOAs, select Edit LOA Allocations, then select an Allocation Method. 3. Allocate the expenses among the LOAs. 4. Select Request Advance to request a travel advance to be sent to your bank account.
2 This option is only available if you don t have a Government Travel Charge Card (GTCC) or are exempt from using it. 5. Select Partial Payments to request monthly reimbursements to the GTCC vendor to help your account going delinquent on long trips. This option is only available if your trip exceeds 45 days. Review Authorization Select Review Authorization on the Progress Bar, then: 1. Enter comments to the AO (optional). 2. Review all document contents. Use the Go to <DTS module name> links to make changes as needed. 3. When everything is correct, select Continue at the bottom of the screen or select Other Auths and Pre-Audits on the Progress Bar. Other Auths and Pre-Audits The Other Authorizations and Pre Audits screen opens. 1. In the Other Authorizations section, add new official comments as necessary and remarks as required.
3 Note: This can be a good place to add the mandatory statement, Alternate means, such as Secure Video Teleconference (SVTC) or other web-based communication, are not sufficiently able to accomplish travel objectives. 2. In the Pre-Audits section, enter justifications for all items DTS flagged as questionable and add Reason Codes where required. 3. In the Advisory section, review any advisory notices, which alert you to items you may have forgotten ( , claiming gas for your rental car). 4. Select Continue at the bottom of the screen or select Review and Submit on the Progress Bar. Sign and Submit The Digital Signature screen opens. 1. Ensure the correct Document Status (SIGNED) and Routing List are selected. 2. Enter comments (optional). 3. Select Submit Completed Document. 4. Read and acknowledge all pop-ups. 5. If prompted, enter your CAC PIN, then select OK. You must sign the authorization within 24 hours of booking or all reservations will be cancelled.
4 Note: Refer to the trifold Adjusting/Amending an Itinerary and Reservations in an Authorization at for help with date, per diem location, or reservation changes. Note: Although this trifold is designed for travelers to use, the steps described are the essentially the same for Non-DTS Entry Agents and travel clerks. August 17, 2018 A DTS authorization is a document used to generate a cost estimate for official travel outside your local area and obtain approval for the trip. This trifold will help you, the Traveler , Create a basic authorization in DTS. If you need more detail, see DTS Guide 2: Authorizations at Log On to DTS 1. Open the DTS Home page at 2. Select Log In. 3. Read and Accept the DoD Privacy & Ethics Policy. 4. Enter your CAC PIN, then select OK. a. If the full DTS Dashboard opens, proceed to Create an Authorization. b. If the User Activation screen opens, enter your SSN in both fields, then select Submit and proceed to Create an Authorization.
5 C. If the DTS Welcome screen opens with an Administrative menu: i. Select Administrative, then Self Registration. ii. Complete all required information, then select SAVE AND PROCEED. iii. Select Submit. When you receive an email saying your self-registration was accepted, restart from Step 1. Create an Authorization 1. On the DTS Dashboard, select Routing TDY Trip under Create New Document. DEFENSE TRAVEL MANAGEMENT OFFICE Create an Authorization: Traveler Instructions 10 11 12 9 2 3 4 Note: If this is the first time you ve used DTS, it s been over 30 days since you last validated your profile, or your GTCC is nearing or past expiration, the Profile Validation screen opens first. Confirm or update all information, then select Update Personal Information. Create Itinerary 1. Complete the fields to enter your: a. Departure and arrival locations and dates.
6 B. Trip type, purpose, and description. c. Transportation modes and departure times. d. Conference information (if applicable). 2. Save your itinerary. You must enter the correct TDY location to receive accurate per diem allowances. For example, if you are TDY to an installation ( , Ft. Lee, VA), do not enter a nearby city ( , Richmond, VA). Enter TSA Information If you need air reservations, before you start booking them, the TSA Information screen opens. 1. Verify or correct your TSA Secure Flight Information, then select Continue to Booking. Book Air Travel If your itinerary reflects a need for air reservations, the Flight screens display. If not, select Add to Trip > Add new flight on the Review Reservation Selections screen (see Section 2 Enter TSA Information). 1. Available flights display in a list, but you can search for different flights. Select an available flight.
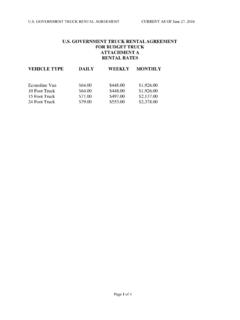
7 2. Select a seat or seat type. 3. Confirm the flight. Repeat steps 1-2 for all connecting flights. 4. Repeat steps 1-3 for all remaining flights. Book Rental Car If your itinerary reflects a need for a rental car, the Rental Car screens display. If not, select Add to Trip > Add new Rental car on the Review Reservation Selections screen. 1. Available cars display in a list, but you can search for different cars. Select an available car. 2. Confirm your selection. Book Lodging The Lodging screens always display last. You can also select Add to Trip > Add new lodging on Review Reservation Selections screen. 1. DTS displays the most appropriate lodging type for your trip, but you can display or search for different hotels. Select an available hotel. 2. Select an available room. 3. Confirm your selection. If available, select Get More Options to see more hotel types.
8 Selecting a lodging type that is not the recommended type may cause you to receive a reduced lodging reimbursement. Choosing Select Room multiple times may result in multiple bookings that are not reflected on your itinerary. Carefully check the itineraries DTS and the TMC email to you. If you cancel a lodging reservation, always check with the lodging provider to ensure they received the cancellation. Review Your Reservations After you make all your reservations, the Review Reservation Selections screen displays. You can also get here by selecting the Tr ip Summary link on any Reservations module screen. 1. Review and update all reservation information, then select Continue to Expenses. 2. A pop-up message warns you that DTS will cancel your reservations in 24 hours if you haven t signed the authorization. Acknowledge the information. Expenses Select Expenses on the Progress Bar to display all your projected expenses and mileage allowances.
9 The Transportation Expenses section shows the estimated costs of the reservations you booked in DTS. You can t change them from here. The Other Expenses section displays the rest of your expenses and mileage allowances. To enter an expense or mileage allowance: 1. In the section header, select Add Expense. 2. In the pop-up window, select an expense type, complete all required fields, and select Save. 3. Repeat until you have entered all expenses and mileage allowances. If you select Pvt Auto-TDY/TAD or Pvt Motorcycle-TDY/TAD, you must use the tools on the Select Location pop-up screen to calculate your official mileage; otherwise, use your vehicle s odometer. The Substantiating Documents section contains documents ( , special approvals or permissions) you electronically attached to the authorization. Add new documents by uploading them or dragging them from another location.
10 The Trip Workbook contains images that contain multiple documents ( , receipts) and tools to crop and save each document in a separate image. Add images to the Workbook by uploading them, faxing them, or dragging them from another location. Drag an image onto an expense in the Transportation Expenses or Other Expenses sections to associate it with that expense. Per Diem Select Per Diem on the Progress Bar to view your per diem ( , lodging, meals, and incidental expenses) allowances. To change those allowances: 1. Select Adjust Per Diem Amounts to change one or more allowances. 2. Enter the Date Range you want to adjust. 3. Make all necessary changes, then select Save Adjustments. 5 7 6 1 3 2 8 4