Transcription of Creating 2D Drawings from 3D AutoCAD® Models
1 Creating 2D Drawings from 3D autocad Models Page | 1 Creating 2D Drawings from 3D autocad Models David Piggott CrWare, LP GD205-2P This class explores the various techniques in Creating 2D part and assembly Drawings from 3D autocad Models . As part of the autocad 3D Power Track, you will learn best practices for Creating Drawings from your 3D Models . While not always required, it is still necessary to generate Drawings for an object to be built. Using the tools and methods presented in this class, you will learn to quickly and efficiently create those Drawings . About the Speaker: David develops technical course content for CrWare, LP, which is used in both Autodesk Official Training Courseware and CrWare training manuals. In addition, he provides custom training and consulting services to Autodesk product users throughout the David has over 17 years of teaching experience in CAD, 3D solid modeling, and CNC programming and is a journeyman mold maker.
2 He is an Autodesk Inventor Certified Expert, an Autodesk Approved Instructor, and chair of the Autodesk Training Center Advisory Board. David earned a Bachelor s degree in Manufacturing Engineering and an Associate s degree in Machine Tool Technology through Ferris State University. Creating 2D Drawings from 3D autocad Models Page | 2 Creating 2D Drawings from 3D autocad Models Page | 3 Objectives After completing this class you will be able to: Extract geometry from solid Models Use Flatshot to create 2D views from your 3D solids Create and manipulate section planes Create 2D sections or elevations and 3D sections of your 3D solid parts and assemblies Create layouts of 3D Models including annotation and dimensions Prerequisites Navigate the 3D autocad environment. Create and edit 3D solid Models . Navigate the drawing layout and paper space environment. (The following text is adapted from Autodesk Official Training Courseware (AOTC) title autocad 2008: Creating and Presenting 3D Models .)
3 This excerpt is being used with the written permission of Autodesk. You may not duplicate or re-use this material in part or whole without written authorization.) Creating 2D Drawings from 3D autocad Models Page | 4 Overview Two-dimensional Drawings are still needed to communicate ideas in industry. While designing in 3D offers significant advantages, designs may still have to be displayed in a 2D format for producing your products. The following lessons teach you the methods, commands, and options for Creating views of your 3D Models . These methods include defining views based on orientation of 3D Models , planes, and 2D geometry extracted from the 3D Models . You also learn to create, edit, and manage layouts, and to combine defining views to create layouts that document your 3D designs. Section a Solid Model and Generate 2D Geometry This lesson describes how to graphically remove part of a 3D model and generate 2D geometry from the solid model.
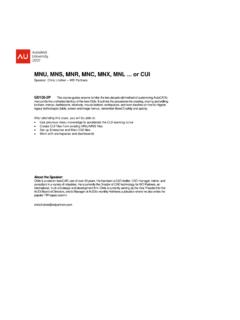
4 As you create more detailed Models , there will be times when you need to view an aspect of a model that is visually obstructed by other parts or features of the model. By using section planes, you can view the information you want in 3D or 2D form. You can also generate 2D cross sections based on the planes you define that can be used to generate mass property information or create 2D drawing views. In the following image, a front view of the assembly was created for a 2D drawing to be provided to manufacturing. The other view is a cross section of the valve body to be used in strength and material analysis. Creating 2D Drawings from 3D autocad Models Page | 5 About Flattened Views Flattened views are generally required when you need to create dimensioned Drawings of 3D Models . While the 3D model is the closest representation of the finished product, it does not work well for placing dimensions and other annotations for production Drawings or construction documentation.
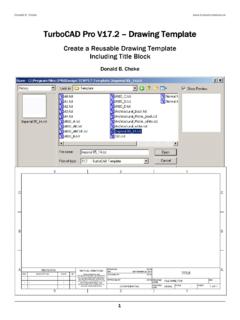
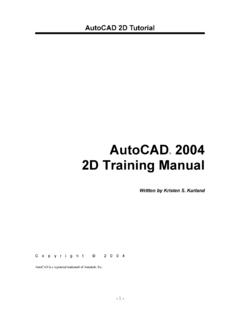
5 Regardless of the design discipline, 2D geometry is still relied upon heavily when it comes to final documentation and annotation. To make the most use out of your 3D Models , you need to create flattened views from those Models . In the following illustration, while the 3D perspective image does a better job of conveying the overall design, the 2D elevation view is better suited for construction documentation Creating 2D Drawings from 3D autocad Models Page | 6 Definition of Flattened Views A flattened view can be defined as a view created from a 3D model in which objects are projected in their current position, relative to the view, onto a plane that is parallel to the current view. Flattened views can be from any angle and are not limited to standard orthographic projections. In most cases, it is equally beneficial to include a flattened view of an isometric projection. The following illustration shows how a 3D model is projected onto a viewing plane, resulting in a 2D elevation 3D model Plane representing 2D view Resulting flattened view for the elevation Creating 2D Drawings from 3D autocad Models Page | 7 Example of Using Flattened Views In an Architectural environment, flattened views are used to represent plan and elevation views to send to clients for review without having to send the entire drawing file.
6 The client can view all elevations, including as many isometric projections as required. Displaying 2D Geometry from a Model View In this section of the lesson, you learn how to access the Flatshot dialog box and use the options within it to create 2D geometry based on your 3D Models . The ability to create accurate 2D data efficiently is significant as the majority of today's industry still relies on 2D data as the primary means of communication between design and manufacturing. In an Architectural environment, Flatshot view and drawing can be used to quickly create plan and elevation views to send to clients for review without having to send the entire drawing. DWFs of the Flatshot views can be generated for Web-based applications. In the following illustration, the Flatshot command was used to create different 2D views of the 3D model. The display of the 2D geometry is controlled by settings in the Flatshot dialog box. Creating 2D Drawings from 3D autocad Models Page | 8 Flatshot Command Access Command Line: Flatshot, FSHOT Dashboard: 3D Make Control Panel Options for Creating 2D Geometry Using Flatshot Following a typical workflow, you first need to set the viewing orientation of the 3D model so you are viewing it as a flat view in the direction you want.
7 You then start the Flatshot command and specify a destination and display characteristics for the new geometry. When using the default Insert As New Block option, you insert the new geometry into a drawing using the same procedure and options as for inserting any block into a drawing. Use the following options with the Flatshot command. Option Description Basepoint Use to specify the insertion point of the geometry. Scale Use to scale the geometry uniformly in all axes. X Use to scale the geometry in the X direction independently of the Y and Z axes. Y Use to scale the geometry in the Y direction independently of the X and Z axes. Z Use to scale the geometry in the Z direction independently of the X and Y axes. Rotate Use to rotate the geometry on the current XY plane. Creating 2D Drawings from 3D autocad Models Page | 9 Flatshot Dialog Box Insert as New Block: Use to create 2D geometry of the 3D model as a block.
8 Replace Existing Block: Use to update an existing view to reflect changes in the solid model. Export to a File: Export the 2D geometry to be available for use in other Drawings . Foreground Lines: Use to set the color and linetype of the visible lines. Obscured Lines: Use to set the color and linetype of hidden lines. Show: Use to toggle the display of hidden lines. Procedure: Creating 2D Geometry from a Model View The following steps give an overview of Creating 2D geometry from 3D Models . 1. Display the model in the orientation of the view to be created. 2. Display the model as a parallel projection. 3. Start the Flatshot command. 4. If the view being created is new, decide whether the geometry created will reside in the current drawing file or be written out to a new drawing file. 5. Set the color and linetype for the visible foreground lines. 6. Create the Flatshot view. Creating 2D Drawings from 3D autocad Models Page | 10 Creating Section Planes In this section of the lesson, you learn to define section planes based on 3D Models .
9 You can use these section planes to view internal sections of 3D Models , create 2D cross sections of Models , create 3D cross-sectional Models , and generate 2D geometry containing mass property information. You can use mass property information in strength and area calculations, which are essential in determining items such as safety factors or material costs. In an Architectural environment, you can use section planes to view into a structure. For example, you could place a section plane just above floor level to see the floor plan without the extraneous information. Or a section plane could remove a wall to reveal the contents of a room or floor as one would look into a doll house. In the following image, an orthographic section was created on a model of a pressure relief valve assembly. Section Plane Command Access Section Plane Command Line: Sectionplane Menu: Draw Modeling Section Plane Dashboard: 3D Make control panel Options for Creating Section Planes Following the command prompts and a typical workflow, you determine the views required of your 3D model.
10 You start the Sectionplanes command and choose whether to create an orthographic or segmented plane. An orthographic plane is aligned to a standard orthographic view. A segmented plane is based on a series of points that you define. Creating 2D Drawings from 3D autocad Models Page | 11 When you start the Sectionplane command, you are prompted to select a face or any point to locate the section line. You have the option to draw segments or align to an orthographic direction. You can use the Draw Section option to create offset sections and the Orthographic option to create a plane based on standard orthographic views. Use the following options with the Sectionplane command. Option Description Draw Use to define the plane by selecting a series of points. Orthographic Use to create a plane based on one of six standard orthographic views: Front, Back, Top, Bottom, Left, and Right. Procedure: Creating a Section Plane The following steps give an overview of Creating section planes.