Transcription of Creating an Oracle Physical Standby Database
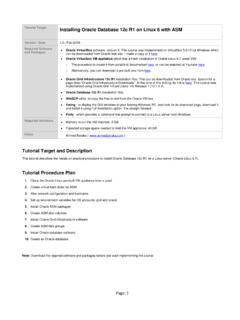
1 Create an Oracle 12c Physical Standby Database | page: 1. Practice Create an Oracle 12c Physical Standby Database Title Purpose This tutorial describes the procedure to create a Physical Standby Database . Software The practice will build an Oracle Physical Standby Database version version on Oracle Linux 64-bit. Document , Sep-2016. version Required Putty Software This freeware utility provides a command line prompt to connect to a Linux / Files server from Windows. Oracle VirtualBox Oracle VirtualBox software, version 5. This tutorial was implemented on VirtualBox for Windows. VirtualBox Appliance The tutorial has been built based on an Oracle virtual machine appliance where an Oracle Database version has been installed with ASM in Linux version The procedure to create an Oracle Database 12c with ASM in a virtual appliance from scratch is described in the practice Installing Oracle Database 12c R1 on Linux 6 with ASM.
2 It is available in the first section of this course. Hardware Free space in your hosting machine is required. We will work on two appliances each make take about 42 GB of disk storage. A tutorial guide by Ahmed Baraka Create an Oracle 12c Physical Standby Database | page: 2. The Primary and Standby Databases Architecture The architecture of the primary Database that will be used to build the Standby Database is as shown below: The Standby Database will have exactly the same design except the hostname and IP address will be different. Network Configuration If the IP address assigned to the appliance that you downloaded from my web site does not go compatible with your network, you can either change the settings of your Virtual Network Adapter so that is becomes of the same subnet as of the appliances, or you can change the network settings of the appliance.
3 To change the network settings of your appliance, you need to do the following: Use system-config-network utility to change the IP address Edit the ip address in /etc/hosts file Edit the ip address in the files A tutorial guide by Ahmed Baraka Create an Oracle 12c Physical Standby Database | page: 3. Data Guard Configuration Specifications Standby Database Type Physical Standby Protection Mode Maximum Performance fast-start failover Disabled The management interface SQL*Plus Standby Database Unique Name ORADB_S2. Standby Database Hostname srv2. A tutorial guide by Ahmed Baraka Create an Oracle 12c Physical Standby Database | page: 4.
4 The Practice Overview Prepare the Practice Environment Clone the Oracle Database appliance twice: one will be the primary and the other will be the Standby . Make some configuration changes on the Standby appliance to make it ready for the practice. Preparing the Primary Database Enable archiving mode Configure ARCHIVELOG DELETION POLICY in RMAN. Enable forced logging Configure Standby redo log files (SRL). Set the related primary Database initialization parameters Enable Flashback Database Set CONTROL_FILE_RECORD_KEEP_TIME parameter Create a Password File (if it isn't there). Configure the file Preparing the Standby System Create the required directories Create a static listener entry for the Standby Database Create an init<SID>.
5 Ora file Copy the password file from the primary system Configure the file Creating the Physical Standby Database Use RMAN to create the Physical Database online from the primary Database Set the Standby Database parameters Start the Redo Apply Verify the Physical Standby Database is performing properly Post creation steps A tutorial guide by Ahmed Baraka Create an Oracle 12c Physical Standby Database | page: 5. Practice Procedure I. Prepare the Practice Environment 1. Make a clone of your Oracle 12c Database appliance. When you clone your appliance, do not initialize the network card. This clone will be the primary Database .
6 Give that cloned appliance the name Primary DB . 2. Make another clone of your Oracle 12c Database appliance. This time initialize the network card. Give that cloned appliance the name Physical Standby DB . 3. Fix the mac address issue in the Physical Standby Database . The issue took place because when you initialize the network card, the VirtualBox will assign it a mac address different from the old one that was recognized by Linux in the appliance. This will make the network card not operational in the appliance. To fix this issue, perform the following: Obtain the new MAC address from the Settings of the Clone appliance.
7 Startup the VM appliance and login as root. Open a terminal window and edit the udev rule for network devices /etc/ Copy the new mac address to the line of your eth0 rule and delete the new rule for eth1. Enter the new MAC address in the file /etc/sysconfig/network-scripts/ifcfg-eth 0 as well then reboot the appliance: A tutorial guide by Ahmed Baraka Create an Oracle 12c Physical Standby Database | page: 6. 4. Drop the Database from the Physical Standby Database . To do it, perform the following: Switch to Oracle user Make sure the Database is up and running run the dbca Delete the ORADB Database 5.
8 Change the hostname and IP Address on the Physical Standby Database . To do it, perform the following: As root and on a terminal command prompt, run system-config-network command. Make sure the Device Configuration is selected and press ENTER. Enter the IP address of the machine, DNS and Gateway IP addresses Make sure the DNS Configuration is selected and press ENTER. Enter the hostname as srv2. Confirm the configuration modifications in /etc/sysconfig/network-scripts/ifcfg-eth 0. Accordingly, update /etc/hosts file. Change the hostname to srv2. As grid user, fix the hostname in the $TNS_ Reboot the appliance 6.
9 Start the Primary DB appliance and make sure the Database is up and running. 7. Make the configurations in Putty for the databases. Ping the VM IP address from your host machine to make sure it is seen. It should see it. Start Putty and connect to the VM -> IP Address -> Connection -> Keepalive every 5. seconds You can control the font in the command prompt Window -> Appearance -> Change button Save the configuration for srv1 and srv2. Configure /etc/hosts file on both machines so that srv1 and srv2 can see each other. A tutorial guide by Ahmed Baraka Create an Oracle 12c Physical Standby Database | page: 7.
10 8. Reconfigure Oracle Restart on the Standby Database machine. This is necessary, because the hostname in the Standby system was changed and therefore the ASM would fail. As root remove the old Oracle Restart configuration /u01/ -deconfig -force Add ASM back to Oracle Restart configuration /u01/ As grid: Add ASM back to Oracle Restart configuration su - grid srvctl add asm srvctl start asm As grid: recreate ASM server parameter file (SPFILE). # create temporary init+ cd mkdir tmp cd tmp vi init+ asm_diskgroups='CRS','DATA','FRA'. instance_type='asm'. large_pool_size=12M. remote_login_passwordfile='EXCLUSIVE'.