Example: barber

Creating Escher-Type Tessellations - Mathwire.com

Creating Escher-Type TessellationsBy Terry Creating Escher-Type 1: Step 1: Begin with a square Cut a square from cardboard or cardstock. Draw a design at the top that only touches the side at beginning and end Do the same on one side. Creating Escher-Type 2: Step 2: Top Translation (Slide) Carefully cut out the top piece. Translate (slide) the top piece to the same position at the bottom of the square. Use tape to secure the pieces together. Creating Escher-Type 3: Step 3: Side Translation (Slide) Carefully cut out the side piece. Translate (slide) the side piece to the same position on the other side of the square. Use tape to secure the pieces together. Creating Escher-Type 4: Step 4: Use escher Eyes Look at your shape from all angles. Slide, flip and turn your shape to view all :Place your shape on an overhead projector and move it all around to view possibilities.

Step 2: Top Translation (Slide)Step 2: • Carefully cut out the top piece. • Translate (slide) the top piece to the same position at the bottom of the square. • Use tape to secure the pieces together. Creating Escher-type Tessellations 3 tkawas@mathwire.com

Tags:

  Types, Creating, Creating escher type tessellations, Escher, Tessellations

Information

Domain:

Source:

Link to this page:

Please notify us if you found a problem with this document:

Other abuse

Transcription of Creating Escher-Type Tessellations - Mathwire.com

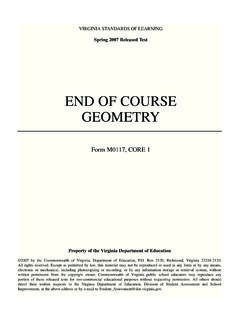
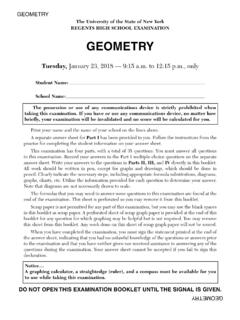
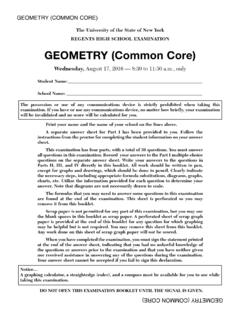
1 Creating Escher-Type TessellationsBy Terry Creating Escher-Type 1: Step 1: Begin with a square Cut a square from cardboard or cardstock. Draw a design at the top that only touches the side at beginning and end Do the same on one side. Creating Escher-Type 2: Step 2: Top Translation (Slide) Carefully cut out the top piece. Translate (slide) the top piece to the same position at the bottom of the square. Use tape to secure the pieces together. Creating Escher-Type 3: Step 3: Side Translation (Slide) Carefully cut out the side piece. Translate (slide) the side piece to the same position on the other side of the square. Use tape to secure the pieces together. Creating Escher-Type 4: Step 4: Use escher Eyes Look at your shape from all angles. Slide, flip and turn your shape to view all :Place your shape on an overhead projector and move it all around to view possibilities.

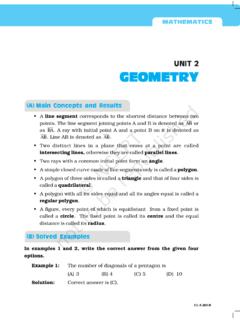
2 Creating Escher-Type 5: Step 5: Replicate the Shape Position the shape on the large paper according to the design you see within the shape. Use a pencil to trace around the shape. Carefully slide the shape so that the new position fits into the traced shape exactly. Trace the shape in its new position. Continue this process until the whole paper is tessellated. Draw in details and color. Name the tessellation and sign the original. Creating Escher-Type


Related search queries