Transcription of DATE MODEL(S) Technical Service Bulletin APRIL 2015 …
1 SB-10058136-4434. GROUP NUMBER. CAMPAIGN 15-01-022-1. DATE MODEL(S). Technical Service Bulletin APRIL 2015 SONATA (LF). SUBJECT: E - C V V T SEAL SEATING ( Service CAMPAIGN TX3). This TSB supersedes TSB# 15-01-022 to revise the Service procedure to clarify the steps to access the E-CVVT area. IMPORTANT. ** DEALER STOCK ONLY **. Dealers must perform this Service Campaign on all affected vehicles prior to customer retail delivery. When a vehicle arrives at the Service Department, access Hyundai Motor America's "Warranty Vehicle Information" screen via WEBDCS to identify open Campaigns. Description: On certain 2015 SONATA (LF) vehicles equipped with and GDI engines, the Check Engine Light may illuminate with DTC P0010 (Intake Camshaft Position Actuator Circuit). stored in the ECM. This condition may be due to incomplete seating of the internal oil seal plug at the intake camshaft E-CVVT (Electronic-Continuously Variable Valve Timing) actuator. The vehicle may also exhibit one or more of the following conditions: Target engine idle speed is elevated to 1,200-1,400 RPM.
2 Hesitation and/or slight reduction in power during acceleration Follow the procedure outlined in this Bulletin to seat the seal plug of the intake camshaft E-CVVT. Applicable Vehicles: Certain 2015MY Sonata (LF) equipped with or engines Parts Information: No new parts required for this Service procedure. Circulate To: General Manager, Service Manager, Parts Manager, Warranty Manager, Service Advisors, Technicians, Body Shop Manager, Fleet Repair SUBJECT: E-CVVT SEAL SEATING ( Service CAMPAIGN TX3). SST Information: Description Tool Part #. E-CVVT Seal Installation Tool 09243-C1000. NOTE: Special Tool SST 09243-C1000 has been previously shipped to all Dealers as a Required Special Tool. Dealers who wish to order additional or replacement tools may do so through the Hyundai Dealer Tool Program. (1-866-539-4248). Warranty Information: Op. Code Operation Op. Time 50CA04R0 E-CVVT Seal Seating M/H. NOTE: Submit Claim on Campaign Claim Entry Screen Service Procedure: A.
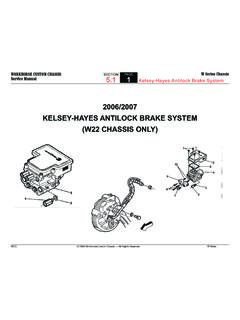
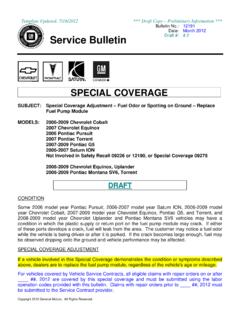
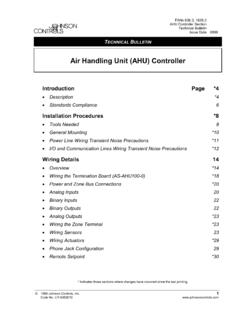
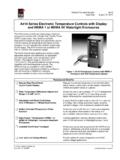
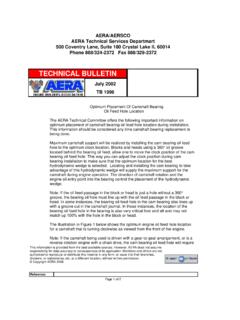
3 1. Remove the engine cover and support the weight of the engine at the lifting bracket eyelet (A). NOTICE. Attach the engine support fixture SST (or equivalent) as shown in the picture on the right. Alternatively, the engine can be supported from underneath with a floor jack. Remove the Engine Room Under Cover Place a wide rubber block (or equivalent). between the floor jack and the oil pan Lift only enough to support the engine TSB #: 15-01-022-1 Page 2 of 6. SUBJECT: SUBJECT: E-CVVT SEAL SEATING ( Service CAMPAIGN TX3). BB. B. 2. Disconnect the overflow hose (AB) and remove the mounting bolts (B) to dismount the engine coolant reservoir (BB). AB. 3. Once the engine is securely supported, remove the engine mounting support bracket (C). C. D. 4. Remove the engine mount (D). TSB #: 15-01-022-1 Page 3 of 6. SUBJECT: SUBJECT: E-CVVT SEAL SEATING ( Service CAMPAIGN TX3). 5. Remove the E-CVVT cover plug (E). E. 6. Using a set of Vernier calipers (or equivalent ruler), measure exactly 19mm from the end of the large end of tool 09243-C1000 (refer to the picture in Step 7).
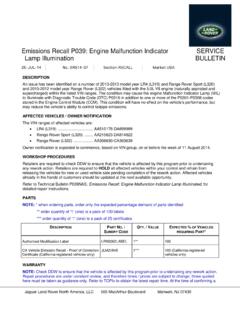
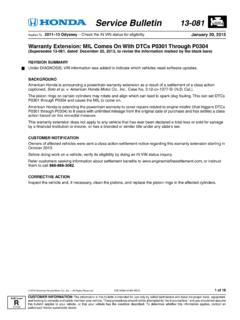
4 Using a suitable fine tip Mark tool at 3. marker, mark at least 3 locations around the spots around the tool at a body of tool F. (At every 120 ). point 19mm from the end of the large end of tool (F). 7. Once the tool 09243-C1000 has been measured and marked, use a suitable masking tape and apply the tape around the entire circumference being sure mm to follow the 19mm measured marks that were previously made in Step 6. NOTICE. Confirm that the distance from the end of the Large End Small End applied tape to the large end of the tool is exactly 19mm. TSB #: 15-01-022-1 Page 4 of 6. SUBJECT: SUBJECT: E-CVVT SEAL SEATING ( Service CAMPAIGN TX3). 8. Use the larger end of the Special Service Tool 09243-C1000 and insert the tool (G) until the edge of the tape lines up with the outer edge of the E-CVVT. G. cover seal hole. NOTICE. Do not install the tool further than the leading edge of the tape. NOTICE. Placing a stubby screwdriver at the small end of the tool will aid in the positioning of the tool to seat the seal into the E-CVVT center cavity.
5 9. Once complete, reinstall the E-CVVT cover plug H. (H), engine mount (I), engine mounting support bracket (J). (Engine Mount and Support Bracket Fasteners). Tightening torque: 88Nm (65lb-ft) J. I. 10. Reinstall the engine coolant reservoir (K), reinstall K. the mounting bolts (L) and reconnect the overflow hose (M). L. (Engine Coolant Reservoir Mounting Bolts). Tightening torque: 9Nm (80lb-in). M. TSB #: 15-01-022-1 Page 5 of 6. SUBJECT: SUBJECT: E-CVVT SEAL SEATING ( Service CAMPAIGN TX3). 11. If present, clear any stored related DTCs in the ECM using the GDS. 12. If present, clear any DTCs in the BlueLink system per instructions of TSB 12-BE-005-2. 13. Verify repair by checking the following items: Proper installation of the engine mount and support bracket Proper installation of the coolant overflow hose and reservoir at the normal full level Normal starting and operation of the engine Check Engine Light not illuminating No external oil leaks TSB #: 15-01-022-1 Page 6 of 6.
6 SUBJECT.